How Do You Transfer A Tattoo Stencil To Your Skin At Home?
Tattoos are a popular form of body art that involve inserting ink into the dermis layer of the skin to create permanent designs. The tattoo artist first creates a stencil, which is a paper outline of the tattoo design. This stencil serves as a guide for precisely transferring the design onto the skin before the tattooing process begins.
This article provides an overview of how to properly transfer a tattoo stencil onto skin in a home setting. We will cover the necessary supplies, preparing the stencil and skin, applying transfer medium, transferring the design, and troubleshooting any issues. This ensures the stencil adheres correctly so you are ready to start tattooing the outline with precision. Understanding these steps allows you to effectively move the tattoo design from paper to skin.
Supplies Needed
To properly transfer a tattoo stencil from paper to skin at home, you will need the following supplies:
- Tattoo stencil paper – This special paper allows tattoo artists to print or draw designs that can be transferred to skin.
- Transfer gel or cream – This transfer medium helps the stencil adhere to skin. Common options are deodorant, gel, or tattoo transfer cream (https://truetattoosupply.com/collections/tattoo-stencil-products).
- Razor blades – Fresh, sharp razor blades allow you to gently lift the stencil paper after transferring the design.
- Paper towels – For wiping away excess transfer gel/cream.
- Gloves – Latex or nitrile gloves keep everything sanitary.
- Antiseptic skin cleanser – Cleansing the skin both before and after transferring the stencil helps prevent infection.
Having these supplies on hand will make at-home tattoo stencil transfers simpler and more successful.
Preparing the Stencil

The first step in transferring a tattoo stencil is preparing the actual stencil. This involves creating the design and applying it to stencil paper. Here are the main steps for preparing the tattoo stencil:
Start by finalizing the tattoo design you want. This can be hand-drawn or printed out from a digital file. For a hand-drawn design, draw the outline of the tattoo on paper using a pencil or pen. For a printed design, send the digital file to a printer. Print the design onto regular printer paper or special tattoo stencil paper.
Next, cut the design out carefully with scissors or an X-acto knife. Make sure to cut along the exact outlines. This will create the stencil. The stencil should only have the outline of the design, with all inner cut-outs removed.
Now apply the stencil to thermal stencil paper, also called tattoo stencil paper. This special paper is coated to allow tattoo stencils to transfer. Place the cut-out stencil face down on the stencil paper and rub over it with a spoon to transfer the design outlines onto the thermal paper.
Carefully peel off the paper stencil. The design outlines should have transferred onto the thermal stencil paper, which can now be used to transfer the design onto skin. The stencil is now ready for the tattoo transfer process.
Preparing the Skin
Before applying the tattoo stencil, it is important to properly clean and prepare the skin. This helps ensure the stencil adheres correctly and prevents contamination that could lead to infection.
First, wash the area with an antimicrobial soap like Hibiclens. Scrub the skin for 2-3 minutes to remove dirt, oils and bacteria from the skin’s surface (1). This will allow the stencil to stick better. Be sure to rinse the soap off completely.
Next, if hair is present, use a new disposable razor to shave and remove all hair from the area. Shaving should be done after washing, just before stencil application. This allows for the closest shave and ensures hair doesn’tgrow back under the fresh tattoo (2).
The skin should now be prepped and ready for the stencil application. Be sure the area is fully dry before moving onto the next step.
Applying Transfer Medium
Once the stencil and skin are prepped, you’ll need to apply a transfer medium like tattoo transfer gel or cream. This helps the stencil adhere to the skin and transfers the ink. Some popular options are Tattoo Transfer Gel by Therapro (https://www.amazon.com/tattoo-transfer-gel/s?k=tattoo+transfer+gel) and Purple Tattoo Transfer Gel by Castin’ Craft (https://www.walmart.com/c/kp/tattoo-transfer-gel).
To apply the transfer gel or cream:
- Squeeze out a liberal amount onto the skin where you’ll be placing the stencil.
- Using your fingers, spread it evenly over the area, covering the entire space where the tattoo will go.
- Massage it gently into the skin to prep the surface.
- The layer should be thick enough to fully saturate the stencil.
This transfer medium allows the stencil to stick directly onto the skin. It also helps pull the ink from the paper down onto the skin when applying the stencil.
Transferring the Stencil
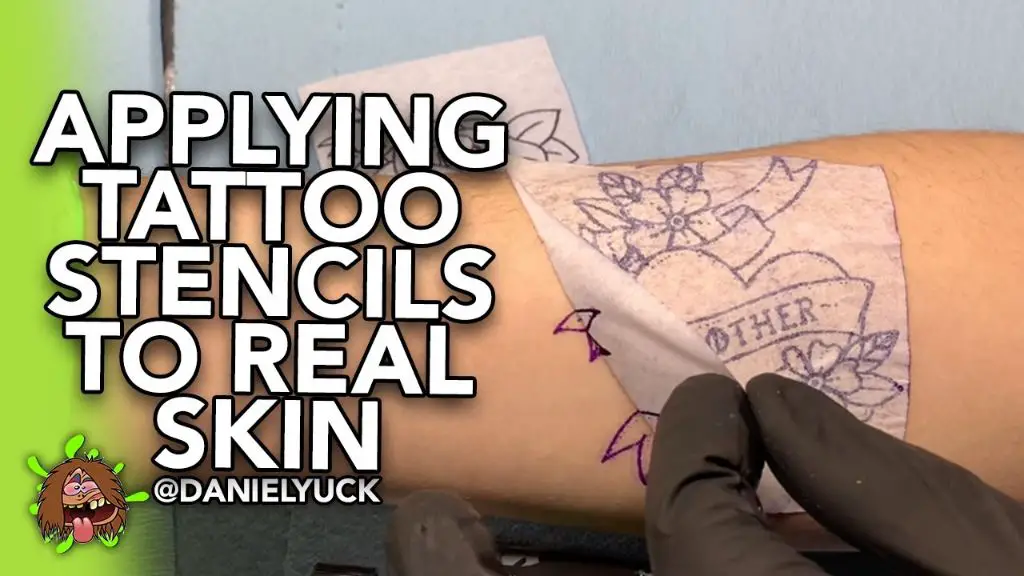
After the preparation steps, it’s time to transfer the stencil to your skin. This is a crucial step to get right for a crisp, clean tattoo outline. Make sure to carefully place the stencil on your skin, aligning it exactly how you want the final tattoo positioned. Gently but firmly press the stencil down to adhere it. Use your fingers or a plastic tattoo tool to rub over the entire stencil, applying even pressure across the whole area. You want to transfer as much of the stencil ink to your skin as possible. Take your time with this step and don’t rush it. The more thoroughly you transfer the ink, the better the stencil outline will come out.
As you rub the stencil, watch for gaps or light spots in the ink transfer. Go over these areas again, pressing a bit harder to get the ink to take. The stencil should look dark, crisp and complete once fully transferred. Avoid smudging the outline too much here. While some guidelines may help with placement, you want the main line work to stay intact. When done carefully and correctly, this transfer process will prep your skin with an exact outline to follow for tattooing.
Removing the Backing
After the stencil has been transferred to the skin, the next step is carefully removing the backing from the stencil. The backing is the plastic, paper, or acetate material that the stencil design was originally printed on. Removing the backing reveals the purple or blue stencil ink outline on the skin underneath.
It’s important to gently peel back the backing rather than ripping it off quickly. Going slowly helps ensure the stencil ink adheres properly to the skin and reduces risk of smudging. Start peeling from a corner and work outward. Continue peeling the backing until the entire stencil outline has been revealed.
Some tips for smoothly removing stencil backing include:1
- Apply transfer gel or solution evenly and generously to help the stencil ink stick to the skin.
- Let the stencil sit on the skin for 5-10 minutes after application before removing the backing.
- Peel the backing slowly at a low angle along the plane of the skin.
- Avoid pulling the backing straight up or ripping it off, which can pull ink away.
- Be extra gentle around intricate stencil details to prevent smudging.
With care, the stencil backing can be removed to reveal a clear, accurate outline for guiding the tattoo process.
Checking the Transfer
After removing the backing from the stencil paper, it’s important to check that the stencil transferred properly to the skin. Look carefully at the stencil to make sure all parts of the design transferred and the lines are solid. Pay extra attention to small details and fine lines, as these are the most likely to have ink breaks or missing sections.
If any areas are missing from the stencil, you’ll need to reapply transfer medium and stencil paper to those spots. You may need to use a small piece of stencil paper just for the section that needs to be redone. Go over the missing section again with a dry paper towel to firmly adhere it.
Check the edges of the stencil as well to ensure they transferred cleanly without smearing. Blurry lines will make it harder to follow while tattooing. Any smudged edges can be cleaned up carefully with a little rubbing alcohol on a cotton swab.
Take your time checking the stencil transfer to catch any imperfections. A complete, quality stencil is essential for an accurate tattoo with clean lines. It’s better to catch any issues with the transfer before starting to tattoo. Paying close attention now will pay off with a smooth tattooing process.
Troubleshooting Issues
Sometimes the tattoo stencil transfer doesn’t go perfectly. Small gaps or smudges in the stencil can occur due to not applying enough transfer medium, excess moisture on the skin, or issues with old/expired stencil paper. Here are some tips for troubleshooting common stencil transfer problems:
If there are small gaps or missing lines, carefully redraw them with a fine tip marker or tattoo pen. Make sure not to apply too much pressure when redrawing, as you don’t want to drive the ink deeper into the skin.
For smudging, gently dab the area with a paper towel or tissue to lift excess ink. Avoid rubbing, as this may spread the smudge further. You can also try lightly tracing over any smudged lines with a tattoo pen.
If the stencil transfers but seems faded or too light, consider applying a second coat of transfer medium over the existing stencil and pressing the original stencil over it again. This can help reinforce the stencil lines.
For stencils that won’t transfer at all, the issue is likely dried-out or expired stencil paper. Try a fresh sheet or new pack of stencil paper, as the transfer solution may lose effectiveness over time.
Always work carefully when troubleshooting a tattoo stencil to avoid damaging or obscuring the design. With some patience and finesse, you can fix most transfer mishaps and get a clean stencil ready for your tattoo.
Next Steps Before Tattooing
After applying the stencil and allowing it to dry completely, there are a few additional steps to take before starting the tattoo. According to Professional Tattoo Stencil Application in 5 Easy Steps, it’s important to let the stencil dry fully, which usually takes around 20-30 minutes. This allows the stencil to adhere properly to the skin before beginning.
It can also be helpful to take a photo of the stencil on your skin before starting the tattoo. This gives you a reference image to consult if you need to reapply the stencil later. Taking a photo also allows you to see how the stencil looks on your body before permanently inking the design.
Be sure to give the stencil a final check to make sure all necessary details are transferring properly and the placement looks accurate. At this point, the stencil should be securely on the skin and ready for the tattooing process. Now the stencil can serve as your guide as you begin carefully tracing the lines with ink.
Once you’re fully prepared with the stencil in place, the supplies handy, and a game plan for the tattoo, you’re ready to begin applying permanent ink and bringing your design to life!


