How Do You Make A Good Coil Pot?
A coil pot is a type of pottery made by coiling narrow ropes or strips of clay on top of each other to build the sides of the pot, squeezing and smoothing the coils together to bond and seal the pot. Coil pots have a long history, dating back thousands of years across many different cultures. Evidence of coil pots has been found from ancient cultures around the world including in Africa, Asia, Europe, and the Americas. Some key examples include coil pots made by the Jomon people of prehistoric Japan from as early as 14,000 BCE and coil pots made by Native American Pueblo peoples.
To make a coil pot, the basic steps are:
- Choosing and preparing the clay
- Making the base
- Building up the sides by adding coils of clay
- Bonding the coils together
- Shaping and smoothing the coils into the desired form
- Adding textures, patterns, or decorations if desired
- Allowing the pot to dry slowly
- Firing the completed pot in a kiln to harden
This overview provides a brief history of coil pots and outlines the general process for making one. The following sections will go into each step in more detail.
Choosing Clay
When choosing clay for coil pots, there are several recommended clay types to consider:
Stoneware clay is a popular option. According to the Ceramics Arts Network, stoneware fires to high temperatures ranging from cone 6 to cone 10. It results in a very strong finished piece that is water-resistant and durable for daily use. Some good stoneware clays are Laguna’s Babu Porcelain and Highwater’s Standard Stoneware (source).
Earthenware is another common choice. It fires at lower temperatures, ranging from cone 06 to cone 2. While earthenware is more porous and fragile than stoneware, it can result in beautiful colors and is beginner-friendly. Good earthenware options include Laguna’s B-Mix 5 and Highwater’s Standard Earthenware (source).
When selecting a clay, it’s important to consider properties like plasticity, strength, color, and shrinkage rate. Very plastic, high-shrinkage clays are easier to coil build with. Stronger stoneware clays hold up better than porous earthenware. The clay color impacts the finished look. Knowing the shrinkage rate allows properly sized work (source). Test different clays to find one with properties suited to your project.
Preparing the Clay
Properly preparing the clay is an important first step in making a good coil pot. Two key techniques for preparing clay are kneading and wedging:
Kneading involves working the clay with your hands to make it soft and pliable. Start by forming the clay into a ball. Then, push into the ball using the heels of your hands and fold the clay over itself. Repeat this process, continuing to push, fold, and turn the clay. Knead for several minutes until the clay is smooth, elastic, and free of air bubbles. Kneading ensures even moisture distribution and a consistent texture.[1]
Wedging is a technique for removing air pockets and blending recycled clay. To wedge, cut off a piece of clay and slam it down onto your work surface. Fold the clay over and slam down again. Repeat this wedge-and-slam process, rotating the clay a quarter turn after each slam. Continue wedging until the clay feels homogeneous with no air pockets. Proper wedging results in clay that is easier to work with and less likely to explode during firing.[2]
Making the Base
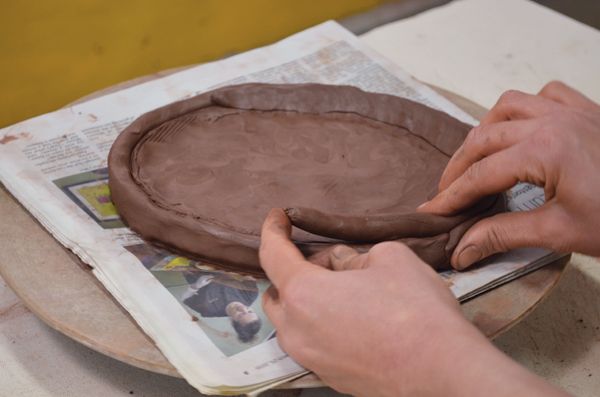
The first step in making a coil pot is to create a solid base on which to build the coils. This provides stability for the pot and ensures it will stand upright when completed. According to Lakeside Pottery’s tutorial on coil pots, you want to start by rolling out a circle of clay using a rolling pin or slab roller. The clay should be about 1/4 inch thick. Make sure the circle is a bit wider than you want the base of your pot to be.
Once the base is rolled out, you need to secure it to your work surface so it doesn’t move around as you build the coils. Lakeside Pottery recommends using a rib or roller to compress the clay base onto a batt of clay, canvas, or wood. You can also use slip or scoring to help adhere the base. The key is making sure it is firmly attached before starting on the coils. This will provide the necessary foundation for constructing your coil pot.

Building the Coils
A key step in constructing a coil pot is building the coils themselves. This involves rolling the clay into long snake-like forms that will be stacked to form the pot’s walls.
When rolling coils, aim for consistent thickness throughout the coil. Coils that are too thick may be prone to cracking and slow drying, while coils that are too thin can be delicate and challenging to handle.
Many potters recommend rolling coils approximately 1/4″ to 1/2″ thick. However, thicker coils around 3/4″ can be used for larger pots. The thickness should be even from one end to the other.1
In addition to even thickness, strive for consistency in the coil width. Coils of the same width will stack together neatly with even gaps between each row. Varied widths can lead to uneven stacking.
Use a guide stick or template when rolling out coils to maintain consistency. Cut coils to the desired length as you make them. Keeping the coils a uniform size will help the construction process go smoothly.
Attaching the Coils
Attaching and smoothing the coils is a critical step in coil pot making. As you attach each coil to the previous one, you’ll want to blend them together seamlessly to avoid cracks when drying and firing. Here are some tips:
Use a rubber rib or wooden knife to carefully smooth over each seam between coils, blending the clay together and removing any gaps or ridges. Work slowly and gently to avoid tearing the clay. Some water can help lubricate and smooth seams.
To properly blend coils, make sure to scrape and compress the seam while smoothing it out. Don’t just run over the top lightly. Really push the coils together and meld them into one continuous piece.
As you build upwards, compress each coil into the one below it so there are no interior gaps. Vertical seams should be smoothed both inside and out.
Pay extra attention to smoothing seams on the inside ridges and corners of shapes, as these are prone to cracking. Rub firmly to bond the clay well in curved areas.
Let the clay firm up slightly between attaching coils. Bone-dry clay can also be toughened up with a spray bottle of water or dipped in a bucket to make it more pliable for smoothing seams.
Avoid attaching coils when the clay is too soft. Let it firm up until it can hold its shape without deforming too easily, then blend seams for the strongest bonds.
Take time with this step, and don’t rush attaching and smoothing coils. Well-blended seams are crucial for creating sturdy, crack-free coil pots.
Shaping
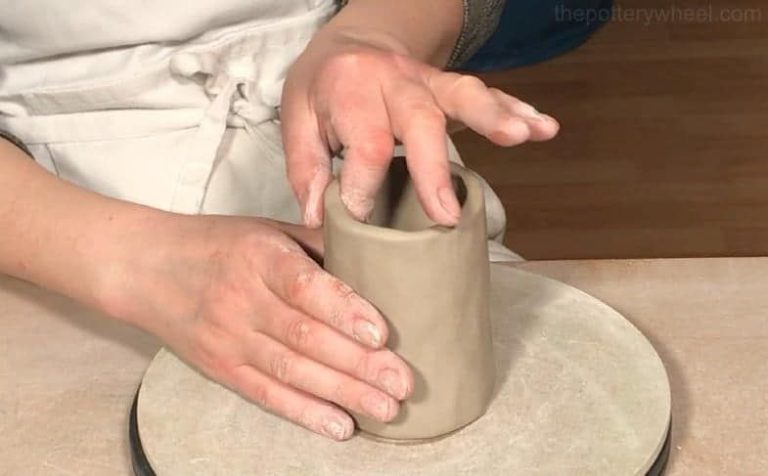
Once the coils are attached, it’s time to shape the pot into your desired form. Begin by gently pressing the coils in and evening out the sides. Coil pots tend to bulge outwards, so press the coils in evenly to create straight sides or gently push one area out to create a rounded, smooth shape. As you shape, support the inner and outer walls evenly so they remain an even thickness. The clay should be flexible enough to shape without too much pressure or distortion. Work slowly and carefully to prevent cracks or weak spots.
Decide what shape you envision for your coil pot, such as round, oval, square, or freeform. Turn the pot upside down and place your hands inside and outside the walls to slowly shape the clay into the desired form. Rotate the pot and work all around, regularly checking for even wall thickness. You can also use some simple pots or shapes as guides. Create smooth, graceful contours for an organic look or straight lines and angles for more geometric forms. Let the clay stiffen slightly between shaping sessions to retain the form without distortion. Refine the shape and correct any irregularities before the clay dries and hardens.
Cited from: https://themadandcriptheologypodcast.buzzsprout.com/1778057/10370282-episode-15-iris-gildea-and-sharoni-sibony
Textures and Patterns
Adding textures and patterns to your coil pots can make them more visually interesting. Some options for textures include:
- Pressing items into the clay to imprint textures, like lace, burlap, leaves, etc. [1]
- Incising designs into the clay with tools like skewers or chopsticks.
- Rolling over the coils with textured rollers.
- Stamping the clay with rubber stamps, found objects, or homemade stamps.
Make sure the clay is still soft and pliable when adding textures. Let your creativity run wild and experiment with different objects to create unique patterns. TEXTURE can add another dimension to your coil pots.
Drying
Once you have finished shaping your coil pot, you need to allow it to dry properly before firing or decorating it. There are two main methods for drying coil pots:
Air Drying
Air drying is the most common method for drying coil pots made from air-dry clays. Simply leave your finished pot in a safe place where it won’t be disturbed. Make sure it is elevated off any surfaces so air can circulate completely around the pot. Air drying can take 24-48 hours or more depending on factors like humidity and thickness of the coils.
To help speed up the drying process, you can place your pot near a window or fan to improve air circulation. Just don’t dry it in direct sunlight as this can cause cracking. You can lightly drape a towel over the pot to protect it while still allowing airflow.
Using a Dehydrator
Using a food dehydrator is a handy way to speed up the drying process for coil pots. The warm circulating air inside the dehydrator will dry your pot more quickly and evenly than air drying. Place your pot on a mesh tray, leaving space around it for airflow. Set your dehydrator to a low temperature around 110-120°F. Monitor the pot and rotate it periodically. Drying time can be 2-12 hours depending on thickness.https://artfulparent.com/how-to-make-clay-coil-pots/
Make sure the pot is completely dry before decorating or firing. Drying thoroughly prevents cracking and weak spots. Gently test the pot by pressing on the coils to ensure no moisture remains.
Firing
Firing is one of the most important steps in creating a coil pot. There are two main firing stages – bisque firing and glaze firing. Bisque firing refers to the first firing before any glazes are applied. This initial firing hardens the clay and makes it less porous. Bisque firing is done at a lower temperature, usually around cone 08-04 which is about 1652-1808°F (900-1000°C). It’s crucial not to over-fire during bisque firing otherwise the clay can become too vitrified and glazes won’t properly adhere.
There are various methods that can be used for firing coil pots. The most common options are electric kilns, gas kilns, wood-fired kilns, pit firing, or raku firing. Electric and gas kilns allow the most control over temperatures. Wood-fired kilns utilize renewable fuel sources and create unique atmospheric effects. Pit firing involves burying pots in sawdust which creates beautiful organic finishes. Raku firing is a specialized technique resulting in crackled metallic glaze effects.
For the second firing, glazes are applied to bisque ware and fired again at a higher temperature around cone 4-10 which is about 1945-2300°F (1060-1260°C). It’s important to follow the recommended temperature range for the specific glazes used. The glaze melting point must be reached for the glaze to become glassy and adhere correctly to the clay body. Glaze firing produces a durable, non-porous pot ready for use. Allow sufficient cooling time before removing glazed pots from the kiln.
No matter which firing method is chosen, it’s essential to closely monitor the kiln temperatures using pyrometric cones. Careful firing is key to creating a strong finished coil pot. For more details on firing techniques, refer to this comprehensive guide: https://ceramicsfieldguide.org/chapters/chapter-6/


