How Many Layers Of Underglaze For Sgraffito?
What is Sgraffito?
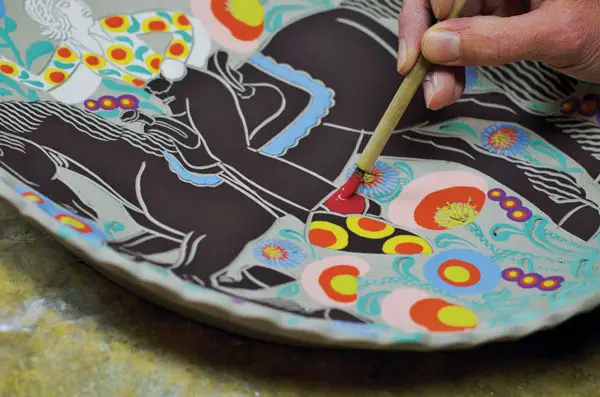
Sgraffito is a decorative technique used in ceramics and pottery where layers of colored slips or underglazes are applied to leather-hard clay, then designs are created by scratching through the layers to reveal the different colors underneath. The word “sgraffito” comes from the Italian word “sgraffiare” meaning “to scratch”.
The origins of sgraffito pottery can be traced back to ancient Mesopotamia, where artisans used the technique to create detailed designs on bricks and pottery. It was later revived during the Renaissance in Italy, where Italian potters developed the technique further. From Italy, sgraffito spread to Germany, Holland, England and other parts of Europe. https://potteryinspiration.com/sgraffito-pottery/
The distinguishing features of sgraffito decoration are the layers of colored slips and the scratched designs revealing the underlying colors. Sgraffito results in pottery with intricate, painterly designs created by carving away parts of the layers. It allows potters to create color combinations and patterns not possible with solid colored glazes.
Underglaze Basics
Underglazes are heavily pigmented ceramic compounds that are used to decorate pottery and other ceramic wares before firing (Digitalfire). They add vibrant color and designs to greenware or bisque pottery before a transparent glaze is applied on top. Underglazes are available in a wide variety of colors and effects.
The most common types of underglaze are liquid underglazes and underglaze pencils. Liquid underglazes can be brushed on in any design. Underglaze pencils allow for finer details and lines (Kingston Ceramics Studio).
Some of the key advantages of underglaze are:
- Provides bright, opaque colors on greenware or bisque
- Wide range of colors and effects available
- Does not flux or run when fired, allowing crisp designs
- Can be used to accent or highlight areas under a glaze
- Versatile – can be painted, dipped, airbrushed, splattered, etc.
Typical Number of Layers
When creating sgraffito pottery, most artists use between 1-3 layers of underglaze on the clay before carving the design.1, 2 Using just one layer can produce nice effects, but doesn’t allow much depth or contrast in the finished piece. Two layers is common as it provides an additional color while still allowing the design to be carved through to the clay body. Three layers starts to add more complexity with the extra color, but can make carving more difficult.
The main factors that determine the ideal number of underglaze layers are:1
- Firing Temperature – Lower fire clays like earthenware can accept more layers without cracking vs higher fire clays.
- Clay Type – Porous, coarse clays take more underglaze vs smooth, tight clays.
- Desired Effect – Extra layers provide more color variation.
Testing on sample tiles is recommended to find the right layering for each clay body and desired artistic effect.
Applying Underglaze Layers

Proper application of the underglaze layers is crucial for creating clean, crisp sgraffito designs. It’s important to apply the underglaze in even, consistent coats and allow ample drying time between layers. Most sources recommend applying 2-3 layers of underglaze for sgraffito.
Each layer should be brushed on smoothly and evenly across the leather-hard clay surface using a soft brush. According to diamondcoretools.com, more underglaze should be applied than you would normally use for decoration to account for the layers that will be carved away during the sgraffito process. Allow each layer to dry fully before adding the next coat.
Proper drying time between underglaze layers is crucial to prevent the layers from mixing together when carving the design. Most sources recommend waiting at least a few hours between coats for adequate drying. Pay close attention to the underglaze manufacturer’s instructions for ideal drying times. Once the final layer is dry, the surface is ready for the sgraffito design to be carved into the layers, revealing the clay body underneath.
Creating the Sgraffito Design
Once the underglaze layers have been applied and allowed to dry, it’s time to create the sgraffito design. This involves carving through the layers of underglaze to reveal the clay body underneath. There are several key steps in this process:
First, you’ll need the proper tools for carving through the underglaze layers. Many artists use wooden or rubber tools with different shaped tips for carving lines and textures. Metal tools can also be used but must be kept sharp. Avoid anything too sharp or hard that might scratch the clay surface underneath the underglaze.
Next, plan out and transfer your design. This can be done freehand or by tracing an existing drawing. Simple line drawings with geometric shapes or patterns work well for sgraffito. If using paper, be sure to remove it after transferring the design so it doesn’t burn during firing.
When carving, use light to medium pressure and carve at an angle rather than straight down to avoid digging into the clay. For thin delicate lines, use the edge of a tool. For wider lines, use the flat face of a wider tool. Take care not to go all the way down to the bare clay as this will make lines appear sunken rather than flat.
As you carve, periodically stop to brush away excess underglaze dust to clearly see your progress. Carve from top to bottom and outside to inside when doing enclosed shapes. Work slowly and carefully for best results. Let the underglaze layers dry again before proceeding if needed.
Check your design from multiple angles as you carve to ensure it remains balanced. Be careful when overlapping lines or shapes and carve these elements in the proper order. Once satisfied, allow the carved piece to dry fully before firing.
Additional Decoration
After creating the sgraffito design, there are a variety of decoration techniques that can be used to further enhance the artwork. Popular options include:
Glazing – Applying colored glazes over the sgraffito design can help highlight and accentuate the contrast between the clay body and the scratched design. Glazes come in a wide range of colors, from bold primaries to neutrals, allowing artists to complement or contrast with the base clay. Clear glazes are also an option for adding gloss and protection without altering the color. According to Primitive Decorating Ideas on Pinterest, many artists use yellow, green, brown or other earthy glazes on top of red earthenware clay with sgraffito.
Staining – Ceramic stains are used to enhance the color and details of sgraffito designs. They can be applied overall or just in certain areas, such as the etched lines. Stains allow for toning and shading effects. Earthy colors like greens, blues and browns work well to antique sgraffito designs on redware. As shown on the Shooner Redware Pottery Pinterest board, staining over sgraffito adds liveliness and visual interest.
Wax Resist – Applying wax before glazing is another technique for highlighting sgraffito designs. The wax will resist and block the glaze from adhering where applied. Once fired, the wax melts away and the underlying clay is left exposed. The contrast of glazed and unglazed areas make the details of the sgraffito really stand out. Wax resist also allows for adding patterns and textures beyond just the etched design.
When choosing decorative enhancements, it’s best to select options that complement both the clay body color and the sgraffito design itself. The goal is to showcase the hand-etched artwork while adding visual interest and depth.
Firing Sgraffito Ware
Proper firing is essential for achieving the desired effects with sgraffito ceramics. The key considerations are:
Correct firing temperatures – Sgraffito ware is typically fired to cone 04-06 temperatures (1945-2165°F or 1063-1185°C). Lower temperatures like cone 06 are common. The temperature depends on the clay body and glazes used. Firing too low can lead to poor glaze fusion or colors. Firing too high risks glaze defects.
Tips to prevent defects – Slow bisque firing and glaze firing cycles with holding periods help prevent glaze cracking or crazing. Make sure to lett pieces cool slowly after glaze firing as well. Using compatible clay and glazes designed for the same temperature range avoids defects.
Achieving desired effects – The contrast between the underglaze and exposed clay depends on the surface quality after bisque firing, underglaze colors used, and the temperature. Test samples are recommended to perfect the look.
Proper firing is key to achieving the decorative scratch-work designs and vivid contrasts that make sgraffito pottery so striking. Paying close attention to firing temperatures, using compatible materials, and preventing thermal shocks will allow beautiful sgraffito pieces to be reliably created.
Examples of Sgraffito Art
Sgraffito art has a long and varied history, with beautiful examples found across many cultures and time periods. Here are some notable examples of sgraffito ceramics and the range of techniques used:
One of the earliest examples comes from ancient Greece, where sgraffito designs were incised into black-figure pottery starting around the 6th century BCE. The designs were often simple geometric patterns or figural scenes (Lister, 1978).
During the Renaissance, Italian potters developed a new form of sgraffito using colored slips under a white slip. Intricate scenes were etched to reveal the colored layers below. The Italian scholar Cipriano Piccolpasso provided early documentation of this technique in his 1548 book The Three Books of the Potter’s Art.
Sgraffito was widely used in Germany during the 16th-18th centuries. German sgraffito tends to feature floral and foliate designs popular during the Baroque era. Vibrant colors like manganese purple and copper green were often used under the white slip (Perkins, n.d.).
In the 19th-20th centuries, sgraffito experienced a revival among art potters like William De Morgan. Modern examples showcase the range of visual styles possible, from simple incised line drawings to complex multi-colored etchings.
Contemporary artists continue to use sgraffito decoratively or to make bold artistic statements. There are endless variations in color, line, and technique – but all sgraffito celebrates the striking contrast revealed when layers are etched away.
Similar Ceramic Techniques
There are many other decorative techniques in ceramics that share some similarities with sgraffito. Here is a brief overview of a few popular techniques and how they compare:
Mishima
Mishima involves using a sharp tool to incise intricate lines and patterns through layers of colored slip. The process is similar to sgraffito in that you are carving through layers of material. However, mishima focuses more on detailed line work rather than scratched areas of color.
Learn more about mishima: Warm Glass – Mishima Ceramic Technique
Terra Sigillata
Terra sigillata involves applying and burnishing very thin layers of refined clay slip to create a smooth, glossy surface finish. The polishing and layering process shares similarities with building up smooth layers of underglaze in sgraffito. However, the end result is a polished surface rather than carved lines.
Learn more about terra sigillata: Arteologic – Terra Sigillata Ceramic Technique
Sgraffito Tips and Tricks
Sgraffito can seem deceptively simple, but there are some tips and tricks that can help you avoid common issues and get the best results.
Troubleshooting Common Problems
Some common problems and solutions in sgraffito include:
- Underglaze peeling or flaking – Ensure the underglaze is completely dry before applying the top layer. Allow 24 hours between coats.
- Top layer sticking – Use wax resist or silicone release agents between layers to prevent them adhering.
- Clean lines – Use fine tipped tools and steady hands to get crisp edges. Tape can be used as a guide.
- Underglaze bleeding – Allow each layer to fully dry before scratching to prevent smudging.
Expert Tips
Experienced sgraffito artists recommend:
- Start simple – try basic patterns and explore the technique before intricate designs.
- Plan ahead – sketch out the pattern to follow before starting.
- Vary layers – use contrasting colors in each layer for dramatic reveals.
- Highlight with glazes – add transparent glazes over the top to make colors pop.
Creativity Ideas
For unique sgraffito designs, consider:
- Nature motifs – leaves, trees, animals, seashells.
- Geometric patterns – lines, circles, squares.
- Cultural symbols – Asian characters, Mexican skulls.
- Textures – crosshatching, dots, waves.
Let the clay body show through for another color option. Get creative with the tools used like dentist picks, nail art brushes, or screwdrivers. The possibilities are endless!


