How Do Glaze Colors Work?
Glazes are vitreous coatings applied to ceramic surfaces to impart color, texture, and protection. Glaze colors result from interactions between various metal oxides, silica, and fluxes when fired at high temperatures. At a chemical level, coloring oxides act as chromophores which selectively absorb and transmit light rays to produce color.
Glazes transform during firing from mixtures of powdered raw materials into glossy, translucent layers. The development of diverse colors depends on many variables in the glaze recipe and kiln atmosphere. By controlling factors like oxide additions, thickness, and temperature, ceramic artists exert precision over the final color outcomes.
This article will provide an in-depth look at how glaze ingredients and firing methods produce the vivid colors found on finished ceramic wares. It aims to give ceramicists, hobbyists, and materials enthusiasts a better understanding of the chemical transformations underlying glaze coloration.
Glaze Ingredients
There are several common ingredients that make up ceramic glazes. The most important are:
- Silica – Silica is the glass former and provides the glaze structure. It is usually sourced from clay, sand or feldspar. Silica by itself produces a glaze that crazes and is very matte.[1]
- Alumina – Alumina is added to the glaze for durability and to prevent crazing. Common sources of alumina are kaolin and alumina hydrate.
- Flux – Flux aids melting and controls the glossiness of the fired glaze. Common fluxes are feldspar, dolomite, sodium and calcium carbonate. Too much flux can cause the glaze to run and drip.[2]
- Colorants – Metal oxides are used to introduce color to glazes. Common colorants are cobalt, copper, iron, manganese and chromium.
How Colorants Create Color
The color in ceramic glazes comes primarily from metal oxides and stains that are added to the glaze. These inorganic colorants interact with the glaze chemistry during firing to produce the final colors.
Metal oxides like cobalt, copper, manganese, and iron act as colorants when added to glazes. They provide a wide range of colors from blues and greens to browns, blacks, and reds. The metal ions interact with oxygen and silica in the glaze melt, going through oxidation-reduction chemical reactions that determine the final color.
Stains are also important colorants for glazes. They are made up of mixtures of oxides, salts, and compounds that produce more complex colors like oranges, purples, pinks, and yellows. When stains are added to the glaze and fired, the components interact to strike the desired color effects.
The colorants work by subtly changing the molecular structure and light absorption qualities of the glassy glaze layer. Factors like the glaze ingredients, thickness, and firing atmosphere all impact the final colors produced.
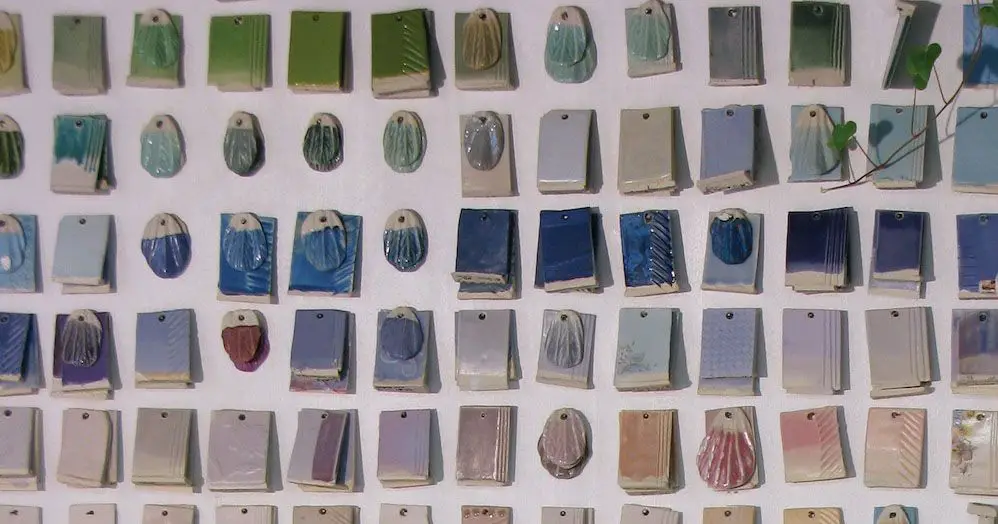
Proper mixing and application of the colorants is crucial to achieve the intended effects. Testing on glaze test tiles is important to dial in the right combinations and concentrations.
Opaque vs Transparent Glazes
Glazes can be classified as either opaque or transparent based on their appearance when fired. Opaque glazes do not allow light to pass through them, resulting in an opaque, non-see-through surface. Transparent glazes allow at least some light to pass through, creating a translucent effect where the clay body is still somewhat visible underneath the glaze.
The main difference between opaque and transparent glazes is the use of opacifiers. Opacifiers are compounds like tin oxide, titanium dioxide, or zirconium silicate that are added to glaze recipes. These materials remain solid and suspended within the glaze after firing, reflecting light and creating opacity. Transparent glazes do not contain opacifiers, allowing light to travel through the glass formed during firing.
Another key difference is that opaque glazes tend to be glossy, while transparent glazes can produce a range of surface effects including gloss, semi-gloss, satin, and matte finishes. The ingredients and firing temperature impact the final surface quality.
When choosing between opaque and transparent glazes, potters consider factors like the clay body color, whether the body should show through, as well as the desired colors and surface effects for a finished piece. Both offer unique advantages for ceramic work.
Firing Temperature
Firing temperature plays a critical role in determining the final color of a glaze. Glazes are made up of a mixture of minerals, clay, and metal oxides that melt and fuse together during the firing process. The melting point of the glaze ingredients, along with the kiln temperature and length of firing time, all impact the reactions that occur and thus the final glaze color.
In general, higher firing temperatures result in more intense and saturated glaze colors. At lower temperatures, the glaze ingredients may not fully melt and react, producing paler or muted tones. As the temperature increases, mineral components dissolve, fuse, and react with one another and any added colorants to create the final glaze color.
For example, an iron oxide red glaze fired to 2100°F may appear light orange. When fired to 2300°F, the iron oxides will become more soluble in the melt, producing a strong tomato red. Firing even hotter to 2400°F may yield a very dark burgundy or black.
It’s important to test glazes at the intended firing temperature. Changing the firing can shift colors unpredictably. While some glazes tolerate a wide firing range, achieving consistent colors requires an understanding of the chemistry and firing behavior of the specific glaze recipe.
Glaze Thickness
The thickness of a glaze has a significant impact on the vibrancy and saturation of its color. According to Digitalfire, transparent colored glazes will often fire the wrong color shade if not applied at the right thickness. Glazes with a higher expansion than the ceramic body underneath will tend to craze if put on too thick.
As explained by Big Ceramic Store, some glazes become lighter and more translucent when applied too thin. A glaze like Saturation Gold needs an ideal thickness to achieve the proper color saturation. Too thin and it won’t be vibrant enough, while too thick can lead to crazing, crawling, and other defects.
Getting the glaze thickness right for a specific color takes testing and experience. The saturation point where the color is fully vibrant can vary across different glaze recipes, so ceramic artists must fine-tune the thickness as they work with different colored glazes.
Glaze Recipes
When formulating glaze recipes, the specific minerals and compounds used as colorants will determine the final glaze color. Glaze artists can produce a wide spectrum of colors by carefully combining colorants in different ratios. Some examples of popular glaze color palettes include:
Blues: Cobalt oxide produces a range of blues from light sky blue to deep navy when added to translucent glazes. According to Ceramic Arts Network, adding 4% cobalt carbonate to a base glaze recipe will create an intense blue.
Greens: Chromic oxide added to glazes results in greens ranging from light mint to deep forest green. A transparent glaze recipe with 3-5% chromic oxide often creates a nice blue-green. As explained on Pinterest, combining chromium and copper oxides can yield blue-greens to yellow-greens.
Yellows: Cerium oxide and titanium dioxide are commonly used to produce yellow glazes. A simple recipe is 90% lead-free transparent base combined with 10% cerium oxide. According to Ceramic Arts Network, this creates a vibrant lemon yellow.
Special Effects
Certain techniques can produce stunning visual effects in ceramic glazes. Here are some of the most popular special effects:
Flashing
Flashing occurs when a glaze turns one color during the early stages of firing, and then transforms into another color at peak temperature. This effect results in areas of the first color flashing through the final glaze surface. Flashing is produced by differences in the melting behavior of the glaze ingredients [1].
Bleeding
Bleeding happens when colors from one layer of glaze bleed into another layer during firing. The effect requires applying multiple layers of contrasting colored glazes. As the glaze melts, the layers will merge and bleed together. Factors like glaze viscosity, surface tension, and firing temperature impact the bleeding effect [2].
Crawling
Crawling refers to when glaze retracts from parts of the clay surface during firing, creating a mottled texture. It occurs due to an incompatibility between the clay body and glaze. Strategically engineering crawling can produce attractive crackled or wrinkled effects. Glaze viscosity, firing temperature, and clay porosity are key factors [3].
Troubleshooting
Some common issues that can arise with glaze colors include pinholing, crazing, shivering, and color problems. Here are some potential solutions for troubleshooting these issues:
Pinholing
Pinholes can occur when air bubbles get trapped in the glaze layer. To prevent pinholing:
- Stir glazes thoroughly before application to release trapped air bubbles.
- Apply glazes in thin, even coats to avoid air bubbles.
- Allow adequate drying time between coats.
If pinholes are already present, a thin coat of glaze can be reapplied to fill them in before firing. Just be careful not to apply too heavily or air bubbles may be reintroduced.
Crazing
Crazing occurs when glazes don’t properly fit the clay body, causing a network of fine cracks. To prevent crazing:
- Make sure glazes and clay bodies are well matched in terms of thermal expansion.
- Avoid applying thick layers of glaze which have a higher tendency to craze.
- Allow adequate slow drying of greenware before firing to prevent uneven shrinkage.
If crazing has already occurred, the piece can be refired to vitrify the glaze further. Or the cracks can be rubbed with a contrasting color to create a decorative effect.
Shivering
Shivering occurs when the glaze doesn’t shrink at the same rate as the clay body, causing it to crack and flake off. To prevent shivering:
- Make sure glaze and clay have similar thermal expansion.
- Avoid thick glaze layers which can shiver more readily.
- Bisque fire properly before glazing to ensure even shrinkage of the clay.
If shivering occurs, the piece will likely need to be stripped of all glaze and re-fired before reapplying a better matched glaze.
Conclusion
Glaze colors are created through complex physical and chemical interactions between the glaze ingredients, colorants, firing temperature, and glaze thickness. While the physics and chemistry behind glaze color is complicated, ceramic artists can achieve beautiful results through thoughtful glaze recipes and testing. With an understanding of how opaque vs transparent glazes work, the impact of firing temperature, and options for special color effects, artists can intentionally create a palette of glazes in an array of dazzling colors.
In summary, glaze color is dependent on many interrelated factors. Small adjustments to the glaze recipe, firing temperature, or glaze thickness can dramatically impact the final color. With careful testing and record-keeping, ceramic artists can unlock new glaze colors and effects. The journey of experimentation is an integral part of creating unique, artistic glazes.

