What Tool Is Used To Lay Tile?
Tile installation is an intricate process that requires specialized tools for cutting, shaping, leveling, spacing, spreading, and finishing tile. While simple projects can be completed with just a few basic tools, professional tile setters use a range of hand tools and power tools to achieve flawless results.
The key tools involved in tile laying include trowels for spreading mortar and grout, tile cutters for precise cuts, tile spacers for consistent spacing, grout floats for smoothing grout lines, tile leveling systems for flat surfaces, and specialty tools like knee pads for comfort. Having the right tools for each step of the installation process is essential for efficiently laying tile with a professional finished look.
This article will provide an overview of the must-have tools used by tile setters during the tile layout and installation process.
Trowels
The most common tool used to lay tile is the trowel. Trowels come in a variety of types and sizes for different applications. According to RUBI, trowels come in two basic types – square-notched and U-notched, measured by the first number which indicates notch size and the second number which indicates space between notches
(https://www.rubi.com/us/blog/trowel-size-for-tile/).
The main types of trowels are:
- U-Notch Trowel – The U-shaped notches help spread the mortar evenly.
- V-Notch Trowel – The V-shaped notches are good for thick mortar beds.
- Square-Notch Trowel – The square notches are best for thin-set mortar on floors.
Choosing the right size trowel is important for proper coverage of the tile adhesive. According to The Tile Club, factors like tile size, tile type, substrate, and grout joint size impact trowel choice (https://www.tileclub.com/blogs/news/how-to-pick-right-trowel-install-tile). Contractors Direct provides a trowel size chart with recommendations based on tile size and application.
Tile Cutters
Tile cutters are essential tools for cutting tile to fit around fixtures, walls, and other obstacles during tile installation. There are two main types of tile cutters: manual cutters and power cutters.
Manual tile cutters (Tileswale.com) consist of a wheeled cutter with a carbide or diamond blade that scores the tile so it can be snapped. They require some physical effort by the user but are inexpensive, portable, and don’t require electricity. Manual tile cutters work well for straight cuts and simple shapes. They come in different sizes for cutting different tile dimensions.
Power cutters (TileTools.com) use an electric motor to cut the tile. This allows for fast, easy, and precise cuts without much physical exertion. Power cutters include wet saws that use water to cool the blade and minimize dust, and dry saws without water. Power cutters can make curved, angled, pocket, and notch cuts. They are more expensive but make short work of complex cuts. Power cutters are available in different blade diameters for different cutting capacities.
When choosing between manual vs. power tile cutters, factors like the tile material, types of cuts needed, portability requirements, and budget should be considered. Many tile installers use a combination of both types of cutters.
Grout Floats

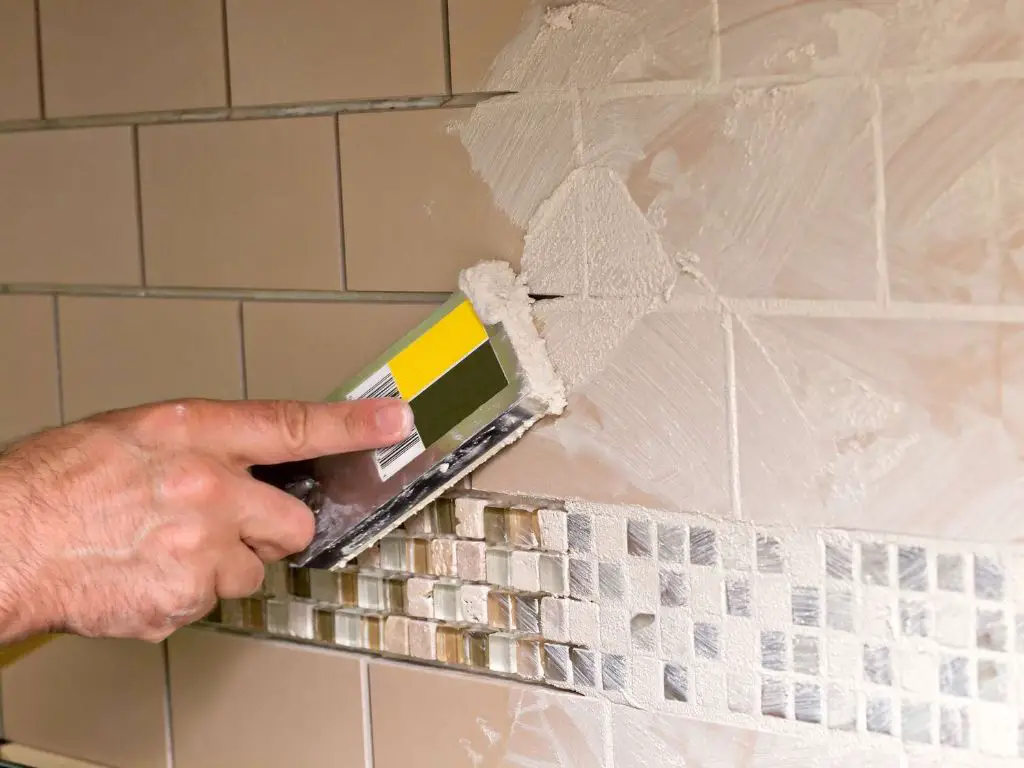
A grout float is an essential tool used in the process of grouting tiles. Its purpose is to spread and pack grout into the joints between tiles, ensuring they are completely filled. Grout floats are designed with a flat, rectangular rubber or sponge surface on one side or both sides of the tool.
The rubber or sponge material is soft enough to press grout firmly into joints, removing excess grout and leaving a smooth, even finish. At the same time, the spongy surface prevents scratching the surface of the tiles (1). Using a proper grout float allows for efficient grouting and a professional finish.
Grout floats come in a variety of sizes from small floats for grouting in tight corners to larger floats for grouting wide floor areas. The size used depends on the tile size and width of grout joints. Smaller mosaic tiles require a smaller grout float for precise grouting between tiny grout lines.
Grout Spreader
A grout spreader is a tool used to spread grout smoothly and evenly between tiles. According to the Family Handyman, “A grout float is a hand tool that resembles a trowel. It’s designed to press grout into the joints between tile or stone.”1 Grout spreaders have a flat, flexible rubber edge that allows the user to spread the grout and work it into the joints and gaps between tiles. This helps ensure an even application and prevents uneven spots or voids in the grout lines.
Grout spreaders are useful for spreading grout smoothly across tile surfaces. Their flexibility allows them to contour to the shape of the tiles and joints. Some grout spreaders have a squeegee-like edge, which helps spread the grout efficiently while removing excess from the tile surface. This promotes a clean grout line with minimal need to go back and clean up excess grout after it has set. Overall, grout spreaders are an important tool for achieving an attractive, smooth grout finish when laying tile.
Spacers
Tile spacers are small plastic crosses that are placed in the corners between tiles as they are being set. The spacers serve two important purposes:
- Maintain proper spacing between tiles – The spacers create a uniform grout line width between the tile edges. Consistent grout lines give the finished tile installation a neat, professional appearance.
- Keep tiles from shifting during installation – The spacers temporarily hold the tiles in position while the tile adhesive sets. This prevents the tiles from moving out of alignment.
Most tile installers recommend placing spacers in all four corners where tiles meet. The spacers are left in place until the tile adhesive has cured, usually overnight, and then removed before grouting. Popular spacer sizes are 1/16″, 1/8″, and 3/16″, which determine the grout line width.
Spacers are essential for achieving straight, evenly spaced grout lines. According to The Spruce, tile expert Danielle Smyth says, “It’s nearly impossible to perfectly space tiles without these handy little cross-shaped widgets.”
Tile Leveling Systems
Tile leveling systems are one of the more advanced tools to help keep tiles even as you lay them. They consist of spacers with built-in height adjustment posts and spring-loaded caps. The posts sit on each corner of a tile and the cap presses down on top of adjacent tiles to keep them all at the same height.[1]
To use a tile leveling system, you first install the base spacers just like regular tile spacers. Then you add the posts and caps on top of them. The caps can adjust up or down to account for any unevenness in the tiles. As you lay each new row, the caps hold them at the same level. At the end, you remove all the caps and posts for a perfectly flat surface.
Tile leveling systems are great for large tile jobs, areas like showers that need to slope properly, or any place where lippage is unacceptable. They take more time upfront versus just using spacers, but save time down the road from having to go back and grind tiles even. With some practice, tile leveling systems give professional-looking results.[1]
Knee Pads
Tiling often requires spending long hours on your knees, which can be uncomfortable and damaging over time. For this reason, many tilers rely on knee pads to provide cushioning and support.
Knee pads designed for tile work feature thick padding and ergonomic caps to protect the kneecap and prevent pain. Compared to basic foam pads, tile knee pads distribute pressure more evenly across the knee joint. This helps reduce fatigue and the risk of long-term damage.
Popular options include the Rubi Gel Duplex Knee Pads, which have deep gel cushioning, and the Recoil Kneepads, which are lightweight and breathable. Tilers report Recoil pads are comfortable for extended periods and don’t slide down the leg.
High quality tile knee pads provide vital cushioning during a physically demanding task. Investing in a pair specially designed for tile setting allows tilers to work comfortably on their knees all day.
Mixing Bucket
A mixing bucket is an essential tool for mixing mortar and grout when laying tile. The bucket is used to combine thinset mortar powder or grout with water to achieve the proper consistency before applying it to the tiles. According to Fine Homebuilding, “With the water already in the bucket, pour in some thinset from the bag. For now, add enough to soak up the water in the bucket” (source). The bucket should be large enough to mix an adequate amount of mortar or grout for the area being tiled. Typically a 5-gallon bucket is sufficient. Using a bucket liner or ‘bucket saver’ can help reduce cleanup time and waste (source). It’s important to thoroughly mix the mortar or grout according to instructions to achieve the proper consistency before applying. A clean mixing bucket is essential for quality results.
Conclusion
When laying tile, having the right tools is essential for an efficient and high-quality job. The key tools needed are trowels for spreading thinset and grout, tile cutters for precise cuts, grout floats for working grout into joints, grout spreaders for smoothing grout lines, spacers for proper tile spacing, tile leveling systems for keeping tiles even, knee pads for comfort, and mixing buckets for preparing thinset and grout. With quality tools like these, tile can be laid straight, flat, and evenly. Careful planning, measuring, mixing, spreading, cutting, spacing, leveling, and grouting are all important parts of the process. Having the proper trowels, cutters, floats, spreaders, spacers, levelers, pads, and buckets makes tile installation much easier. With practice and the right tools, even beginners can lay beautiful, durable tile.


