Do You Need A Kiln For Enameling?
What is Enameling?
Enameling is the process of fusing powdered glass to metal through high heat. The glass melts and bonds to the metal surface to create a smooth, durable vitreous coating.
The origins of enameling can be traced back thousands of years. Archaeological evidence shows enameling techniques were practiced in ancient Egypt, Greece, China, and Japan. Enameled jewelry and decorative objects from the Bronze Age have been discovered across Europe and Asia.1
Over centuries, the art of enameling evolved across different cultures. In the Middle Ages, Limoges, France became a center of enameling in Europe. Enamelwork flourished during the Byzantine Empire. By the 18th-19th centuries, enameling was an established decorative technique for jewelry, watches, vases and other household objects.2
Today, enameling remains an important technique in jewelry making and other decorative arts.
Tools and Materials for Enameling
The most basic tools and materials needed for enameling include:
- Metal – Copper, silver and gold are commonly used. The metal serves as the base.
- Enamel powder – Finely ground glass particles that come in various colors. When fired, the enamel melts and fuses to the metal surface.
- Sifters – Used to apply an even layer of enamel powder onto the metal. Fine mesh sifters between 60-100 mesh are ideal.
- Kiln – Small jewelry kilns are used to fuse the enamel onto the metal by firing it between 1400-1600°F. Kilns allow for precise temperature control.
- Enameling surface – This can be a trivet, mesh screen or sagger plate placed in the kiln to position pieces for firing.
- Tweezers – Helpful for placing and positioning small jewelry pieces.
- Brushes – Small brushes to sweep away excess enamel powder.
Specialized tools like scribers, mandrels, and pliers may also be used in the enameling process. But a hobbyist can get started with just the basics – metal, enamel, sifters, a kiln, and firing surface. More advanced tools can be added as technique develops.
Applying Enamel
There are a few techniques for applying powdered enamel to metal before firing it in a kiln. The basic process involves first cleaning and preparing the metal surface, then applying a thin even layer of enamel powder using one of these techniques:
- Sifting – Sift a thin layer of enamel powder over the metal surface through a fine mesh sieve or tea strainer. This creates an even, smooth coat of powder.
- Painting – Mix the enamel powder into a paste with a bit of water or oils. Use a paintbrush to apply a thin coat of the enamel paste onto the metal. Let it dry before firing.
- Wet Packing – Dip the metal piece in water, shake off any excess. Immediately dip it into the enamel powder to pick up a wet coat of powder. Tap off any excess.
- Sprinkling – Use a spoon or small scoop to sprinkle powder directly onto the metal surface. Tap gently to distribute evenly.
It’s important not to apply the powder too thickly. Thin, even layers result in the best results. Refer to this enameling workshop for more tips on preparing metal and applying enamel before firing.
Firing Enamel

Firing is a crucial step in creating enamel jewelry and art. Enamel powder melts and fuses to metal through high heat in a process called vitrification. Firing enamel requires reaching temperatures between 1,400-1,600°F depending on the type of enamel used. This is hotter than a regular kitchen oven can reach, so a specialized kiln or torch is required.
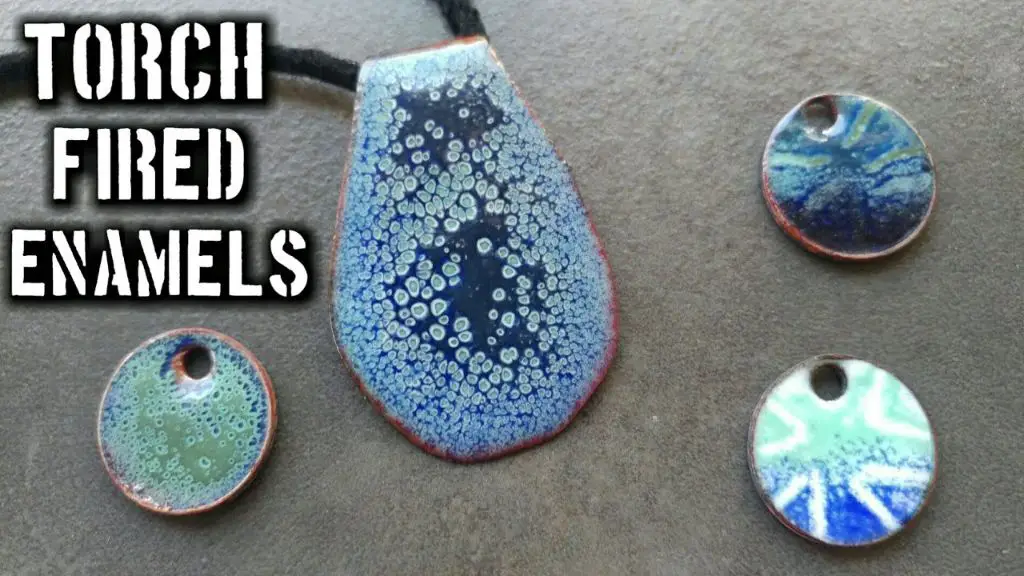
There are two main methods for firing enamel – kiln firing and torch firing. Kiln firing involves placing the enameled metal piece in a kiln and heating to the required temperature. Pieces may need multiple firings with added layers of enamel in between. Torch firing uses a handheld torch to heat and melt the enamel. This allows for more custom designs but can be more technically challenging.
No matter the technique, proper firing is key. Firing too hot or too long can cause the enamel to boil, burn or turn brown. Firing too cool or too quick will result in poor adhesion and a weak bond between enamel and metal. With practice, the ideal time and temperature can be honed in for beautiful properly fired enamel.
Some key firing tips are:
– Heat slowly, around 300°F per minute
– Hold at top temperature briefly, 1-2 minutes
– Allow pieces to cool slowly in the kiln or on a fireproof surface
– Fire transparent enamels 50-100°F hotter than opaques
Proper preparation, patience and practice will lead to successfully fired enamel with vibrant colors and a smooth finish. Always check the manufacturer’s instructions as firing requirements can vary between different enamels and metals.
Types of Kilns for Enameling
When choosing a kiln for enameling, the main options are torch kilns, microwave kilns, and electric kilns. Each type has its own pros and cons.
Torch kilns, like the KKiln (https://www.riogrande.com/product/kkiln-torch-fired-enameling-kiln-120v/704105) are small, portable kilns that can reach enameling temperatures of 1400-1500°F. They are fired by a handheld propane or butane torch. The advantage of torch kilns is that they are inexpensive and can be used anywhere, without requiring an electrical hookup. However, firing with a torch requires skill and close monitoring to achieve proper results.
Microwave kilns, like the iLori MWK-02 (https://www.iloricraft.com/MWK-02), use a standard kitchen microwave to fire enamel. They are safe, easy to use, and more affordable than electric kilns. Firing times are very fast. However, microwave kilns have limited space and may not be suitable for large pieces. There are also size and type restrictions on the metals that can be fired this way.
Electric kilns designed for enameling, like those made by Paragon (https://www.paragonweb.com/kilns.cfm?subcategory=11) or Prometheus (https://www.prometheushobby.com/Kilns-c59.html), allow precise temperature control and even heating. They can accommodate larger pieces and different metal types. However, electric kilns are the most expensive option. They also require sufficient electrical service and venting.
Enameling Without a Kiln
While having a kiln is ideal for firing enamel, it is possible to enameling without one using alternative firing methods like torch firing. Torch firing involves using a handheld torch to heat the metal and melt the enamel powder on the surface 1. Start by cleaning the metal and applying a thin layer of enamel powder. Then begin moving a torch in a circular motion across the metal to evenly distribute heat. The enamel will pass through stages, first turning glossy as the flux melts, then becoming dull as it vitrifies. Remove the heat before the enamel bubbles or burns. Let cool completely.
Other methods like stove-top firing are possible but more challenging. Enamel can be fired on a stovetop burner or even an open campfire, but regulating consistent heat can be difficult. A microwave kiln is another option, however results may vary. While enameling without a kiln takes practice, it opens up creative possibilities.
Advantages of Having a Kiln
Having a dedicated enameling kiln offers several key advantages over trying to enamel without one:
- More control over the firing process – Enameling kilns allow for precise temperature control during firing, which is critical for proper melting of the enamel without over or under firing. This level of control is not possible in a makeshift setup.
- Faster firing times – Enameling kilns are designed to quickly ramp up to enamel firing temperatures, which are typically around 1400°F to 1500°F. This allows the enamel to properly fuse in a matter of minutes.
- Ability to fire multiple pieces – Most enameling kilns have enough interior space to accommodate multiple pieces in a single firing. This improves workflow and productivity.
Having an enameling kiln in your studio provides consistency and reliability that simply cannot be matched with torch firing, instant pot firing, or other improvised methods. The initial investment pays off quickly when factoring in time savings and results.
Disadvantages of Kilnless Enameling
While it is possible to enamel without a kiln, there are some significant disadvantages to this method that may make investing in a kiln worth it for those who want to seriously pursue enameling.
One major disadvantage is having less control over the enameling process. When using a torch or other heat source, it can be challenging to evenly distribute heat and properly fuse the enamel. The enamel may end up with an uneven finish or cold spots where it did not fully melt. With a kiln, the heat is evenly distributed and consistent, allowing for better control.
Enameling without a kiln is also much slower. When using a torch, each piece must be heated individually. This makes producing a large volume of enameled work time-consuming. A kiln allows multiple pieces to be fired at once, speeding up the process.
Working on a smaller scale is another downside. Torch firing is really only practical for small jewelry-sized pieces. With a kiln, larger plates, bowls, and other objects can be enameled. The size of work is limited when relying solely on a handheld torch.
According to this article, enameling sheet copper without a kiln took 4 layers just to get good coverage, demonstrating how much more difficult it is to achieve quality results without a kiln.
Tips for Enameling Without a Kiln
Enameling without a kiln is possible with careful technique and proper tools. Here are some tips for getting good results when torch firing enamel:
Use a high-quality torch like a propane/MAPP gas or acetylene torch that can reach temperatures between 1400-1600°F. Avoid lower quality butane micro torches which may not get hot enough (source).
Apply enamels in very thin, even layers and fuse each layer completely before adding another. Thick applications are harder to fuse fully with a torch (source).
Allow pieces to cool fully between layers to prevent cracking or poor adhesion. Move the torch constantly in a circular motion to evenly distribute heat.
Use a trivet or mesh screen to elevate pieces above the flame. This helps prevent hot spots and burning.
Start with simple, small pieces vs large or complex designs. Torch firing requires careful control and smaller enameled areas are easier to manage.
Have a bowl of cool water nearby to quickly cool pieces after fusing. Avoid quenching hot items directly in water as this can cause breakage.
With good technique, torch firing can produce vibrant, durable enamel effects without a kiln. But be prepared to work slowly in layers for best results.
The Verdict
When it comes to enameling, having a kiln is certainly ideal but not absolutely necessary. While a kiln provides consistent, controllable heat that ensures proper melting and fusing of the enamel, there are some effective alternatives that allow you to practice enameling without investing in a kiln.
Torch firing and oven firing can successfully fuse enamel if done carefully and properly. Using a torch allows precise application of heat and works well for smaller pieces. An oven set to the right temperature can also fuse enamel to metal, though controlling the heating process can be tricky. With both methods, there is a learning curve involved to master the techniques.
Overall, a kiln is recommended for those who want to pursue enameling seriously or work on larger pieces. But for beginners just experimenting with the craft, enameling without a kiln is certainly feasible. Taking the right precautions and following tips from experienced artists can help you successfully fuse enamel at home without a kiln.
While having specialized equipment is ideal, a lack of a kiln shouldn’t dissuade anyone from giving enameling a try. With some clever techniques and patience, stunning enameled jewelry and artworks can be created kiln-free.


