Advanced Sculpting Skills: Enhancing Your Clay Creations
Clay sculpting has been a popular art form for thousands of years. Evidence of early clay sculptures dates back to 24,000 BCE with the Venus of Dolní Věstonice, a ceramic figurine discovered in the Czech Republic. Clay’s malleability, availability, and ability to harden into a permanent form have made it a favored material for sculptors throughout history. Clay sculptures and figurines were prevalent in ancient Mesopotamia, Greece, Rome, and many other early civilizations.
Today, clay remains a popular medium for both professional and amateur sculptors. Its versatility allows artists to create works ranging from miniature figurines to monumental installations. The therapeutic benefits of working with clay are also well-documented, making clay sculpting an appealing hobby for many. With a variety of clays to choose from and a vast array of sculpting tools available, clay continue to inspire creativity in sculptors around the world.
Tools and Materials
Having the proper tools and materials is essential for sculpting and enhancing your clay creations. Some of the most important sculpting tools include wire loop tools, sculpting knives, clay shapers, and spray bottles. Wire loop tools can create details like scales, fur, or feathers in the clay. Sculpting knives allow you to cut precise shapes and designs. Clay shapers help smooth and blend the clay. Spray bottles are useful for keeping clay workable with a mist of water.
There are several types of modeling clay to choose from. Polymer clay remains flexible after hardening and comes in a wide range of colors. Oil or wax-based clays like plasticine stay soft. Self-hardening clays cure by air drying. The type you choose depends on your project and needs.
In addition to clay, having armatures or frames provides support and structure for sculptures. Wire, wood, and foam can all work as armatures. You may also want to incorporate decorative items like beads, buttons, or found objects to enhance your clay creations.
Shaping and Building Forms
The basic shapes of spheres, cubes, and cylinders are the building blocks of any sculpture. Learning to shape clay into smooth, even forms takes practice, but mastering these elemental shapes will provide a solid foundation for more complex sculptures.
Beginners should start with solid, simple forms before attempting hollow sculptures. To create smooth rounded shapes like spheres, blend and press the clay between your hands applying even pressure. For cubes and cylinders, use hands and basic tools like a roller to flatten the sides.
As skills improve, you can practice hollowing out forms to create vases, bowls, and other vessels. Use your fingers or clay sculpting tools to carve and scrape away excess clay from the inside. Be sure to maintain an even thickness when hollowing to prevent cracking.(1)
Building up figures and forms using armatures or frames provides structural support for complex sculptures. Simple wire frames, aluminum foil balls, or even crumpled newspaper can be modeled into shape with clay. Focus clay around the base, building it up gradually to avoid excess weight that could cause cracking.
Textures and Surface Effects
Adding texture to clay sculptures can make them more interesting and realistic. There are many techniques sculptors use to create eye-catching textures.
Impressing
One way to add texture is by impressing the surface of the clay. This can be done by pressing actual objects into the clay, like leaves, fabric, wire mesh, or corrugated cardboard. Sculpting tools with patterned ends like loops, lines or dots can also impress textures. You can also use your fingers, palms, knuckles or fingernails to imprint the clay.
Incising
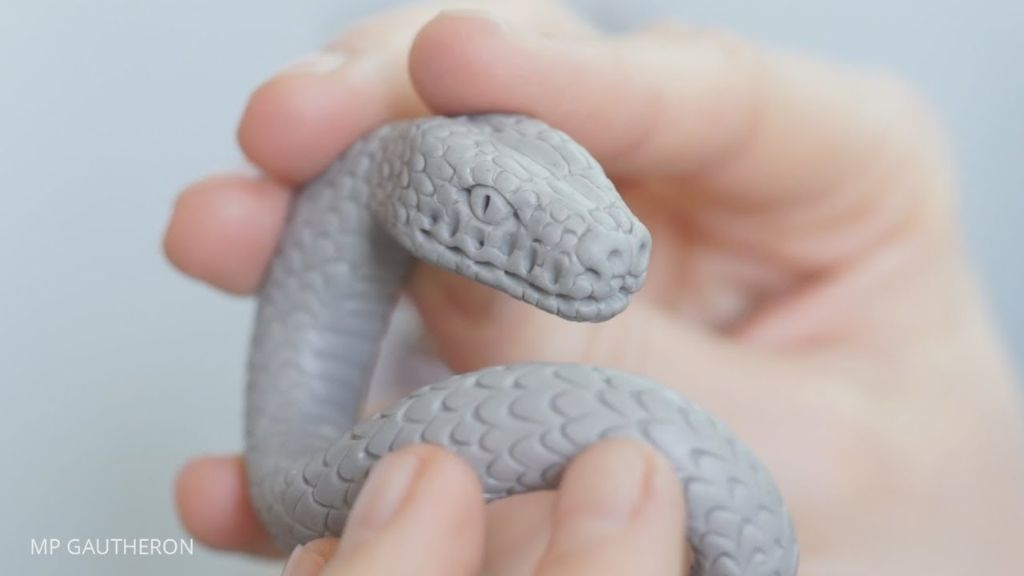
Incising involves engraving lines and patterns into the clay by dragging tools across the surface. Sculpting tools like loop tools, ribs, fettling knives and even pen caps can carve fine lines and grooves. This technique creates beautiful effects like scales on animals or veins on leaves.
Applique
Applying extra pieces of clay on top of the sculpture is called applique. You can cut or tear sheet clay and attach it to certain areas using slip or scoring. This allows you to build up textures and patterns like fur, scales or feathers on animals.
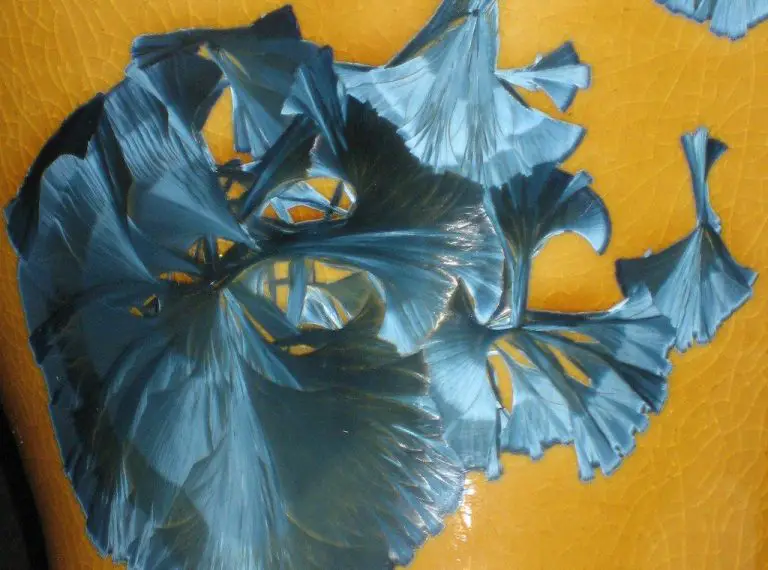
Smoke Firing
Smoke firing introduces color and textures by exposing the clay work to smoke. Combustible materials like sawdust, leaves or paper are burned, and the carbon is embedded into the porous clay. This blackens and stains the surface with organic patterns.
With some creativity, clay can be transformed into a variety of realistic and artistic textures. The possibilities are endless.
Realistic Sculpting
When sculpting realistic human figures, it’s important to carefully observe your subject or reference photos. Pay close attention to anatomy, properly rendering the muscles, proportions, and skeletal structure according to the pose [1]. Accurately sculpting the figure’s proportions and muscular forms will lend realism.
Intricately sculpting details like clothing, hair, and accessories also enhances realism. Study the way fabric drapes and folds over the body, recreating it in clay. For hair, use various loop and coil techniques to suggest flowing locks. AddLife-like facial expressions using subtle changes to the brows, eyes, mouth and wrinkles to evoke emotion.
Consider balance and movement when positioning your sculpture. Observe how their weight shifts and parts of the body counterbalance each other. Allow forms to flow naturally by avoiding stiffness in posing. With careful observation and anatomy knowledge, you can create remarkably realistic human clay sculptures.
Decorative Techniques
There are many ways to enhance the visual appeal of sculptures through creative decoration. Some popular techniques include:
Painting and Glazing
Applying paints, glazes, and stains directly onto the surface of dried clay is a simple yet effective decorative technique. Paint can be used to add color, patterns, textures, or effects like crackling. Clear glazes provide a glossy coat and stained glazes add translucent color. Using multiple layers and combinations allows for rich visual depth and interest.
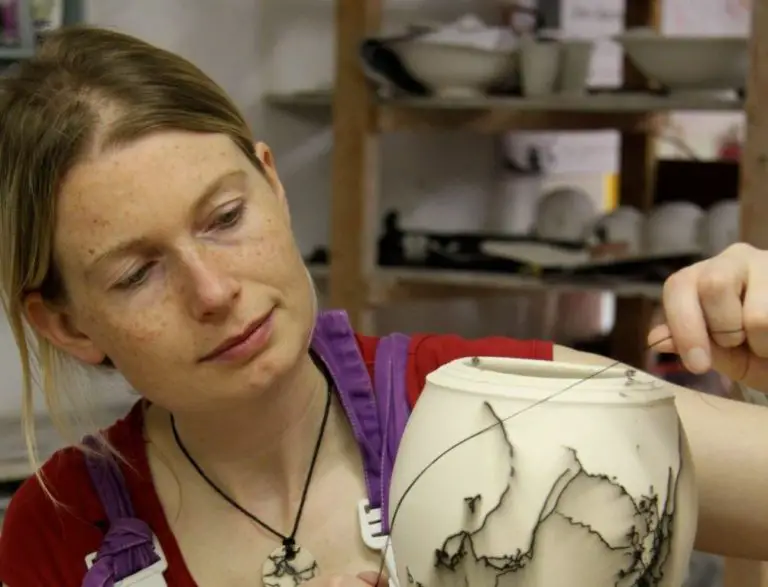
Inlay
Inlaying involves pressing or adhering materials like semi-precious stones, glass, seashells, or ceramic tiles into the surface of leather-hard clay. This creates beautiful embossed effects and color contrasts. The inlaid materials can be whole pieces or crushed into smaller fragments. Plan out designs before insertion and take care not to undermine the structural integrity.
Burnishing
Burnishing is the process of rubbing and polishing sanded clay prior to firing to create a smooth, shiny surface. Fine-grit sandpaper or a polished stone tool is used to compress the clay particles. Burnishing enhances the natural colors and makes details stand out crisply. It can be done over select areas to make them shine against a matte background.
Metal Leaf
Gold, silver, copper and other real metal leaves add an eye-catching touch when applied to fired clay. Adhere small sheets of metal leaf to select areas using specialized glues or size. The thin foil laminates conform beautifully to textures and curves. As the metal tarnishes over time, intriguing antiqued effects emerge.
Finishing and Protecting
After spending hours or days sculpting your clay creation, you’ll want to make sure you finish the sculpt properly so it maintains its beauty. Allowing proper drying time before baking or curing is crucial. Air dry clays need 1-7 days to dry thoroughly, while polymer clays do not require drying time before baking. Follow the manufacturer’s instructions for proper curing temperature and duration for your clay type, as firing it improperly can lead to cracking or other defects.
Once cured or fired, smoothing and refining your sculpture’s surface will give it a clean, professional look. Start with a fine sandpaper (120-400 grit) to remove rough edges and flaws. A clay smoothing tool can blend seams and create smooth curves. Acrylic roller tools are great for flattening surfaces. Avoid over-sanding delicate areas.
Applying a sealer will help protect the finish from moisture, dirt, and oils from handling. Polyurethane and epoxy resin give a high-gloss look. For a matte sheen, try a matte spray sealer. Multiple thin coats are better than one thick coat. Clear acrylic sealer works for both air dry and fired clays. Let the sealer fully cure between coats. With proper finishing and sealing, your sculpture will maintain its beauty for years to come.
Inspiration and Planning
Finding inspiration is an essential first step before beginning any sculpting project. There are many potential sources of inspiration all around us that can spark creative ideas. Observing people, nature, objects, and your everyday surroundings can provide inspiration for subject matter, poses, textures, and more. As noted on LinkedIn, “One of the most obvious sources of inspiration and reference for digital sculpting projects are artworks and sketches, such as paintings, drawings, and photographs” (source). Looking through art books and visiting museums and galleries can also expose you to new styles, techniques, and approaches that can ignite your imagination.
Once you have an initial spark of inspiration, take time to develop concept sketches and small studies to refine your idea before beginning the actual sculpture. Consider what styles, movements, or periods of art history you want to draw upon. As recommended by Artsymposia, “Looking at the sculpture and painting techniques used during the Renaissance, the flowing organic shapes of Art Nouveau, or the distorted figures in Expressionist works” can provide inspiration (source). Let these influences come through in your planning sketches. By taking time for inspiration and concept development, you will create a strong foundation for executing your final sculpted artwork.
Troubleshooting Issues
When working with clay, cracks and crumbles are common problems. This can occur due to the clay being too soft or wet, uneven drying, or joints being too thin. To fix cracks, score the edges of the break with a craft knife, wet it slightly, and press the two sides together firmly. Small cracks can be filled with liquid clay. Let it dry fully before continuing to work (source).
Prevent cracks by keeping clay uniformly moist and wrapped when not working. Allow even, gradual drying and avoid extreme temperature changes. Air pockets cause cracking – pound clay firmly when joining pieces. Build up thin joins gradually. For large sculptures, use wire, wood or other armatures for support (source).
To salvage mistakes, clay can be softened, re-wedged, and reworked indefinitely. For major changes, allow the clay to dry partially before carving away parts to re-sculpt. Be bold and don’t fear destroying your work – some of the best discoveries come from radical alterations (source).
Continuing Your Development
To continue improving your sculpting skills over time, consider joining workshops or classes to learn from experienced instructors. Local art centers, community colleges, museums, and art stores often offer a range of sculpting classes for various skill levels. You can also find online sculpting workshops to learn remotely. Focus on classes that teach new techniques or materials you want to try out. Learning from an expert instructor gives you guided practice as you expand your sculpting knowledge.
Trying new materials and techniques on your own is another way to enhance your sculpting abilities. Challenge yourself to experiment with a material you’ve never worked with before like metal, glass, or found objects. Explore a technique like abstraction or multimedia sculpture. Pushing yourself in new creative directions prevents you from getting stuck in a rut and helps you discover new strengths.
Studying sculpture anatomy and composition allows you to better understand the fundamentals. Look at human anatomy books and take life drawing classes if sculpting figures. Learn about principles of design like balance and movement. Analyzing master sculptures reveals how great artists compose harmonious forms. Understanding these core principles gives you tools to elevate your own sculptures.
Entering art competitions pushes you to produce your best work to impress judges. The deadline and competitive element helps motivate you to go beyond your comfort zone. Receiving recognition for your work validates your talent. Competitions let you network with other artists and get feedback. Use competition successes to build your portfolio and sculpting resume.
When ready to take your sculpting to the next level, consider going professional. This could mean selling your work through galleries or commissions, teaching sculpture, or founding your own business. Build up your portfolio, create a website to showcase work, develop a strong artistic vision, and leverage networks to establish yourself. Going pro requires dedication but allows you to make a career out of your sculpting passion.