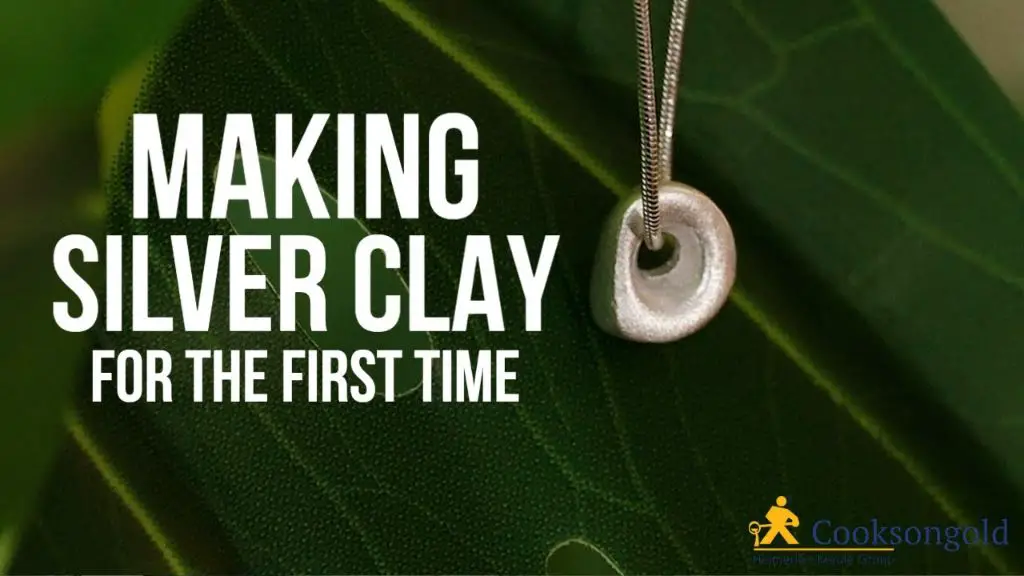
Can You Do Silver Clay At Home?
What is Silver Clay?
Silver clay, also known as precious metal clay (PMC), is a crafting material made of fine silver particles mixed with an organic binder and water (Metal Clay UK). When worked like regular clay, silver clay can be shaped into jewelry, beads, or small sculptures. After drying, the pieces are fired in a kiln or with a torch to burn away the binder, fusing the silver particles into a solid silver piece.
The main ingredients in silver clay are (Silver Clay School):
- Fine or sterling silver particles (typically 60-80% of the volume)
- Water
- Organic binder material such as cellulose gum or polyvinyl pyrrolidone
Silver clay differs from regular pottery clays in that it contains a high percentage of pure silver. It can be shaped like clay, but turns into solid silver when fired. The binder burns away, leaving a pure .999 fine silver piece. This allows creating silver jewelry and objects without smelting silversmithing.
Benefits of Working with Silver Clay
Silver clay provides an affordable and accessible way to work with precious metals from home. The clay contains microscopic particles of pure silver suspended in an organic binder that allows it to be shaped like clay. Once fired, the binder burns away leaving behind 99% pure silver. This makes it possible to handcraft professional looking jewelry without extensive metal working skills or equipment.
One of the main benefits of silver clay is its affordability compared to working with solid silver. Just a small packet contains enough clay to create multiple pieces of jewelry for a fraction of the cost of buying sterling silver sheet and wire. The clay requires only basic sculpting and carving tools to work with so the startup costs are low.
Working with the clay is also an accessible and creative hobby that can be done in a small home studio. Basic handbuilding techniques like rolling coils and slabs allow you to shape the clay into unique jewelry designs. The clay is very forgiving to work with and can be reshaped multiple times before firing, making it great for beginners. Experienced artists also enjoy silver clay for the ability to prototype more intricate designs before casting metal pieces.
Overall silver clay provides an affordable, accessible, and fun creative outlet to make professional looking jewelry at home without extensive tools or skills. The finished silver pieces can be polished to a shining sterling silver finish to wear or sell.
Needed Supplies
To make silver clay art at home, you will need a few basic supplies, most importantly the silver clay itself. The main types of silver clay brands include Art Clay Silver, PMC Silver, and Precious Metal Clay. Silver clay contains pure silver particles mixed with an organic binder and water. It can be shaped just like normal clay when moist. Popular tools for shaping and sculpting silver clay include bamboo skewers, rubber tools, rolling pins, texture sheets, cutters, and stamps.
Apart from silver clay and sculpting tools, you will also need:
- A work surface – This can be a ceramic tile, glass surface, or silicone work mat. Smooth, non-porous surfaces work best.
- A kiln or handheld torch – Silver clay needs to be fired to high temperatures (between 1,260-1,650°F) to burn away the binder. Small tabletop kilns designed for silver clay are convenient, but you can also use a handheld torch.
- Polishing supplies – After firing, silver clay will have a matte finish. Use polishing papers, cloths, brushes, and compounds to create a shine.
- Safety supplies – Work with good ventilation, use kiln gloves and goggles when firing, and avoid touching dry silver clay dust.
Specialized silver clay kits also contain many tools and materials together for convenience. Always work carefully by following manufacturer’s directions for your specific clay brand and firing technique.
Safety Tips
When working with silver clay, it’s important to take proper safety precautions. According to the Metal Clay Academy (https://www.metalclayacademy.com/resources/safety-and-metal-clay/), you should ensure proper ventilation when working with dry clay. Use a respirator or dust mask and work in a well-ventilated area to avoid inhaling any particles. The American Metal Clay Artists group also recommends wearing gloves and avoiding touching your eyes or mouth while working with silver clay (https://amcaw.org/learning-center/safety-metal-clay-and-you/).
When handling silver clay, avoid ingesting it and wash your hands after working with it. Metal Clay Adventures warns that silver clay particles can cause skin irritation for some people, so handle it carefully and clean up thoroughly (https://metalclayadventures.com/blogs/metal-clay-tips-tricks/metal-clay-can-be-hazardous-to-your-health). Work on a protected surface and follow instructions for proper disposal. Taking basic safety precautions allows you to enjoy working with silver clay safely.
Making Silver Clay Art at Home
Making silver clay jewelry and art at home is easy and rewarding. Here are step-by-step instructions on how to work with silver clay to create your own unique pieces:
Condition the Clay: Knead a lump of silver clay until it is smooth, pliable, and free of cracks or air bubbles. Add a few drops of water if needed. Wrap unused clay tightly in plastic to prevent drying out.
Sculpt the Clay: Roll coils, cut shapes with cookie cutters or craft punches, mold pieces by hand, or press into texture mats or found objects. Let your creativity flow!
Allow to Dry: Set aside drying pieces on a non-stick surface for 12-24 hours until no longer cool to the touch. Speed drying with a food dehydrator or hair dryer on low heat.
Fire the Silver: Follow manufacturer guidelines for optimal firing methods like kiln, torch, or stove top. Firing bonds the silver particles and burns away non-metal ingredients.(source)
With some basic supplies, you can easily make stunning jewelry, beads, pendants, charms and more with silver clay right at home. Let your imagination run wild!
Firing Options
There are a few different ways to fire silver clay creations at home without needing access to a professional jewelry studio.
Using a Kiln
Firing silver clay in a small countertop kiln is the most common and preferred method for achieving consistent results. Kilns allow you to precisely control the temperature and firing time. Most silver clay products recommend firing to around 1300-1500°F for 2-3 hours, but always check the specific requirements. Kilns provide even heating throughout the piece to ensure it is fully sintered.[1]
Torch Firing
It is possible to fire silver clay using a handheld gas torch, though it requires more skill. The flame needs to evenly heat the entire piece to avoid under-fired areas. Torch firing is best for smaller, thinner pieces. Move the flame constantly to prevent hot spots. Let pieces cool gradually after torch firing before handling to prevent cracking.[2]
Both kiln firing and torch firing will burn away any binders and leave you with pure silver metal. Kilns provide more control and consistency, while torch firing allows more flexibility.
Polishing and Finishing
After firing, silver clay may still have a rough texture and matte appearance. Polishing and finishing techniques are used to smooth the surface and bring out the metallic shine. There are a few main techniques for polishing fired silver clay jewelry or art pieces:
- Start with a fine grit sandpaper or sanding pad, like 600 grit, to smooth out any obvious irregularities. Work in a circular motion. According to this source, sanding can be done by hand or using a motorized unit for larger pieces.
- Next, switch to a finer grit sandpaper, like 1200-1500 grit, for an even smoother sanded finish. The higher the grit, the more refined the texture will become.
- After sanding, use a polishing compound or paste on a buffing wheel or cotton buff. Apply moderate pressure and buff the piece to a satin sheen.
- Finally, apply a small amount of silver polish to a polishing cloth and buff up the piece to bring it to a high shine. Rub as vigorously as you can, then finish by cleaning with soapy water and drying.
With proper sanding and polishing techniques, fired silver clay can take on a lustrous, smooth finish comparable to cast sterling silver jewelry. Just take care not to overheat the piece when buffing. Work slowly and check the temperature often.
Inspiration and Design Ideas
Silver clay is very versatile and can be used to create all kinds of jewelry and art pieces. From pendants and rings to earrings and beads, the possibilities are endless. Browsing examples of finished silver clay creations can provide inspiration and design ideas.
Pendants are one of the most popular pieces to make with silver clay. Intricate designs like leaves, flowers, feathers, and more can be molded and shaped. Geometric and abstract pendants also have a modern look when done in silver clay. See the Pinterest board “Silver clay easy inspiration” for examples of beautiful nature-inspired pendants.
Rings are another common silver clay piece. The clay can be hand formed into bands or molded over a ring blank for more stability. Decorative elements like leaves or flowers can embellish the band. Stones or crystals can also be set into a fired silver clay ring for sparkle. Wide cuff-style rings have a bold, artistic look when crafted from silver clay.
Delicate and stylish earrings are also very achievable with silver clay. Simple shapes like circles and squares work well, or go for an organic look with leaf and flower motifs. The clay can be rolled thin and cut into any shape for dangle earrings. Lightweight silver clay bead earrings have movement and shine.
In addition to jewelry, silver clay can be sculpted into miniature sculptures, dishes, boxes, and more. The possibilities are truly endless with this versatile material. Browsing the work of others can uncover new ideas and inspiration for your own silver clay designs.
Troubleshooting Common Issues
When working with silver clay, some common issues that may arise include cracking, pitting, discoloration, and trouble getting fine details. Here are some troubleshooting tips:
Cracking
Cracking can occur when the silver clay is dried too quickly or unevenly. To prevent cracking:
– Allow pieces to dry slowly at room temperature instead of using additional heat.
– Avoid drying thick sections too quickly by wrapping them in plastic or damp paper towels.
– Apply slip (liquid clay) to cracks and let dry before continuing to work the piece.
Pitting
Pits and bubbles on the surface are typically caused by trapped air. To minimize pitting:
– Knead the clay thoroughly and slam it against the work surface to release air bubbles.
– Avoid rolling the clay too thin.
– Check for trapped air pockets and remove them before drying the piece.
Discoloration
Discoloration after firing is often due to overheating or impurities in the clay. To prevent discoloration:
– Follow the manufacturer’s firing instructions carefully.
– Make sure kiln temperatures are properly calibrated.
– Use high quality silver clay and dedicated tools.
Trouble with Details
Silver clay can be tricky when trying to capture very fine details or small pieces. Tips for getting good details:
– Let the clay firm up slightly before engraving or carving details.
– Use specialized tools like rubber-tipped sculpting tools.
Displaying and Selling Silver Clay Creations
After spending hours meticulously shaping and firing your exquisite silver clay jewelry or artwork, you’ll want to showcase your creations in the best possible light. Here are some tips for beautifully displaying and profitably selling your handcrafted pieces:
Silver clay art makes for memorable and meaningful gifts for any occasion. Lean into themes and holidays like birthdays, anniversaries, Christmas, Hanukkah, or Mother’s Day when deciding what pieces to create and promote. Carefully wrap each gift in tissue paper and secure in a keepsake box. Include a personal note card explaining the meaning behind the custom design.
To sell online, photograph your work in high resolution on a plain background. Take pictures from multiple angles to accurately convey the piece. On sites like Etsy, clearly list the materials, dimensions, and any other relevant product details. Competitively price your items based on the time and costs involved, materials used, and the current market. Reference prices of similar handmade silver clay jewelry when establishing your pricing structure.
Local art fairs, craft shows, and holiday markets are great opportunities for direct sales. Display your jewelry attractively on a table, jewelry stand, or bust form. Engage customers as they browse, explaining your creative process and inspiration behind each design. Offer business cards and packaged ready-to-give items. Processing cash, card, and mobile payments onsite makes purchases seamless.
Wherever you sell your creations, take pride in your beautiful silver clay craftsmanship. Your unique jewelry and art represent hours of care and dedication. By mindfully displaying and selling your work, you share your passion with others.