Can You Make A Clock In Scratch?
What is Scratch?
Scratch is a free visual programming language and online community targeted at children to teach them coding. It was created in 2007 by the Lifelong Kindergarten group at the MIT Media Lab and allows users to create interactive stories, games, and animations using a drag-and-drop interface to manipulate graphic “blocks” that represent code constructs. Scratch Wikipedia
Scratch aims to make programming accessible and enjoyable for young people, especially those with no previous coding experience. The Scratch platform provides a graphical programming environment rather than requiring text-based syntax. This allows younger learners to engage with core programming concepts like variables, conditional logic, loops and events without getting bogged down in difficult syntax.
Scratch is used in many schools and coding clubs around the world to introduce children to computer science in a fun and creative way. As of 2022, the Scratch website had over 90 million registered members who have shared over 100 million projects created with Scratch. About Scratch The Scratch community allows users to explore projects made by others, remix them and learn from each other.
Getting Started with Scratch
Scratch is a free programming language and online community that makes it easy for anyone to start coding. Scratch runs in any modern browser and does not require any software downloads. To get started with Scratch programming, the first step is to create a free account on the Scratch website. This allows you to save, edit and share projects.
Once logged in, the Scratch interface features a simple drag-and-drop block coding system. The main sections are the block palette on the left which contains code blocks, the sprite area in the center for adding characters/objects, and the stage on the right which displays the output. To start a new project, you can choose a sprite or backdrop from the libraries or paint your own. Simply drag blocks together to make scripts and bring your sprite to life by adding motion, sound, actions and more.
With an intuitive interface and step-by-step tutorials, Scratch allows anyone to quickly learn programming concepts like sequencing, loops and conditionals. After setting up an account, it only takes minutes to go from idea to interactive project. With Scratch’s block-based editor, you can focus on bringing creative ideas to life without struggling with complex syntax.
Making a Clock in Scratch
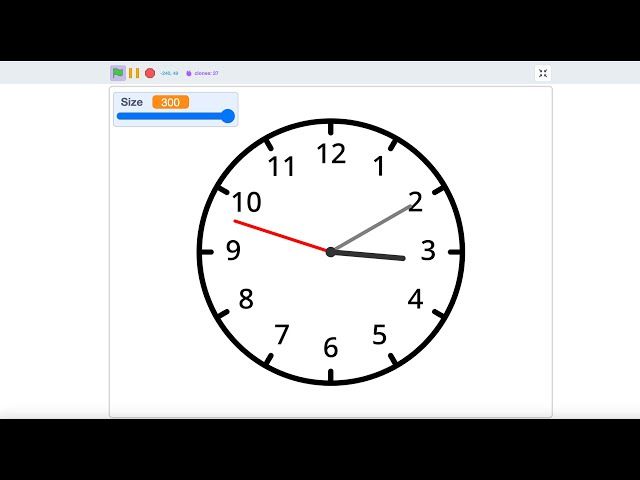
The key to making a working clock in Scratch is to add a sprite for the clock face, import images for the clock hands, use variables to store the time, and create scripts to animate the motion of the hands. Here are the steps:
First, add a new sprite to the stage. This will be the clock face backdrop. You can draw your own clock face, upload an image file, or use Scratch’s built-in paint editor to design the clock face.
Next, import images for the hour, minute, and second hands. Make sure the hands are separate sprite objects that can rotate independently. Position the hands in the center of the clock face.
To track the time, create three variables – one for hours, one for minutes, and one for seconds. Update these variables in the scripts to match the real-time on the computer’s clock.
The key scripts will rotate each clock hand based on the time variable associated with it. For example, the minute hand position can be calculated by taking the minutes variable, dividing by 60, and multiplying by 360 to get the number of degrees to rotate the hand clockwise.
Use a forever loop and the modulus operator (%) to have the hands wrap back to 0 degrees when they reach 360. Adding smooth rotational animation will make the hands move realistically like real clock hands.
With the variables tracking time and the scripts animating the hands accordingly, you’ll have a working customizable clock in Scratch!
Setting the Time
To allow the user to set the time on the clock, we need to create variables in Scratch to store values for the hours, minutes, and seconds. Scratch has a built-in Variables block category that makes it easy to create and manipulate variables.
First, we’ll create three variables called hours, minutes, and seconds by clicking the “Make a Variable” button in the Variables blocks palette. We can set the initial values of these variables to 0.
Next, we need to create a user interface that allows the user to set the time. We can do this by creating number selector spinners for hours, minutes, and seconds using the Sensing blocks. For example:
When flag clicked
Set [hours v] to (0)
Ask [What hour is it?] and wait
Set [hours v] to (answer)
We can use similar blocks of code to get user input for minutes and seconds. Now our variables will store the time set by the user.
As the final step, we need to continually update the values of the time variables. We can create a forever loop that runs a “Timer” block and increments the seconds variable by 1 each second, resetting it to 0 after it reaches 60. The minutes and hours variables can then be incremented accordingly based on the value of seconds.
By using Scratch’s variable blocks to store time values input by the user, we can create a clock that can be set to any time.
Animating the Clock Hands
Once the time variables are set, the next step is to animate the clock hands to rotate based on the time. This can be done in Scratch by using the “point in direction” block to set the direction for each hand.
For the hour hand, its direction can be calculated by doing (hour * 30) + (minute / 2). The hour is multiplied by 30 since each hour on the clock represents 30 degrees. The minute is divided by 2 and added to account for the minute hand’s position.
For the minute hand, its direction can simply be set to (minute * 6) since each minute represents 6 degrees on the clock face.
For smooth animation, these direction blocks should be placed inside Scratch’s “Forever” looping block. The clock hands will then update their position every frame for a nice smooth rotation as time progresses. Using Scratch’s rotation style set to “left-right” will also ensure the hands rotate in the proper clockwise direction.
Here is an example of animating the hour hand based on the time variables:
Forever
Set rotation style [left-right]
Point in direction (hour * 30) + (minute / 2)
Using this technique for both hands results in a nicely animated analog clock in Scratch!
Adding a Digital Display
To show the digital time on our Scratch clock, we’ll need to add a text or number sprite that displays the current hour, minutes, and seconds. This digital display will update dynamically as the clock hands rotate.
The easiest way is to use the built-in text function in Scratch. We can create a text sprite and then set its value to a time variable we create. For example:
set [Time v] to (join (hour) (“:” (minutes) (“:” (seconds))))
This will join the hour, minutes, and seconds variables together with colons to display the digital time. We just need to make sure the time variable updates every second.
To do this, we can add a forever loop to our project that resets Time v to the current time each iteration. Now the digital display will change along with the clock hands.
For more examples and details, see this Scratch forum discussion: Easy Way To Make Digital Clock
Customizing the Clock
Once you have the basic clock functionality working, there are endless creative possibilities for customizing the look and feel. Here are some ideas for making your clock unique in Scratch:
Visuals – You can use any sprites you like for the clock hands and background. Get creative with the themes – use animal characters, food items, robots, or anything else you can imagine. Change up the shapes and textures to match your theme.
Colors – The default Scratch palette has a rainbow of colors to choose from. You can make a vibrant, multi-colored clock or stick to a cohesive color scheme. Try adjusting the color and brightness of the sprites and background for different effects.
Backgrounds – The stage can be customized with backgrounds. Upload your own photos and artwork, or choose from the libraries in Scratch. Add details like numbers, tick marks or decorations around the clock face.
Shapes – The clock hands don’t have to be boring arrows. You can use creative shapes like stars, hearts, or your own custom sprites. Reshape the clocks face as well – try circles, squares, hexagons or other polygons.
With Scratch’s image and sound editing tools, the possibilities are endless for making your clock design unique. Let your creativity run wild!
Saving and Sharing
Once you’ve created your clock project in Scratch, you’ll likely want to save it and potentially share it with others. Scratch makes this easy to do.
To save your Scratch project, simply click “File” from the top menu and then click “Save to your computer.” This will download the .sb3 file to your computer so you can access it later.
To share your project with others, you can publish it online to the Scratch website. First, you’ll need to create a free Scratch account if you don’t already have one. Then, click “Share” from the top menu in the Scratch editor. You’ll see options to share the project to the Scratch website, embed it elsewhere, or get a shareable link.
Publishing to the Scratch website allows others to view, remix, and learn from your project. The Scratch community is full of creative projects shared by Scratchers from around the world. Sharing your clock creation is a great way to contribute and get feedback.[1]
No matter if you want to simply save your clock for personal use or publish it as a creative work, Scratch makes it simple to download and share your projects.
Expanding the Project
There are many ways to expand on the basic clock project in Scratch to add more features and functionality:
You can add an alarm that goes off at a set time. To do this, you’ll need to store the alarm time, continuously check if the current time matches the alarm time, and trigger a sound and visual alert when they match. You can let the user set the alarm time with input blocks.
Creating a stopwatch is another popular extension. You’ll need a variable to store the elapsed time, buttons to start, stop and reset the stopwatch, and code to increment the elapsed time variable each second when running. Display the time in hours, minutes and seconds.
For a timer, you can prompt the user to input a set amount of time. Then decrement a variable tracking remaining time each second. When the time hits zero, stop the timer and display an alert. Let the user reset the timer as needed.
These are just a few ways to build on the clock and leverage Scratch’s features for more advanced time-based projects.
Learning More About Scratch
Scratch offers a wide range of capabilities beyond just making a simple clock. With Scratch, you can create interactive games, stories, music, and art. Some advanced techniques in Scratch include:
– Creating custom blocks to simplify coding
– Integrating multimedia like audio clips and images
– Controlling hardware and electronics using Scratch GPIO extension
– Using variables, lists, and other data structures for more complex programs
To go farther with Scratch, there are many online resources available:
– Scratch provides a library of tutorials and projects to learn from at https://scratch.mit.edu/explore/projects/games/
– FreeCodeCamp offers video tutorials for building games like Pong and Flappy Bird at https://www.freecodecamp.org/news/tag/scratch/
– The book “Scratch Programming Playground” by Al Sweigart provides a deeper dive into advanced Scratch capabilities
With some creativity and dedication, Scratch can be used to make interactive, engaging projects far beyond just a simple clock.


