Can You Make Christmas Ornaments With Air Dry Clay?
Air dry clay, also known as cold porcelain, is an affordable and versatile crafting material that contains no baking or firing. Made from a non-toxic mixture of cellulose, glue, and minerals, air dry clay can be molded into shapes that harden as they dry in the air over 24-72 hours. The finished products feel lightweight yet sturdy.
With its easy workability and bright white color when dry, air dry clay has become immensely popular for do-it-yourself craft projects and ornaments. Many crafters enjoy using it to handcraft custom Christmas decorations. But how suitable is air dry clay for making ornaments to adorn the holiday tree?
This guide will take a deep dive into using air dry clay specifically for Christmas ornaments. We’ll cover the supplies needed, techniques for shaping and embellishing the clay, troubleshooting tips, and creative ornament ideas to make your own beautiful, handmade decorations.
Supplies Needed
Making air dry clay Christmas ornaments does not require extensive supplies. Here are the main items you’ll need:
- Air dry clay– This is the main ingredient. Choose an air dry clay that is lightweight and easy to work with. Look for a clay that dries hard and smooth.
- Clay sculpting tools– You’ll want an assortment of sculpting tools like a roller, carving sticks, and dotting tools. These will help shape the clay and add details.
- Acrylic paint– Acrylic paints work well for painting clay. You’ll need a basic palette of colors like red, green, white, gold, silver, and black.
- Paint brushes– Round and flat bristle paint brushes in small to medium sizes will give you control when painting.
- Clear acrylic sealer– Sealing the finished ornaments gives them a uniform glossy finish and protects the paint.
Making Basic Shapes
Making basic shapes with air dry clay is easy and fun. Start by rolling small balls of clay between your hands to make round ornaments. For teardrop shapes, roll the clay at one end to make a point. You can also mold the clay into 3D shapes like stars, bells, trees, or snowflakes. Pinch and pull the clay gently into the desired shape.
Cutters are a great way to make uniform shapes. You can find Christmas themed cutters at craft stores, or make your own cutters from items around the house. Metal bottle caps, cookie cutters, and the tops of Mason jars all work well. Press the cutter straight down into the clay to cut out clean shapes.
Get creative with household objects to cut custom shapes. Try toothpicks, straws, keys, corks, or skewers. Press them diagonally partway into the clay, then lift straight up to make a carved line or pattern.
Let the cut shapes dry fully before gently removing any excess clay. Make sure to smooth any rough edges for a professional finish.
Adding Texture
One of the best parts about working with air dry clay is how easy it is to add interesting textures. You can press just about any object into the clay to create an imprint. Try using items from around the house like buttons, beads, sequins, coins, keys, feathers, leaves, or flowers. Press them firmly into the clay, but not all the way through. When you remove the object, it will leave an imprint behind. You can also roll the clay out and use a rolling pin over textured items like lace or burlap to transfer the pattern.
There are also many clay tools that can be used to add patterns. Clay cutters are great for making geometric shapes or zig zag lines. Clay rollers with ridges and patterns are useful for adding lined textures. You can find clay tools with shapes like stars, hearts, circles and more to press designs into the clay. Impression mats are rubbery sheets with textures that can be transferred. There are so many options, so try out different tools to find your favorites for creating beautiful designs.
Applying Color
One of the best parts of working with air dry clay is adding vibrant colors and designs. There are a couple key techniques for coloring clay ornaments:
Painting with Acrylics
After the air dry clay has fully hardened, acrylic paint can be used. Painting the ornaments allows you to completely customize the designs. Use paintbrushes to add coats of color. Acrylic paints work well on clay and provide a smooth, even application. Let each layer fully dry before adding another coat of paint.
Marbling with Alcohol Inks
For a marbled look, apply a few drops of alcohol ink or rubbing alcohol to the surface of the clay and gently swirl it around using a skewer or toothpick. The inks will naturally separate into unique patterns. This works best on raw clay before baking. The finished marbled colors will remain after hardening.
Get creative and try mixing colors to achieve new shades. Add patterns like dots and stripes with paint pens. The options are endless when it comes to decorating air dry clay ornaments!
Adding Embellishments
One of the best parts about making ornaments out of air dry clay is having the ability to embellish them by adding decorative elements. There are endless options when it comes to embellishing air dry clay ornaments. Some popular ways to embellish include:
Attaching beads, glitter, sequins etc. to ornament
One easy way to embellish air dry clay ornaments is by gluing various small decorative items to the surface. Sequins, beads, and glitter can all be affixed using a strong glue like E6000. Allow any glue used to fully dry before proceeding.
For a glittered effect, brush a layer of glue onto the surface of the ornament and sprinkle glitter over top, tapping off any excess. Let the glue fully dry before applying any finishing clear coat.
Beads can be meticulously glued on to create patterns and designs. Sequins are another fun option for adding some sparkle. Let creativity guide you when it comes to which embellishments to add.
Wrapping yarn or twine around ornament.
Another easy embellishment technique is to wrap yarn, string, or twine around an air dry clay ornament. Start by brushing a layer of glue over the area you want to wrap. Begin wrapping the yarn tightly around the ornament, securing it with more glue at the end. For a neat look, ensure the yarn lays flat while wrapping with no gaps or overlap. The wrapped yarn adds an interesting texture and pattern to the ornament.
Get creative with different types and colors of yarn too. Yarn with sparkle or metallic sheen can add a festive look to the wrapped ornament. Wrapping an ornament with yarn is an easy way to embellish that both beginners and advanced crafters can accomplish.
Finishing Touches
Once your air dry clay ornaments are completely dry and hardened, the finishing touches will help give them a polished completed look. The two main finishing touches to focus on are spraying with a clear acrylic sealer and adding ribbon, string, or hooks for hanging the ornaments.
Spraying with a clear acrylic sealer is highly recommended. This helps seal and protect the clay, while also giving it a nice glossy finished sheen. Acrylic sealer comes in matte or glossy finishes. For Christmas ornaments, a gloss finish tends to look best. Apply the acrylic spray in a well-ventilated area following the directions on the product. Apply multiple light coats rather than one heavy coat for the best results.
Adding a ribbon, string, or hook is essential for being able to hang and display your finished ornament. Simple twine or ribbon can be tied through a hole in the ornament top. Use a thick gauge craft wire or ornament hook for a more polished and secure hanging method. Hooks can be hot glued to the ornament top. Plan where to place the hanging method before baking the clay, so a hole can be created or area reinforced while the clay is still soft.
Troubleshooting Issues
When working with air dry clay, you may encounter some problems like cracking, paint issues, or slow drying times. Here are some tips for troubleshooting common issues with air dry clay ornaments:
Cracking or breakage
If your air dry clay ornament cracks or breaks, there are a few possible causes. Making the ornament too thin or intricate can lead to cracking. Letting the ornament dry too quickly, either by using high heat like a hairdryer or placing it in direct sunlight, can also cause cracking. To prevent cracks, keep ornaments a little thicker in fragile areas and allow air dry clay to dry slowly at room temperature.
Paint not adhering properly
For paint to stick to an air dry clay ornament, the surface needs to be clean and dry first. Wiping with a damp cloth can leave behind moisture that prevents paint from adhering. Let ornaments dry fully, which can take 24-48 hours with air dry clay, before painting. It also helps to very lightly sand the surface before painting for better paint adhesion.
Drying too slowly
Air dry clay dries through evaporation, so it needs air circulation to dry properly. Avoid drying ornaments in an enclosed space or plastic bag. Drying at room temperature out in the open air will help the clay cure faster. Use a fan directed nearby to improve air flow. Just avoid any high heat sources that could cause cracking. With good air circulation, air dry clay ornaments should dry within 1-2 days.
Creative Ornament Ideas
Use air dry clay to create your own unique Christmas ornament designs. Some fun ideas include:
Snowflakes, snowmen: Sculpt delicate snowflakes or mini snowmen using clay cutouts and toothpicks. Add fine details with a toothpick or skewer. Let your snow creations dry flat.
Trees, wreaths, candy canes: Roll clay snakes to form trees, wreaths, or striped candy cane shapes. Cut out circles for tree bases or wreath forms. Use a toothpick to imprint bark textures or stripes.
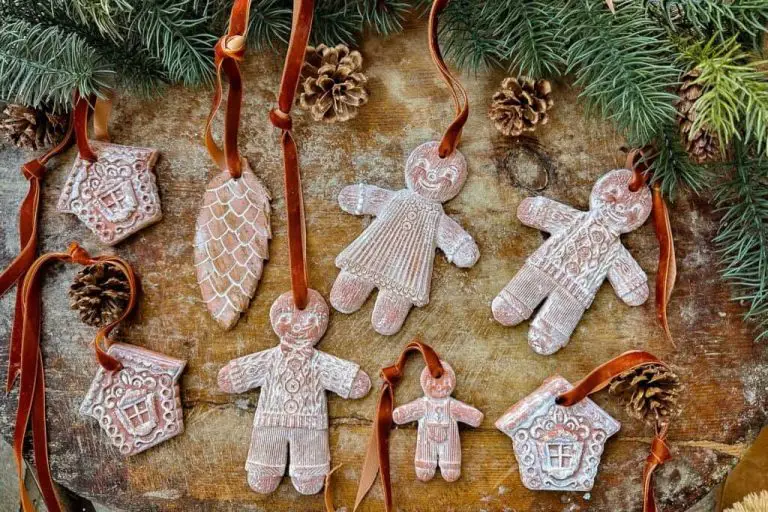
Stars, angels, gingerbread: Cut out basic star, angel, or gingerbread man shapes. Use a straw to cut circles for facial details. Press in lines or shapes for added texture. Let your designs dry hanging with string.
Conclusion
Making Christmas ornaments with air dry clay is a fun DIY project that allows you to unleash your creativity. The key steps include choosing the right clay consistency, making basic shapes, adding texture and color, embellishing with items like glitter or beads, and allowing proper drying time. Air dry clay is an ideal material for ornaments because it hardens into a durable finished product but is easy to work with at the beginning. The lightness of the ornaments makes them perfect for decorating Christmas trees.
With some clay, simple tools, and basic techniques, you can create an endless variety of ornament designs. Let your imagination run wild and make ornaments that reflect your personal style. Try sculpting your favorite animals, objects, or symbols. Make mini scenes by combining multiple shaped pieces. The ornament possibilities with air dry clay are unlimited!
Christmas is the perfect time to tap into your creativity and display your handmade ornaments. Make it a fun project to do with kids or give your personalized ornaments as gifts. No matter what, your air dry clay ornaments will add a heartfelt touch to your holiday decorating.


