Can You Mosaic With Polymer Clay?
What is polymer clay?
Polymer clay is a modeling and sculpting material made from PVC resin and plasticizers. It is an oil-based modeling clay that can be shaped, baked to cure it, and painted once cooled. Polymer clay remains flexible and workable until it is baked in an oven, at which point it hardens permanently.
Some key properties of polymer clay:
- Pliable and easy to shape
- Does not dry out or harden at room temperature
- Can be blended and mixed to create custom colors
- Once baked, it hardens into a strong, durable material
Polymer clay was invented in 1939 by German doll maker Käthe Kruse. However, it did not gain widespread popularity until the late 20th century when companies like Sculpey introduced new polymer clay products to the arts and crafts market.
Today, polymer clay is a popular modeling material used by artists, hobbyists, and crafters to create jewelry, figurines, miniature food items, and more. Its versatility and ability to mimic various materials makes it ideal for a wide range of creative applications.
What is mosaic art?
Mosaic art is the process of creating imagery or patterns using small pieces of materials like stone, glass, ceramics, or other durable materials. The individual pieces, known as tesserae, are placed adjacent to each other and adhered to a surface.
The art of mosaic dates back thousands of years with examples found from ancient Greek, Roman, Byzantine, and Islamic cultures. It was an important technique for decorating floors, walls, ceilings, fountains, and pools with beautiful and intricate designs.
There are various types of mosaic art including:
- Floor mosaics – Found on the floors of homes, temples, public buildings, etc.
- Wall mosaics – Adorned walls and were often used for architectural decoration.
- Ceiling mosaics – Elaborately designed ceilings found in religious structures.
- Fountain and pool mosaics – Decorated large-scale water features.
- Pebble mosaics – Made from rounded pebbles rather than tesserae.
- Micromosaics – Extremely detailed mosaics using tiny tesserae.
Mosaic artists arrange the tesserae to create stunning imagery and geometric patterns. The earliest mosaics often depicted scenes of nature, mythology, religion, and daily life.
Benefits of using polymer clay for mosaics
Polymer clay offers a number of advantages for creating mosaic art. Here are some of the key benefits of using polymer clay for mosaics:
Lightweight
Polymer clay is very lightweight, especially compared to materials like ceramic tile or glass. This makes polymer clay mosaics much easier to work with, transport, and hang on walls without excessive weight.
Flexible
Polymer clay remains flexible even after baking, unlike ceramic materials. This flexibility allows the clay tiles to be shaped as needed and makes the finished mosaic more durable and resistant to cracking.
Easy to Work With
Polymer clay is very easy to condition, soften, blend, sculpt, cut, and shape as desired. This enables creating customized mosaic tiles in any shape imaginable. The clay is readily available in craft stores and requires no specialized tools.
Durable
Finished polymer clay mosaics are surprisingly tough and durable, especially when properly sealed. Polymer clay maintains its color well over time and won’t chip or crack like ceramic. Polymer clay mosaics can withstand normal indoor and outdoor temperature changes.
Challenges of Using Polymer Clay for Mosaics
While polymer clay offers many advantages for mosaic art, it also comes with some unique challenges to be aware of. Two of the biggest challenges are that polymer clay mosaics can’t be grouted like tile, and they require more finishing steps.
Traditional mosaic tiles are set into a bed of mortar or thinset and then grouted between the tiles. This helps lock the tiles in place and creates clean lines between them. However, grout can’t be used with polymer clay because the clay is flexible and porous. Using grout would crack the clay tiles and cause them to break apart.
Instead, polymer clay mosaics must be sealed and finished in other ways. A clear finish like polyurethane, epoxy resin, or UV resin is usually applied over the entire mosaic surface. This helps protect the clay and provides a smooth finish. The artist may also back the mosaic with another material like wood, glass, or metal to create a sturdier piece.
Applying a backing and finish can add time and complexity to the mosaic process. The sealants also require proper handling, ventilation, and drying time. So polymer clay mosaics demand more patience and care on the finishing steps than traditional tile mosaics.
Best practices for polymer clay mosaics
To create stunning polymer clay mosaics, follow these best practices for proper conditioning, baking, using armatures, and surface preparation:
Properly conditioning the clay is crucial for achieving a cohesive, flexible material that bonds well. Knead each color thoroughly before use, and continue kneading scraps when re-mixing colors. Conditioning blends the ingredients evenly and makes the clay malleable.
Follow the manufacturer’s instructions for baking time and temperature. Underbaking leaves clay sticky and prone to cracking and peeling. Overbaking results in darker colors and a brittle mosaic that may warp. Slow baking at a lower temp provides the best results.
For a sturdy mosaic piece, build the design on an armature backing. Options include wood, plastic mesh, cardboard, ceramic, glass, and metal. The armature should be clean and free of dust and oils. Apply a primer if needed for better clay adhesion.
Properly prepare the mosaic surface for maximum clay bonding. Remove any protective film, wash away dirt and oils, and lightly sand glossy surfaces. Wipe clean and apply a primer or acrylic paint layer before adding clay.
Polymer Clay Mosaic Techniques
There are several unique techniques used to create stunning polymer clay mosaics.
Slicing
Slicing involves cutting thin, even slices of polymer clay and arranging them into mosaic patterns. The slices can be cut using a tissue blade or clay cutter. Slicing allows you to reveal colorful layers and patterns within polymer clay blocks.
Caning
Caning refers to creating long, thin rods of polymer clay known as canes. These canes can display intricate designs and color patterns when sliced. The cane slices can then be used to form mosaics. Some common caning techniques include bullseye canes, zigzag canes, and checkerboard canes.
Millefiori
Millefiori mosaics are made using canes created through the millefiori technique. This involves forming a composite cane with colorful polymer clay patterns visible when sliced. The cane is then cut into thin slices to produce floral-style mosaics.
Scribing
Scribing involves using a tool to carve lines and patterns into a polymer clay surface. The carved clay can then be sliced to create mosaic tiles with embossed designs. Scribing allows for diverse textural effects in mosaics.
Polymer Clay Mosaic Tools
Having the right tools makes working with polymer clay for mosaics much easier. Here are some of the most useful tools for polymer clay mosaics:
Clay Cutters
Clay cutters allow you to neatly and efficiently cut your clay into uniform pieces and shapes for mosaics. Tissue blades, needle tools, and various clay cutter sets with blades and wires are handy.
Rollers
Using a roller makes it easy to roll out slabs of consistent thickness. An acrylic roller is ideal. You can also use brayers, pasta machines, and clay dedicated rollers.
Texturing Tools
Texturing tools like stamps, texture sheets, silicone molds, and various sculpting tools allow you to add interesting textures and patterns to clay pieces.
Work Surface
Having a smooth, dedicated work surface makes working with the clay easier. An acrylic sheet, glass work surface, or smooth ceramic tile works well. Avoid porous surfaces that can absorb clay.
Polymer Clay Mosaic Projects
Polymer clay is a versatile medium for creating mosaic art in many forms. Here are some of the most popular polymer clay mosaic projects you can make:
Jewelry
Mosaic pendants, beads and earrings make wonderful jewelry pieces. You can press tiny bits of polymer clay in different colors and patterns into jewelry molds to create mosaic effects. Or roll out and cut sheets of clay into tile shapes to assemble mosaic beads and pendants.
Coasters
Coasters are a perfect small canvas for polymer clay mosaics. Simply roll out a slab of clay for the base, then arrange your mosaic clay pieces on top and smooth them out. Add a coaster back after baking if desired.
Boxes
You can cover small lidded boxes with mosaic polymer clay designs. Cut tile shapes, decorate the surface of the box, overlap the pieces and blend them together using a clay smoothing tool. The result is a one-of-a-kind mosaic box.
Wall Art
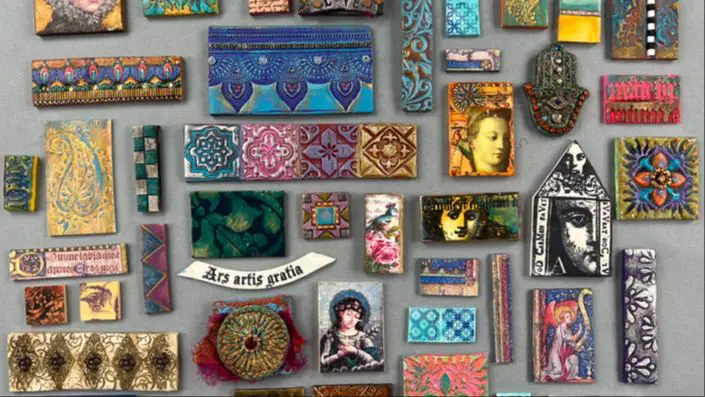
For larger scale mosaic art, create wall hangings and panels with polymer clay tiles. Cut out uniform clay shapes, or use irregular pieces for an abstract look. Layer and blend the clay pieces to form landscapes, geometric patterns or nature-inspired designs.
Tips for Successful Polymer Clay Mosaics
Creating stunning polymer clay mosaics requires practicing good techniques. Here are some tips for success:
Work cleanly: Dust and debris can get pressed into the clay, ruining the smooth finish. Work on a clean, lint-free surface and avoid overhandling the clay. Keep your hands, work surface, and tools clean.
Condition clay: Knead and warm the clay before use, which softens it and makes it easier to manipulate without cracking. Conditioning blends the ingredients and allows the clay particles to slide smoothly against each other.
Use release: Prevent baked clay pieces from sticking to your work surface by applying a thin layer of cornstarch, talcum powder, or commercial release agents. Carefully brush away any excess powder before baking.
Bake thoroughly: Polymer clay cures through heating in the oven. Ensure even baking by preheating the oven and allowing ample time for the clay to fully cure. Check manufacturer instructions for proper temperature and baking times. Underbaked clay will be tacky and prone to damage.
Inspiring Polymer Clay Mosaic Artists
Polymer clay mosaic art is filled with creative and talented artists who are pushing the boundaries of the medium. Here are some inspiring artists to check out who are producing groundbreaking polymer clay mosaic work.
Cynthia Tinapple is a leader in contemporary polymer clay mosaics. She invented new techniques like the Skinner Blend to achieve amazingly life-like effects. Tinapple skillfully captures light, color and textures in her detailed mosaic art. She’s an innovator who has inspired many others.
Angela Mabray’s mosaic work combines polymer clay with glass, beads, and found objects. She embraces imperfections and asymmetry in striking abstract pieces. Mabray takes risks with unusual color combinations, shapes and textures. Her one-of-a-kind mosaic sculptures astound.
Isabelle Collin Dufresne pushes the envelope with 3D sculpture. Her imaginative masks, vessels, and wall art incorporate layers of intricate polymer clay mosaic patterns. Collin Dufresne’s technical expertise produces subtle blends and details that are awe-inspiring up close.
These are just a taste of the incredible polymer clay mosaic artists to discover. Their innovative approaches to the medium take mosaic art to new heights. Exploring their work is sure to ignite creativity and inspiration.


