Can You Use Shino Glaze In An Electric Kiln?
What is Shino Glaze?
Shino glaze originated in Japan during the Momoyama period (1568-1600) and gets its name from Shino, a town in central Japan (wikipedia source). It was developed as one of Japan’s first white glazes using local feldspar (commonwheel source).
Shino glazes are known for their distinctive white, satin-like appearance and texture. A key characteristic is the crackle effect that forms as the glaze contracts during firing, creating fine crazing lines on the surface (ippodo gallery source). Shino glazes can also develop red scorch marks or blushes where the glaze pools thicker during firing.
The colors of Shino glazes range from stark white to warm creams, grays, and ivories depending on clay body, firing temperature, and atmospheric conditions in the kiln. The matte texture contrasts nicely with the smooth clay body underneath.
Shino Glaze Ingredients
Shino glazes are characterized by their unique matte white appearance and crackled texture. The key ingredients that produce these effects are clay and minerals high in silica and sodium such as feldspar.
The high silica content derived from minerals like feldspar and quartz promotes the growth of microscopic crystals during firing which leads to the crackled surface. The high sodium levels from feldspar also help produce small cracks. Typically, shino glaze recipes contain about 70-80% feldspar mixed with 20-30% clay.
Specific minerals that contribute to shino’s distinctive crackled texture include soda feldspar, spodumene, petalite and quartz. These provide adequate silica and flux while promoting crystal growth through sodium and potassium. The clay in shino glaze provides an iron source which contributes to the pale orange colors often seen in finished results.
In summary, it’s the unique blend of high-sodium, high-silica minerals mixed with iron-rich clay that produces the characteristic matte, crackled and subtly colored results synonymous with shino glazes.
Firing Shino Glaze
Shino glazes are typically fired between 2200°F and 2350°F (1204°C – 1288°C), with the ideal temperature being around 2300°F (1260°C). Firing too low, below 2200°F, can result in a bare clay surface with minimal glaze effect. The glaze needs adequate heat to fully melt and produce the signature milky, crawling effect of a shino glaze. According to digitalfire.com, firing between 2280°F and 2320°F tends to produce the most interesting shino surfaces.
Overfiring shino glazes, above 2350°F, can cause excess melting of the glaze resulting in a glossy surface without the desired matte, crawling effect. It can also lead to pinholing or bubbling. Keeping the temperature in the optimal 2200°F – 2350°F range will bring out the best characteristics of shino glaze.
Using Shino in Electric Kilns
Shino glazes can be successfully fired in electric kilns. Electric kilns provide some advantages over traditional wood-fired kilns when firing shino glazes:
Electric kilns allow for precise temperature control during the firing process. This is important because shino glazes require specific temperature ranges to achieve their signature crackled effects. With an electric kiln’s pyrometer, the temperature can be closely monitored and adjusted as needed (“Techno File: Visual Arts Shino”).
Electric kilns heat up and cool down at controlled rates, unlike the unpredictable cooling of traditional anagama wood-fired kilns. The gradual cooling phase is key for proper development of shino’s crackle patterns. Ramping the kiln temperature down slowly, about 100°F per hour, will produce the best results.
It’s also important to note that shino glazes often require an oxygen-rich atmosphere during firing. Make sure the peepholes are open and kiln vents are unblocked when firing to allow adequate airflow and oxygen into the kiln chamber.
Electric Kiln Firing Tips
When firing shino glaze in an electric kiln, proper programming and controlling of the heat is important for achieving the desired results. Electric kilns allow you to program precise heating rates, target temperatures, and hold times (The Basics of Firing Electric Kilns). It is recommended to program the kiln to heat up slowly, generally no faster than 200°F per hour. A slow, gradual increase in temperature allows the shino glaze ingredients to react properly through the various heat stages. Rapid heating can cause flaws like pinholes, cracking, or crazing in the finished glazed surface.
Proper placement and spacing of the pottery pieces is also crucial when firing shino glaze in an electric kiln. Pieces should be spaced 1-2 inches apart and placed on stilts or kiln posts to allow adequate airflow and prevent glaze contact between pieces (Firing in an Electric Kiln). Grouping pieces according to size can help prevent smaller items from being overfired. Avoid stacking glazed pieces directly on top of one another. Following these tips will provide the ideal firing environment to achieve the unique crackled texture and details that make shino glaze so distinctive.
Achieving Desired Effects
When firing shino glazes in an electric kiln, it’s important to properly troubleshoot any cracking or crazing that may occur. Cracking and crazing are common issues when firing shino glazes to higher temperatures. To avoid cracks, slowly increase to the peak temperature and allow sufficient hold time for even heat distribution. Going too fast can result in uneven expansion. For crazing, adjust the clay body or glaze to be more closely aligned. Consider switching to a stoneware clay body if using earthenware. Or increase the silica and alumina in the glaze recipe while decreasing fluxes like calcium or sodium [1].
Firing schedule and temperature impact the colors achieved with shino glazes. At lower cone 04-06 temperatures, shino glazes produce earthy oranges, rust reds, and smokey grays. Going to higher temperatures like cone 6 can yield more dynamic effects with blues, greens, purples, and pinks. The reduction environment is key, so make sure sufficient hold time is allowed. Fast firing or insufficient ventilation may not allow full development of the colors. Test sample tiles first to hone in the schedule and identify the optimal peak temperature for your desired colors and effects.
Popular Shino Glaze Recipes
Shino glazes are known for their subtle colors and natural aesthetic. There are many standard recipes that can achieve the distinctive Shino look. Here are some of the most popular variations:
This versatile cone 6 Shino glaze from Ceramics Monthly has a cream colored base with orange flashing:
– 25% Nepheline Syenite
– 25% Kentucky Ball Clay
– 50% Silica
For a whiter base try this cone 10 Shino recipe from Digitalfire:
– 20% Whiting
– 35% Potash Feldspar
– 45% Silica
Mixing and preparing a Shino glaze involves standard practices like wedging and sieving dry materials. Specific tips include:
– Use pots with high alumina content to allow subtle effects to show through
– Mix to a creamy consistency before applying thinly to bisqueware
– Use a soft brush to apply evenly and brush-out lump
– Allow to dry completely before firing
Tips for Applying Shino
There are a few techniques for applying shino glaze to pottery pieces:
Brushing: Using a soft brush to apply shino allows you to evenly coat the piece while controlling the thickness. Brush in smooth, even strokes and allow to dry between coats. Shino is very thick, so brushing tends to work better than pouring or dipping when going for a thinner application. According to D. Michael Coffee, shino is commonly brushed on first before other glazes because of its viscous nature.
Dipping: Dipping the piece in shino will provide an even, thick coat. Allow the piece to dry between dips for multiple coats. According to Coyote Clay, pieces can be dipped in shino and then dipped in a second glaze color to create interesting overlapping effects.
Pouring: Pouring shino over vertical surfaces can create drips and thick sections. Only use the pouring method if you desire those effects. It can be challenging to control the thickness and evenness when pouring.
In general, 2-3 coats of shino glaze are recommended regardless of application method to achieve an opaque, smooth surface. Allow the piece to dry completely between coats to prevent dripping or unevenness in the final firing.
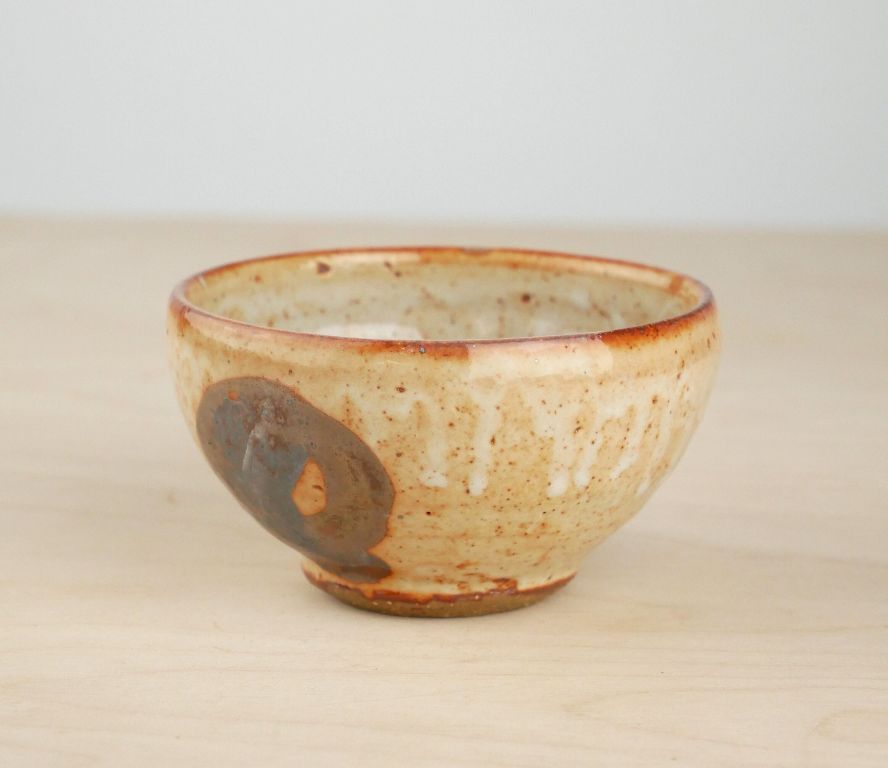
Examples of Shino Glazed Pieces
Shino glazes produce a distinctive matte white finish with fine crazing lines that give depth and texture to the surface. The glaze accentuates the natural clay body and brings out subtle colors and patterns in the clay. It is often used in combination with other glazes to create striking visual effects.
Here are some examples of beautiful ceramic pieces glazed with shino:
- This covered jar combines shino with a blue glaze on the lid and base for visual contrast (https://www.pinterest.com/pin/439219139001881742/). The shino provides a muted backdrop that makes the blue glaze stand out more.
- This ceramic bowl has shino dripping down from the rim over a red copper glaze below (https://www.pinterest.com/pin/253216861656991633/). The combination produces a fluid, organic look.
- This tall vase uses shino on the upper third and a dark brown glaze on the lower section (https://www.pinterest.com/pin/303500462365284894/). The simple color blocking creates an elegant look.
- This piece combines shino with temmoku glaze in a brushed-on technique for a mottled effect (https://www.pinterest.com/pin/439219139001881742/). The contrasting matte and glossy textures are eye-catching.
Shino is very versatile and can be combined with all types of glazes in different ways to produce unique finished pieces. The cracking and texture takes on the colors layered over or under it for beautiful effects.
Shino Glaze Safety
When working with any ceramic glaze, it’s important to take proper safety precautions. According to Coyote Clay, while their liquid Shino glazes are considered non-toxic under normal use conditions like brushing, pouring, and dipping, it’s still smart to use caution.
Some key tips for safe Shino glaze handling include:
- Wear a protective mask when mixing dry glaze materials to avoid breathing in dust
- Use gloves when applying liquid glaze
- Wash hands thoroughly after glazing
- Never ingest glazes or use glazed pottery for food storage/serving without testing for potential leaching of lead and cadmium
It’s also important to note that even low-fire glazes rated as food-safe when mature should not come into contact with acidic foods and beverages which can allow metals to leach out over time (Ceramic Arts Daily). Proper firing to maturity helps create a stable glass surface that prevents leaching.
By taking basic precautions, ceramic artists can safely enjoy working with Shino glazes and achieve stunning artistic effects.