15+ Beautiful Diy Fabric Flowers
The beauty of flowers is undeniable, but their fleeting nature can be a drawback. What if you could enjoy the elegance of blooms without the worry of them wilting and dying after just a week? The solution lies in fabric flowers, which when created and cared for properly, can last a lifetime. In this article, we’ll delve into the world of fabric flowers and explore 15 different techniques to create your own stunning arrangements, from simple to elaborate designs.
Black layered flower
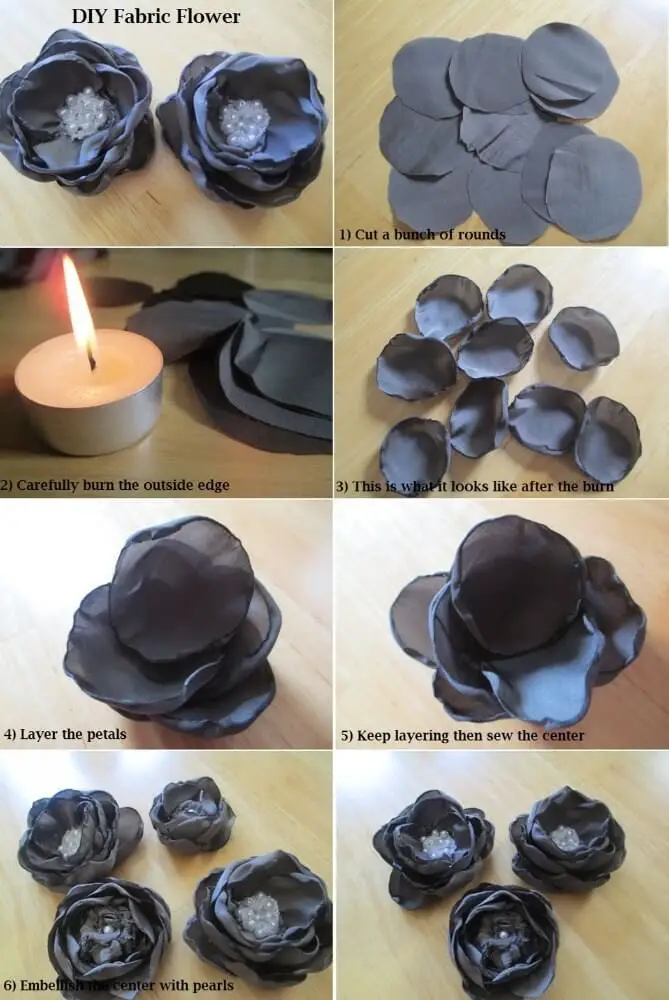
To create a delicate and intricate design, you’ll need a few simple materials. Begin by cutting out 16 round shapes from black silk-like material that has a high flammability rating. Next, carefully burn the outer edge of each round to give it a petal-like shape. Once you have your petals prepared, start layering them together using a glue gun, securing each one as you go. To add some visual interest, place a few pearl beads in the center of the flower and secure them with glue.
Desert Rose
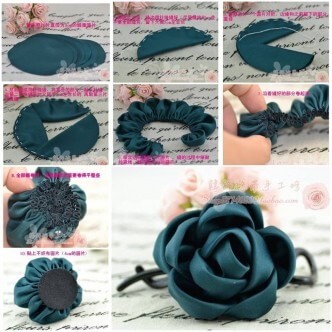
To create this design, you’ll need a few basic materials: two colors of fabric, a needle, and some thread. The technique we’ll be using is called rouging, which involves creating a series of crescent shapes that are stitched together to form a ruffle-like texture. To start, cut out the rounds depicted in the image, then fold each one in half and begin stitching at the point where the two ends meet.
As you work your way around the circle, add additional crescent shapes, ensuring that the ends of each shape overlap slightly. Continue this process until you’ve completed a full circle, at which point you can pull gently to create the desired ruffle effect. Next, fold the fabric repeatedly, allowing the texture to emerge and eventually taking the form of a rose.
Ruffled satin flower
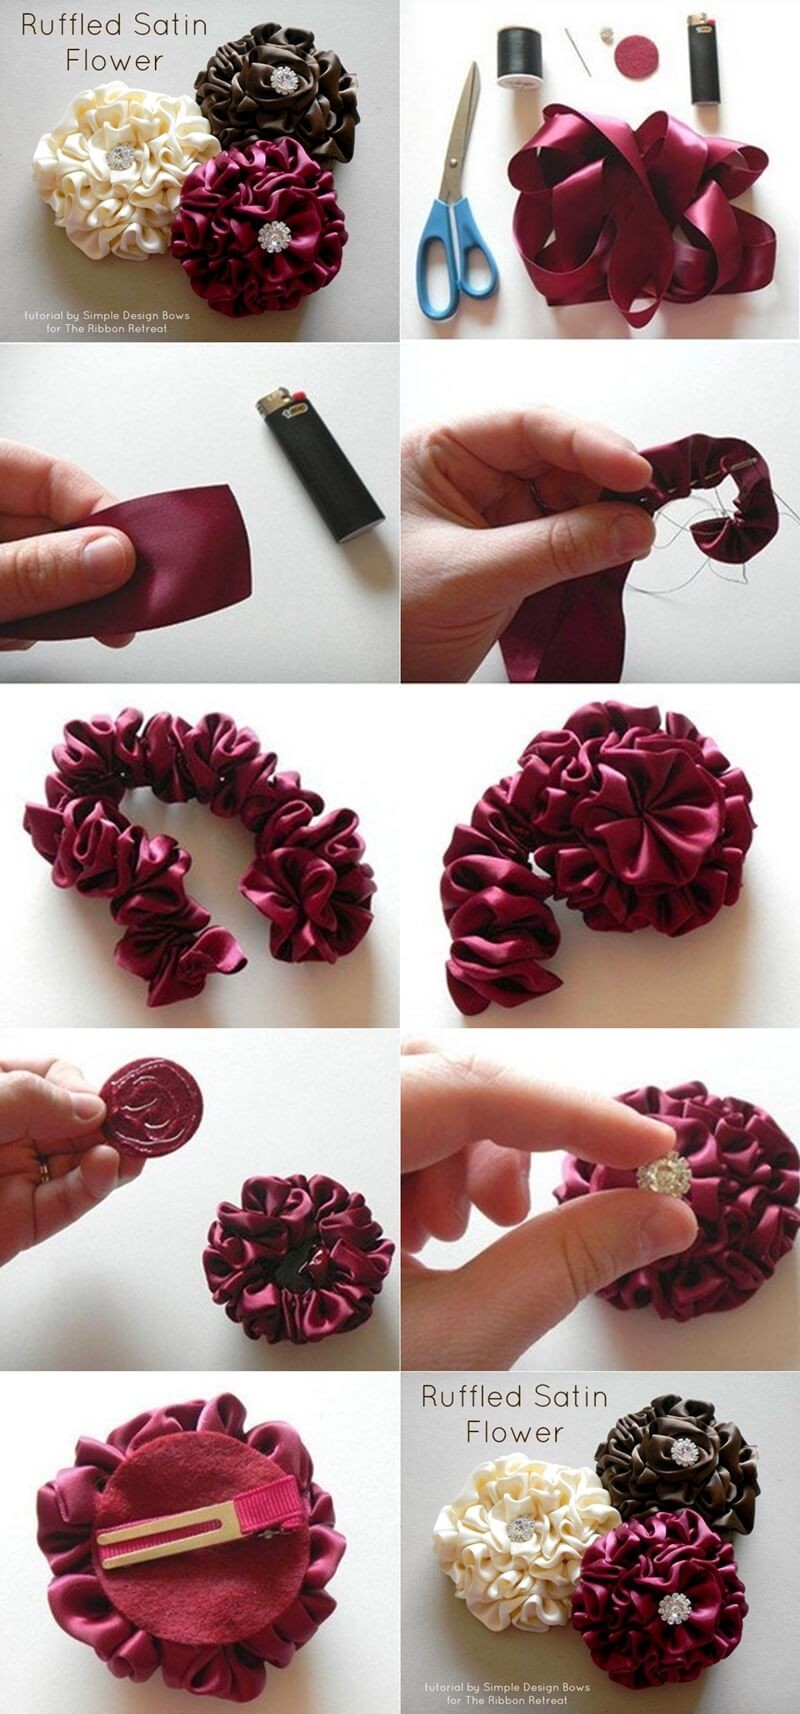
To create this delicate floral design, you’ll need a few basic materials: scissors, a lighter, a needle and thread, and the material itself. Begin by cutting the fabric into strips, folding each strip in half to create a crease. Then, start stitching the open ends together, gradually building up the shape of your flower. To add some texture and dimension, lightly burn the outer edge of the fabric strips, carefully curving them to create a natural ruffle.
As you continue stitching, the fabric should naturally begin to pucker and take on a soft, puffed appearance. Next, twist each strip into a long, thin coil, allowing the coils to interlock and form the foundation of your flower. Finally, position the small satin circle in the center of your creation, adding beads or other embellishments as desired to give your bloom a lifelike sheen.
Hand-sewn flower
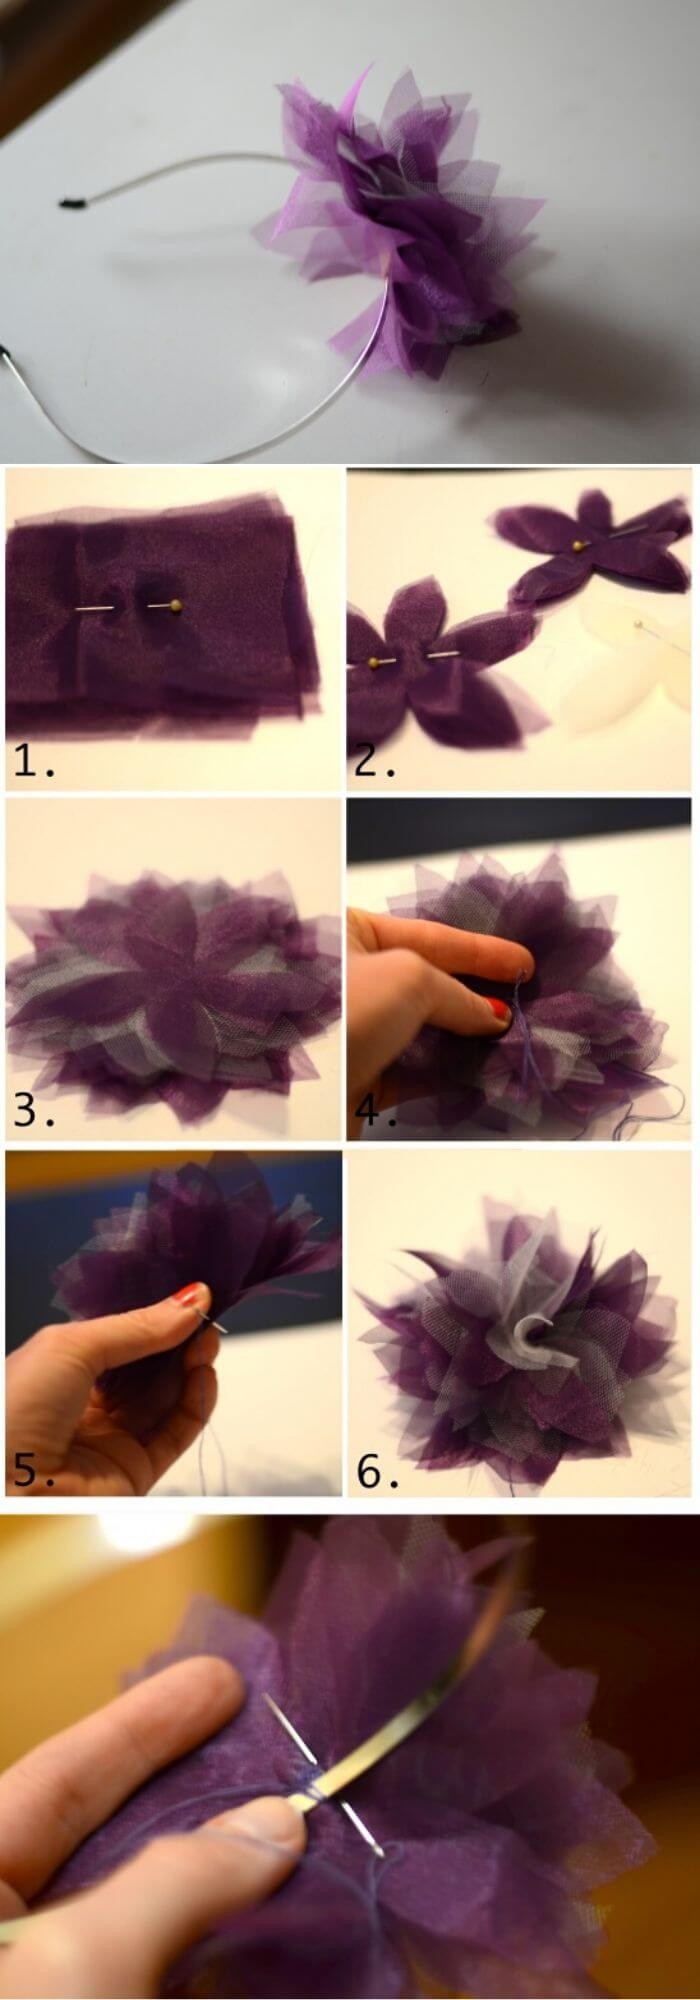
To create this intricate, hand-sewn piece, you’ll need a few basic materials. First, gather two types of mesh material – each with its own unique texture or pattern to add visual interest. You’ll also require a needle and thread, which will be used to bring your design together. Once you have these essentials in hand, you can begin the creative process.
Start by cutting out star-shaped flowers using two different sized templates.
This will give you a sense of depth and dimensionality when layered together. Begin building up your design by layering the various colors on top of one another – don’t be afraid to experiment and adjust as needed until you’re satisfied with the overall size and look.
Finally, gather your bundle together using your thumb and forefinger, then begin stitching through the middle, securing all parts in place.
With patience and attention to detail, you’ll be able to create a truly unique piece that showcases your handiwork.
Easily rolled Muslin roses
To create this unique decorative piece, you’ll need some essential materials: strips of muslin cloth, scissors, a hot glue gun, and glue sticks. The process is surprisingly simple. Begin by knotting one end of the muslin cloth to secure it in place. Next, twist the cloth until a tight cigar-like shape forms. As you continue twisting, allow the fabric to roll in on itself, securing it with small amounts of hot glue as needed.
This repetitive motion will help create a cohesive and visually appealing design.
Five-minute flowers
To get started, gather the necessary materials: a needle, thread, and a diamond-shaped fabric cutout. Begin by folding the diamond in half once, then fold it in half again. Hold the open ends facing towards you, creating multiple identical shapes as needed. Then, start sewing these shapes together.
Basic small flower
To add definition to your small flower cut-outs, you’ll need to take an extra step beyond creating the basic shape. One way to do this is by sewing a line above each petal and then pulling it tight. This will help create a more realistic and defined appearance for your flowers.
Felt flower cut-outs
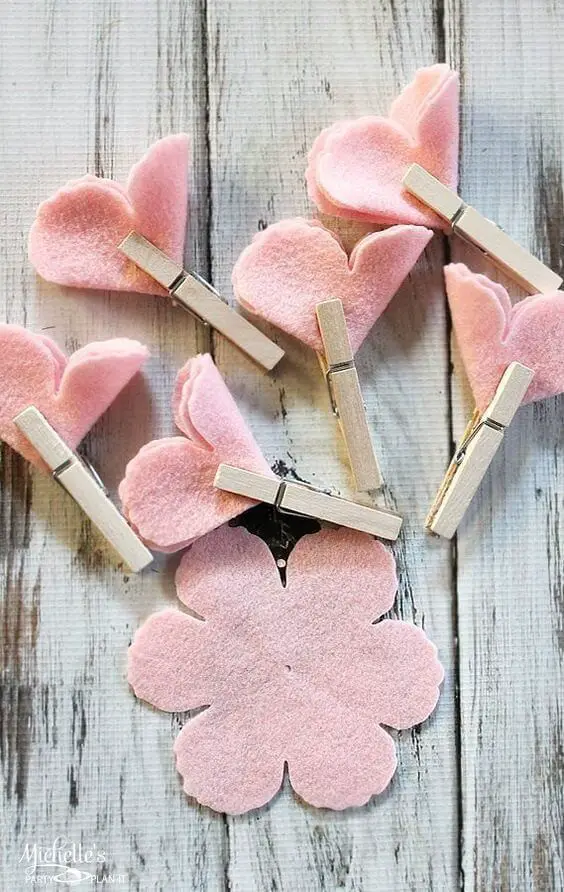
To complete this DIY craft, you’ll require some essential materials, including felt cut-outs, scissors, and a needle with thread. Begin by cutting a circular opening in the center of your flower-shaped felt piece using your scissors. Next, use your needle to sew around the perimeter of the hole, making sure to keep the stitches tight as you work.
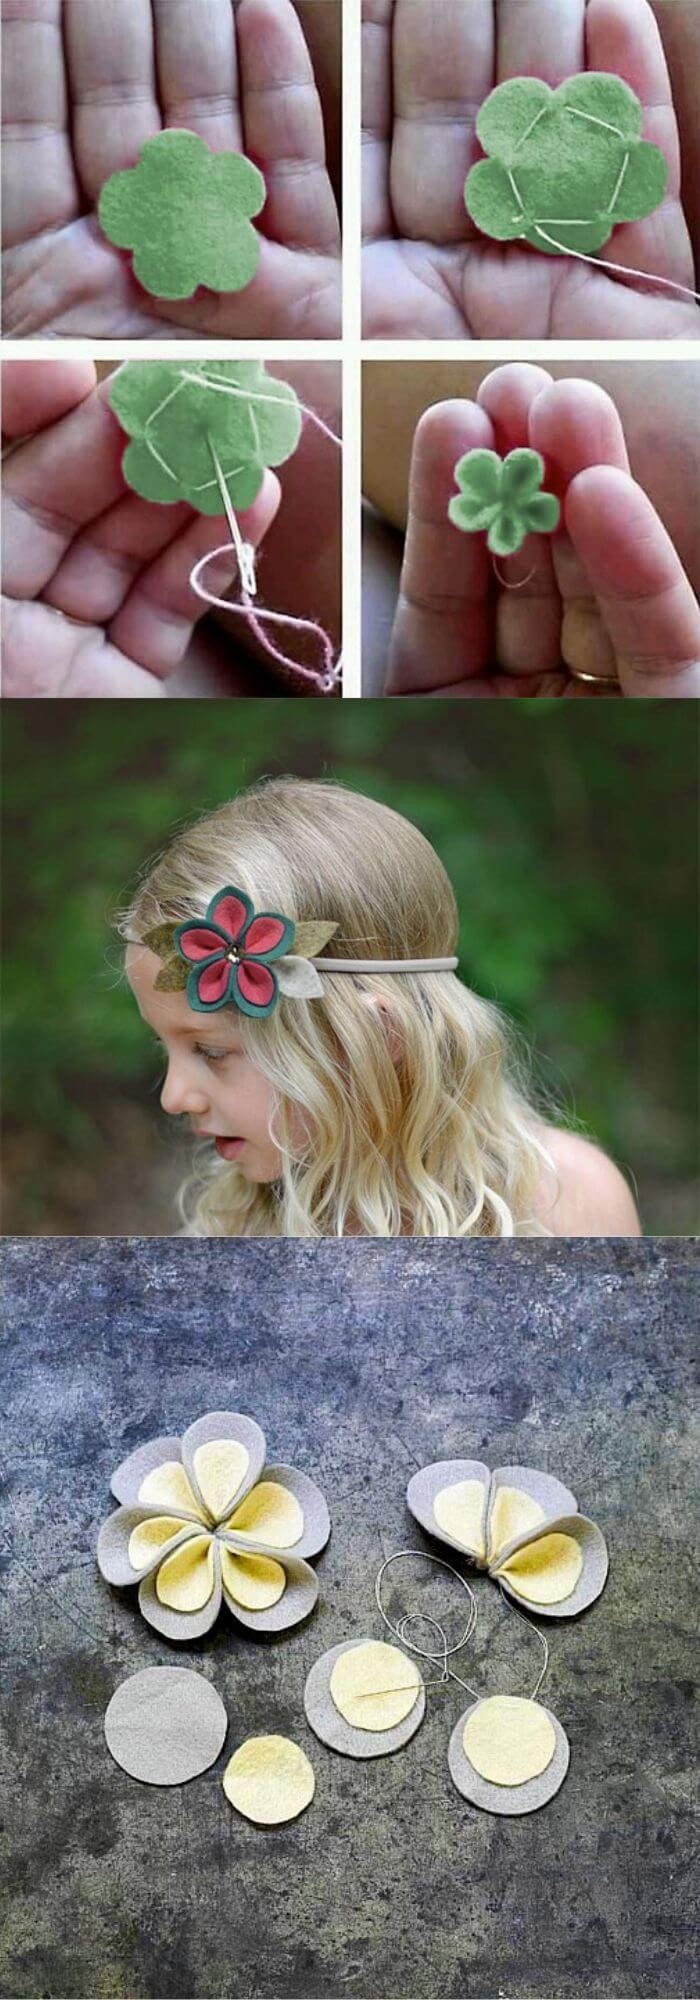
Felt and button flowers
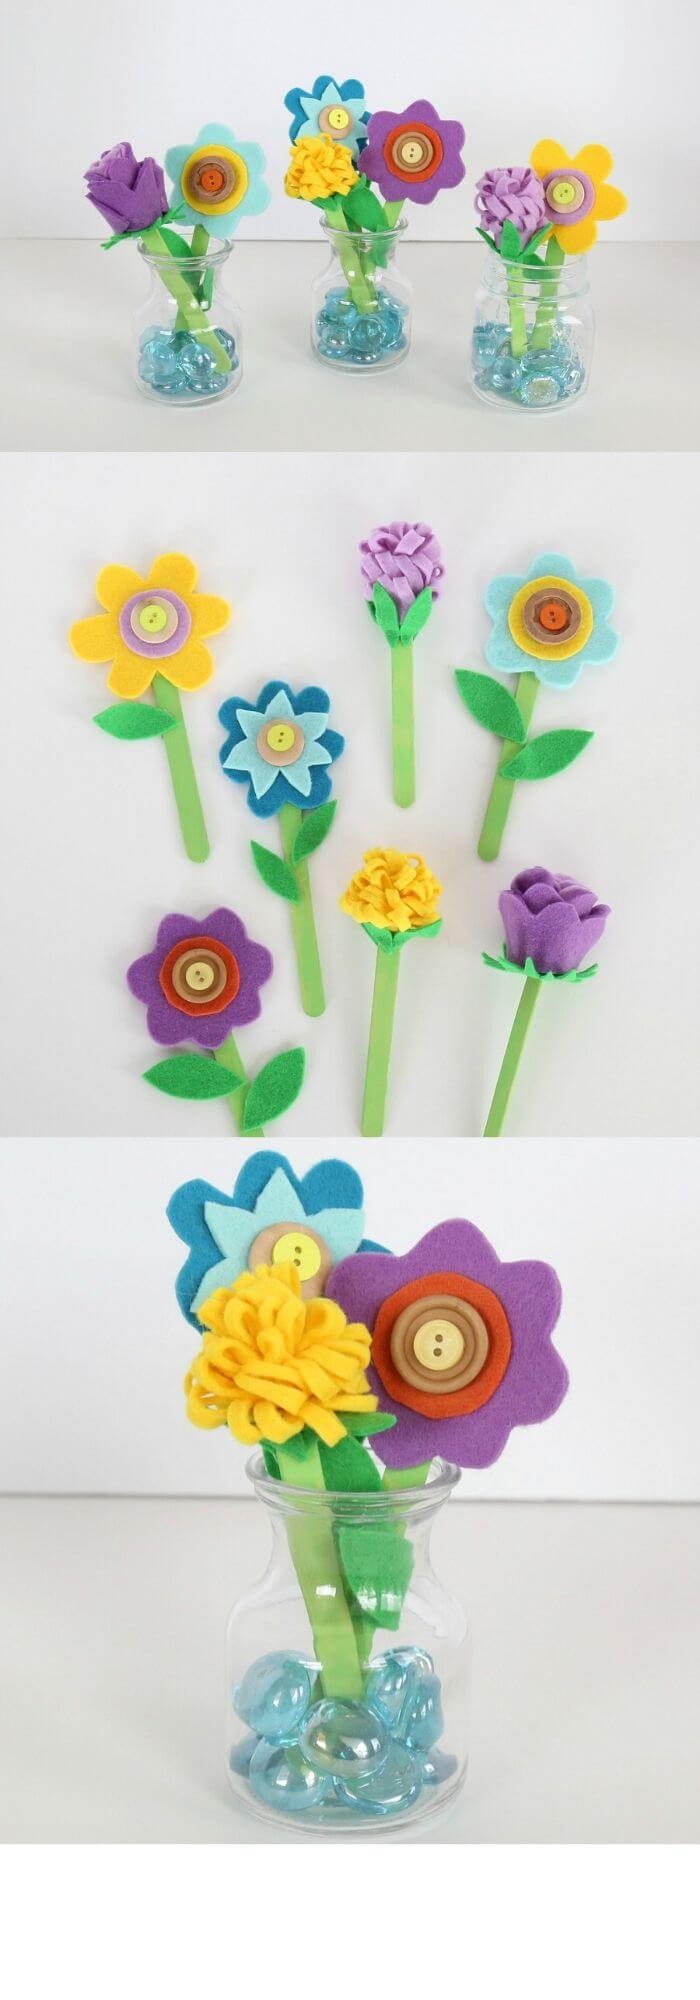
To create a unique ornament, gather the following materials: a collection of felt cut-outs in various sizes and colors, pink and white buttons, a needle, and some thread. Begin by layering the felt cut-outs until you achieve the desired size, then place a button in the center. Next, thread your needle with the chosen thread and pass it through one eye-hole, making sure to penetrate all the layers.
Once complete, repeat the process in reverse, coming back through the same eye-hole for added security.
Felt flower bustle
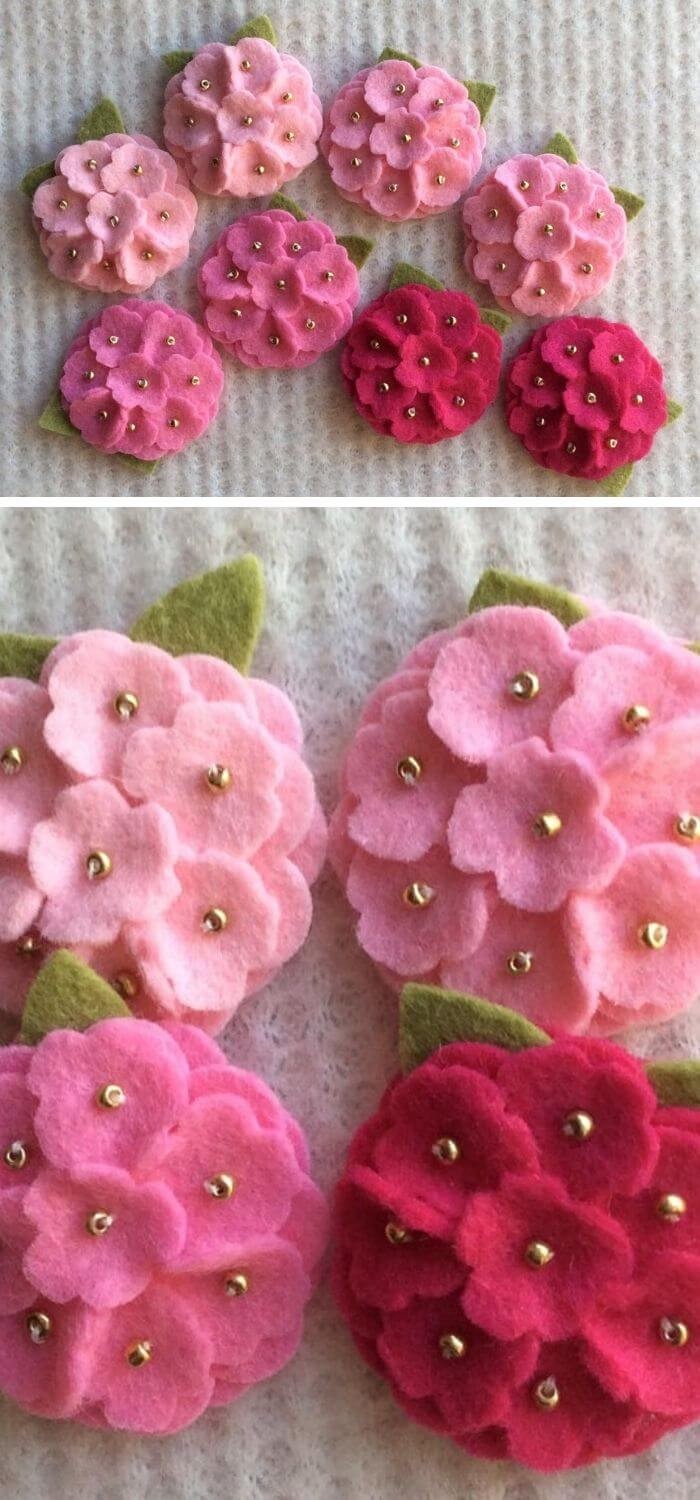
To create this unique embellishment, gather the following materials: felt flower cut-outs, small round silver or gold beads, a hot glue gun, and glue sticks. The process begins by layering the felt flowers slightly overlapping each one as you go along, securing them with glue. Once you’re satisfied with the size, it’s time to add decorative flair in the form of beads. Simply apply a small amount of glue to the center of each flower and secure the bead, ensuring it remains firmly in place.
Ribbon flower
To begin this creative project, you’ll only need three simple supplies: red ribbon, scissors, and a willingness to get creative! First, wrap the ribbon around your hand, forming a medium-sized ball. Once you have it tied off, take a moment to secure the bundle with a knot. Then, using your scissors, carefully cut through each length of ribbon, releasing the tension and preparing the materials for the next step.
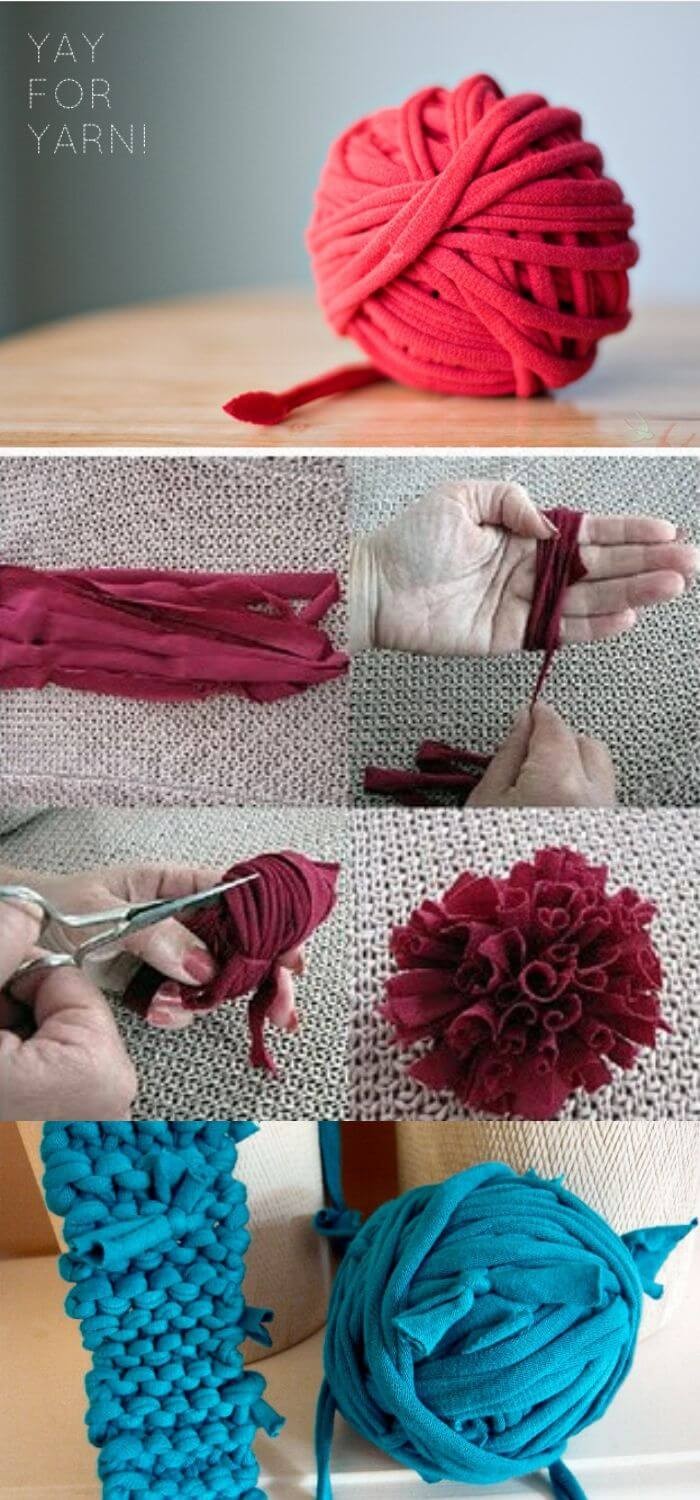
Tee- shirt pom pom flower
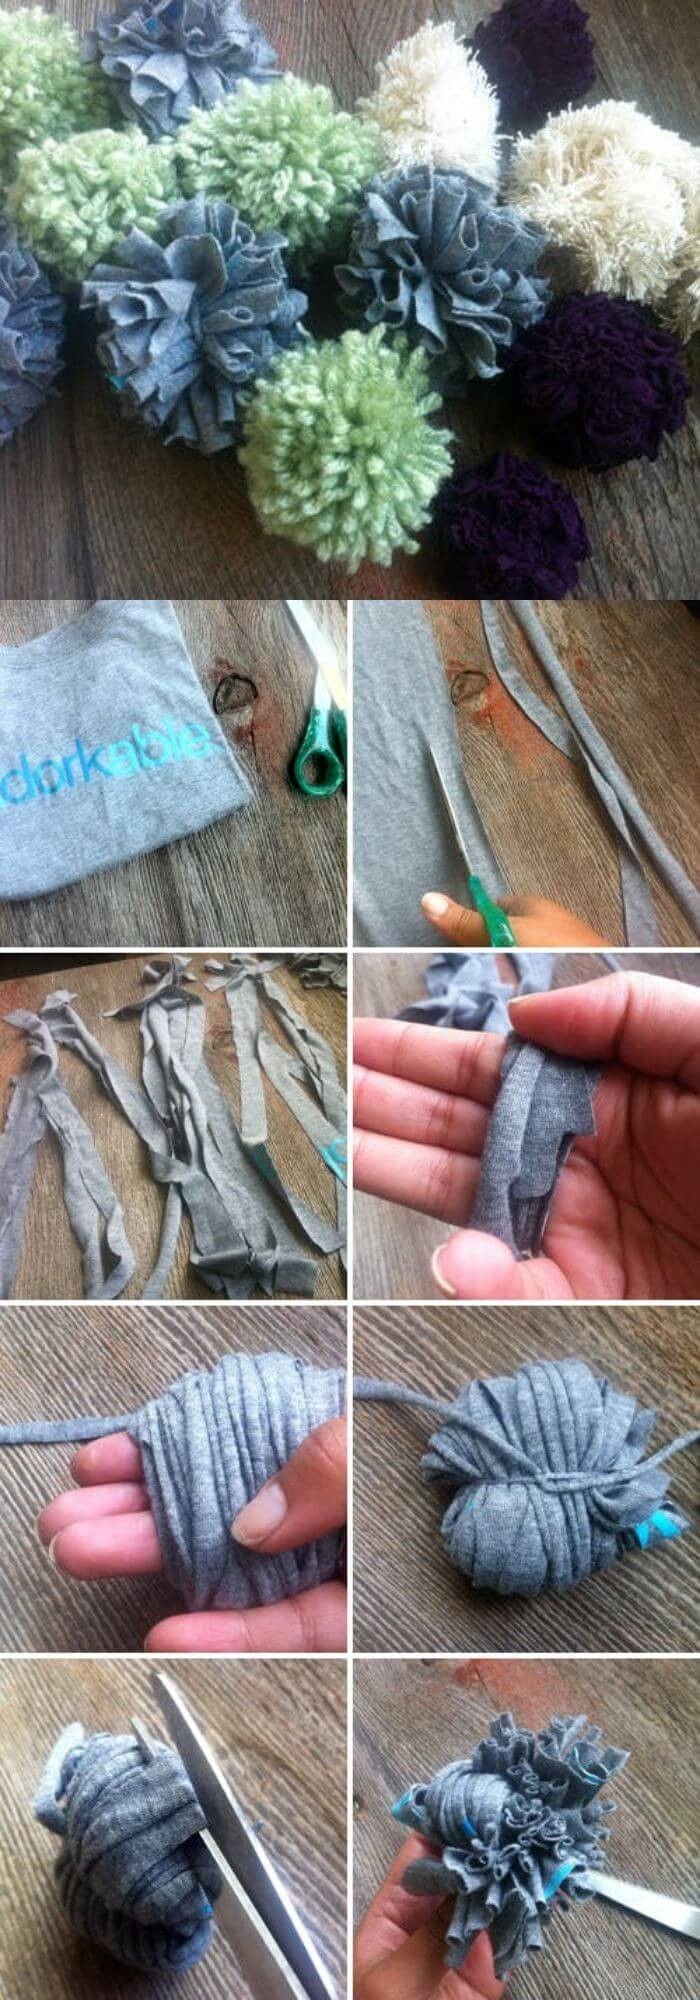
To create a tactile prop for sensory play, start by gathering an old t-shirt that’s no longer needed. Cut it into long strips, about 1-2 inches wide, depending on the size of the shirt. Then, wrap these strips around your non-dominant hand, overlapping them slightly as you go, until a medium-sized ball begins to form. Once you have the desired shape, tie a knot around the center of the ball to secure it in place.
Finally, use scissors to carefully cut down the sides of each layer, creating a textured and visually interesting prop that can be used for sensory exploration.
The flower loom
When working with larger, more intricate flower designs, this particular technique proves to be a valuable asset. Its application allows for the creation of complex, abstract blooms that might otherwise be challenging to produce.
rolled rose
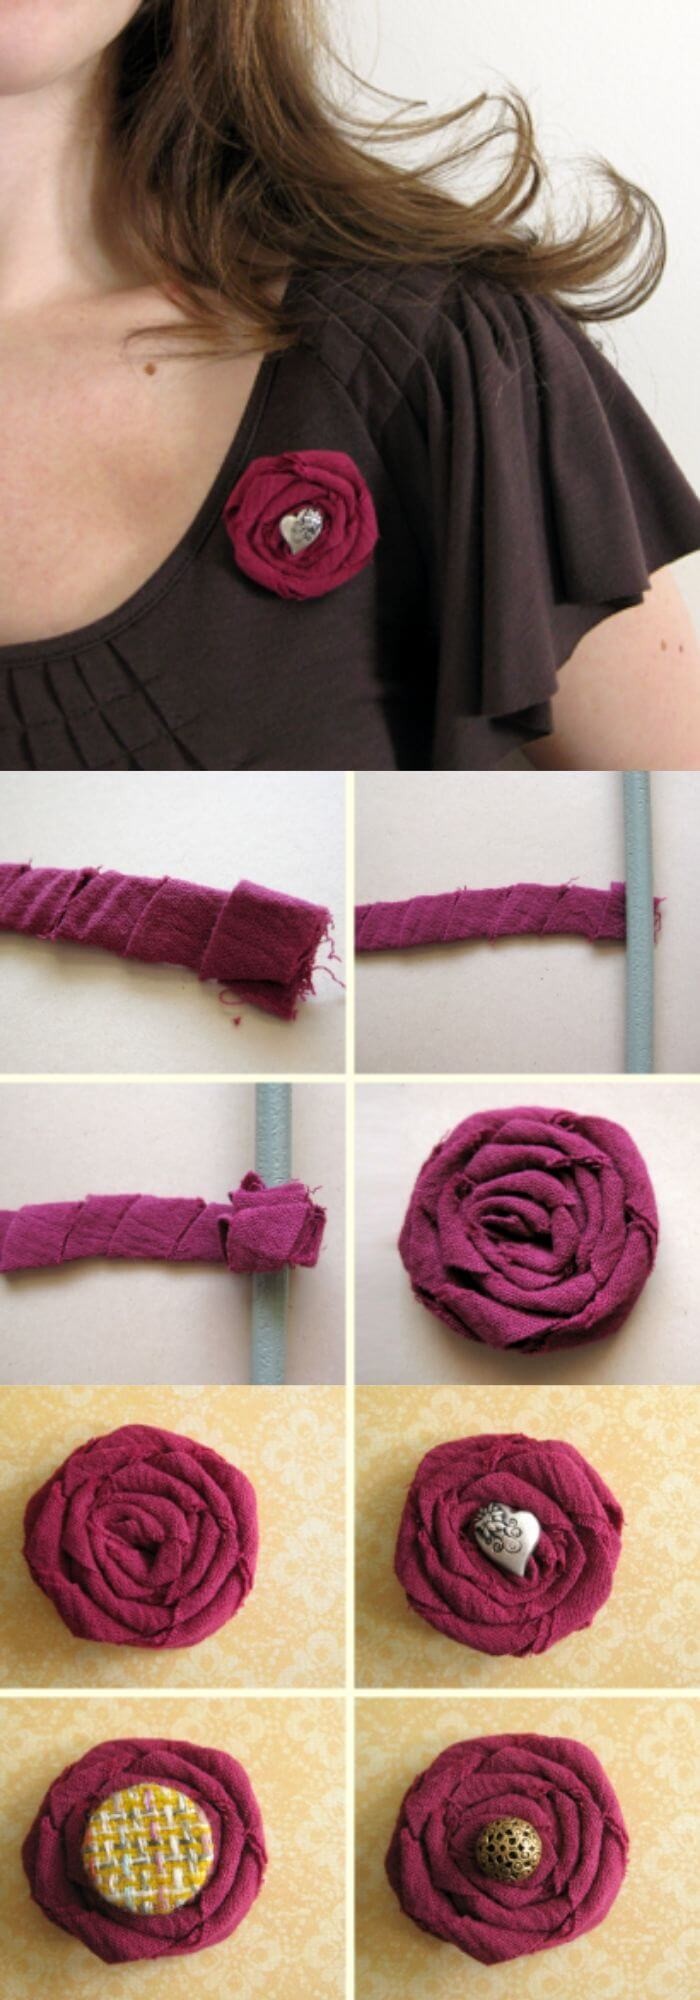
To create your own fabric-covered rolling pin, start by gathering the following materials: any type of fabric, scissors, hot glue, and a rolling stick. Begin by tying a knot at one end of the material and twisting it until it forms a cigar shape. Then, roll the fabric onto itself, applying hot glue as you go to secure each layer. The rolling stick can be used to help form tight rolls and maintain even tension.
With patience and a steady hand, you’ll have a beautifully crafted rolling pin in no time.
pretty yellow flower
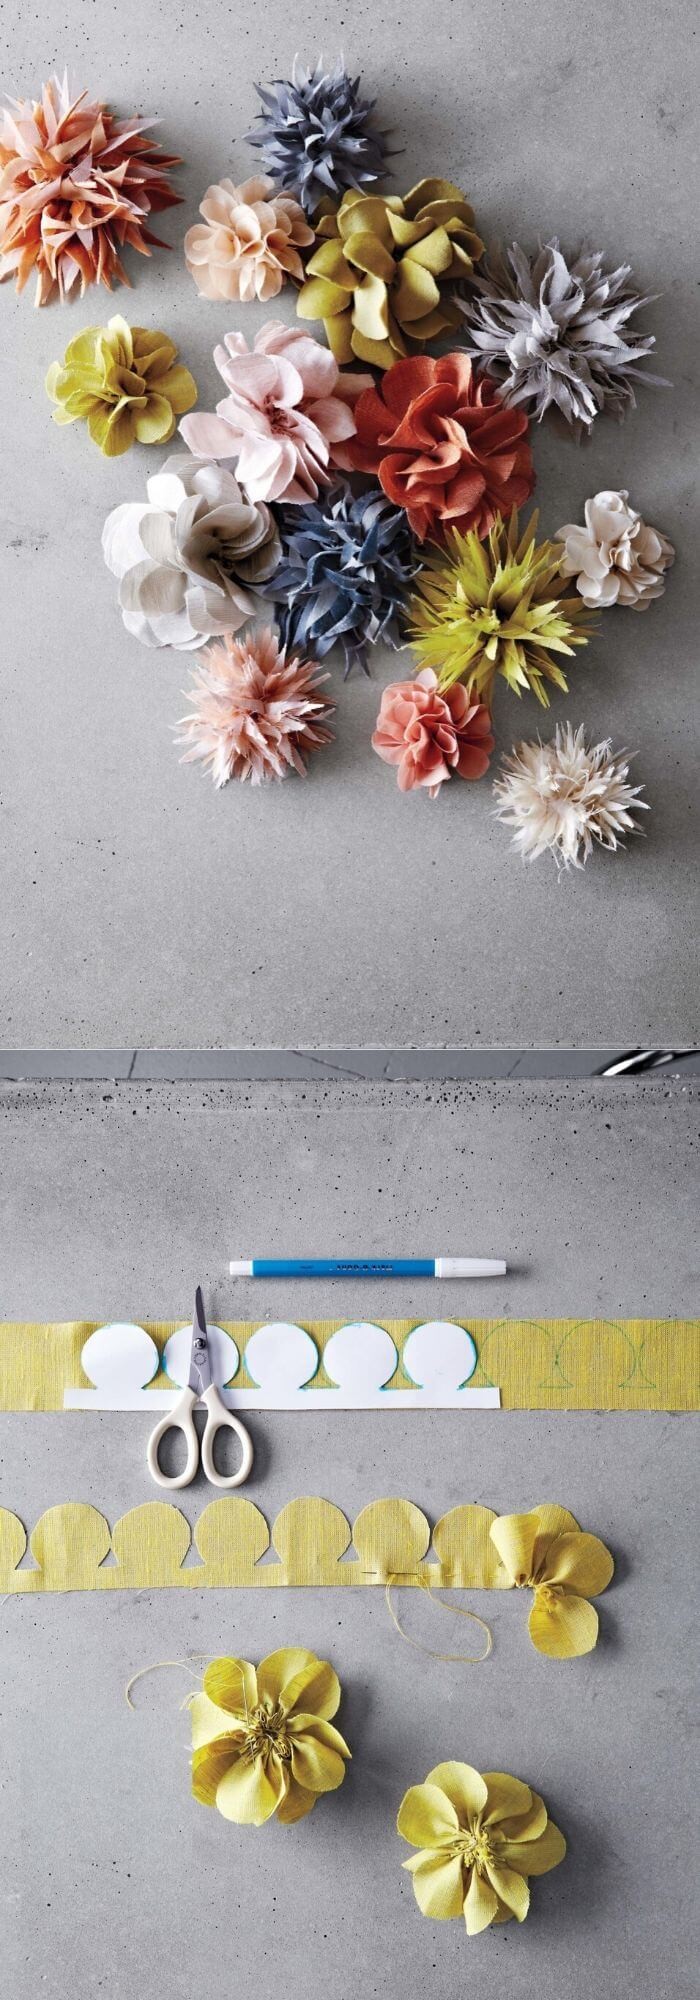
To create your pansy design, you’ll need to gather a few basic supplies. These include a marker pen for tracing the template onto your chosen fabric, scissors to cut out the desired shape, a needle and thread for stitching the pieces together, as well as yellow silky fabric to serve as the foundation of your project. Begin by drawing the pansy template on the yellow fabric, being careful not to separate the two completely.
Once you have a strip of the pattern in place, start sewing the individual elements together to bring your design to life.
Conclusion
As I delved into researching this topic, I was astonished by the sheer variety of fabric flower types that exist. From delicate petals to intricately detailed designs, each one is a testament to the creativity and skill of crafters like you. For even more inspiration and ideas on how to incorporate these beautiful blooms into your projects, be sure to explore the links provided.
Related Posts
For the woodworking enthusiast, having the right tools can make all the difference in precision and accuracy. Among these, dowel jigs stand out as a crucial component for crafting intricate wood pieces. In this context, we’ve compiled an expert-approved list of the top 12 best dowel jigs that cater to various skill levels and projects in 2024. Whether you’re a beginner or an experienced carpenter, having access to high-quality dowel jigs can elevate your woodworking experience.
Additionally, for those interested in other creative pursuits like crochet and cross-stitch, we’ve also curated lists of top-rated kits for beginners and experts alike, highlighting the best crochet hooks for effortless crafting and cross-stitch kits for precision stitching.