Easy Clay Projects For Beginners To Master
Clay has become an increasingly popular artistic medium in recent years. According to Skillshare, clay is now popular among artists of all skill levels. One of the reasons for its popularity is that clay is an accessible material that is easy for beginners to start working with.
Clay is a great option for beginner artists for several reasons. First, clay is inexpensive and can be easily found at local craft stores. It’s also a very forgiving medium. If you make a mistake while sculpting, you can simply mush the clay back together and start over. Additionally, basic clay projects require minimal tools, making it easy to get started.
Clay allows beginners to immediately start creating three-dimensional artworks. With just a ball of clay, artists can pinch, roll, and shape it into endless creations. The engaging, hands-on nature of sculpting with clay makes it an enjoyable introduction to art.
While advanced clay techniques do take time to master, beginners can find success with simple, entry-level projects. Following basic instructions, even those without experience can shape impressive clay creations. With this guide, we’ll explore fun and fulfilling clay projects perfect for beginners.
Gather Your Clay and Tools
The type of clay you choose is important for beginner projects. Polymer clay is a good option to start with since it doesn’t require firing and is easy to condition. Air-dry and paper clays are also great beginner clays that don’t need a kiln. However, for more durability, pottery clays like stoneware and earthenware that require firing are recommended. As for essential tools, at minimum you’ll want:
- Clay sculpting tools – A set with different shaped sculpting and carving tools is ideal.
- Rolling pin – For flattening out clay evenly.
- Texture tools and stamps – Adds interesting surfaces.
- Paint brushes – For painting details.
- Cutting tools – Like tissue blades and clay cutters.
- Work surface – Plyboard, canvas, or silicone mats.
Start with these basics for beginner projects. You can add specialty pliers, rollers, and extruders later on as you advance. The type of clay you choose will also determine if you need clay conditioning liquids, glazes, or finishes.
Safety Tips
When working with clay, it’s important to take some basic safety precautions. Here are some tips for staying safe:
Wear an apron or old clothes to protect your clothing. Clay can stain fabric.
Use a drop cloth or work surface you don’t mind getting messy. Clay can stain surfaces.
Avoid contaminating clay. Only use clay tools and equipment for clay to prevent cross-contamination with food items. Wash hands thoroughly after working with clay.
Work in a well-ventilated area. Some clays release fumes.
Use slip judiciously. Slip is liquid clay used to join pieces, but contains silica dust. Use a small brush to apply slip.
Avoid breathing dust from dry clay. Wet clay first or wear a special N95 dust mask.
Store clay properly sealed and away from moisture. Dry clay can grow mold.
Clean tools thoroughly. Dry clay on tools can harbor bacteria.
Take regular breaks. Repetitive motion can strain muscles and joints.
Follow age recommendations. Polymer clay cautions to keep away from children under 3 years.
Supervise children. Don’t allow unsupervised access to tools or ovens.
Understand firing safety. Follow kiln instructions carefully to avoid burns.
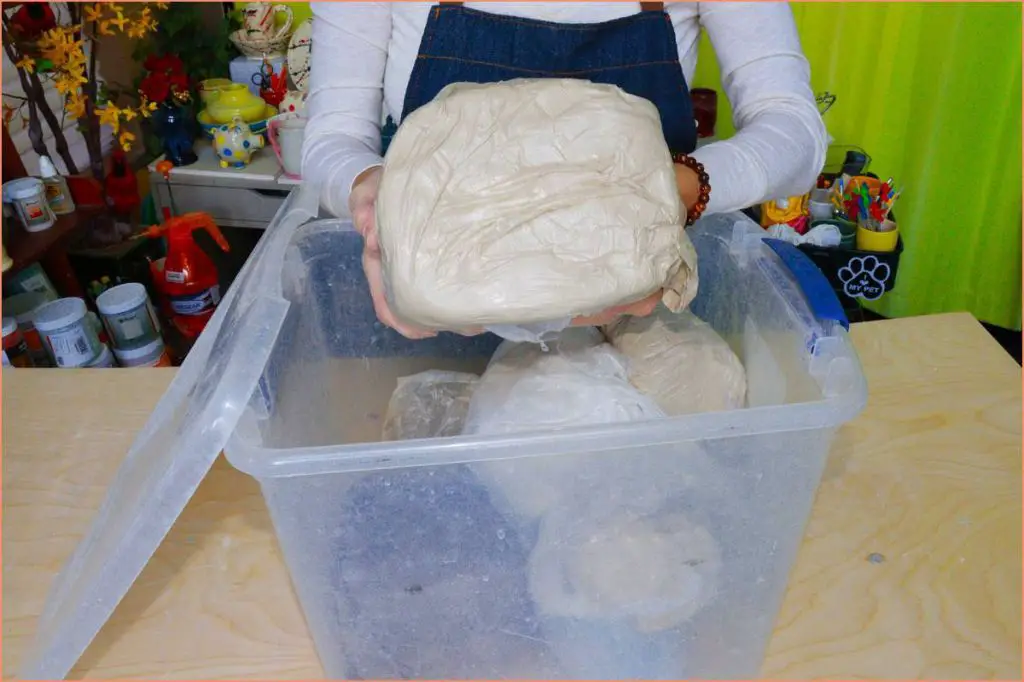
Clay Storage and Prep
Properly storing clay is crucial for keeping it workable and preventing it from drying out. Fresh clay should be wrapped tightly in plastic and stored in an airtight container or plastic bag. Avoid exposing clay to air, which can cause it to dry out and become difficult to work with (url1).
Before sculpting with clay, it’s important to properly condition it. Take the clay out of the packaging and knead it firmly with your hands for a few minutes until it becomes uniform and pliable. This helps remove any air pockets. You can also use a roller or acrylic clay conditioner to achieve an even, smooth consistency (url2).
If the clay is too firm, add a few drops of water while kneading to make it more malleable. If it’s too sticky, gently knead in some cornstarch or baby powder. The clay should be soft but not tacky. Properly prepping the clay makes it much easier to sculpt smooth forms without cracking or tearing.
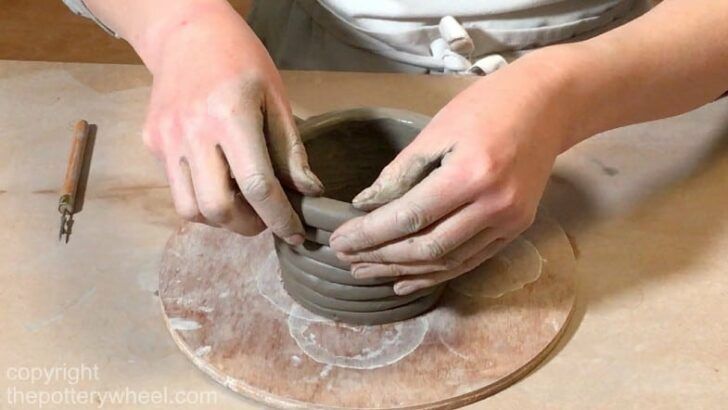
Basic Shapes and Coils
One of the easiest ways to get started with clay projects is to learn how to create basic shapes like balls, coils, and slabs. These simple forms serve as the building blocks for many clay creations. Follow these step-by-step instructions to practice making basic shapes out of clay:
To make a ball: Roll a piece of clay between your palms in circular motions. Apply even pressure as you work the clay into a smooth sphere. Balls work well for sculpting small animals, figurines, beads, and more.
To make a coil: Roll a piece of clay on a flat surface under your palm to form a “snake.” The diameter of the coil can vary based on your project. Coils are great for attaching clay pieces together and adding texture.
To make a slab: Use a rolling pin or acrylic rod to roll out clay to your desired thickness on a flat, nonstick surface. You can cut slabs into shapes or use them as a base for building upon. Score the edges before joining slabs together.
As you gain experience, try combining basic shapes to craft items like bowls, vases, and boxes. Refer to this clay shapes guide for more tips on working with balls, coils, and slabs.
Pinch Pots
Pinch pots are a simple yet satisfying beginner clay project. They are made by pinching and shaping a ball of clay with your fingers, without any additional tools. This allows you to get a feel for working with clay and make cute little pots completely freehand.
To make a basic pinch pot:
- Start with a ball of clay about 1-2 inches wide. Roll it into a smooth sphere in your palms.
- Poke your thumb into the center of the ball, indenting it while keeping the walls evenly thick.
- Continue pinching and rotating the ball, gradually pushing your thumb in and opening up the hole to form a pot shape.
- Pinch the edges to refine the shape and thin out the walls.
- Add decorative elements like ridges, patterns or textures by pinching with your fingers.
- Open a wider mouth at the top so the interior can be seen.
Pinch pots are fun, simple projects for both kids and adults. Let your imagination run wild with different shapes, sizes, and decorative pinch patterns. They can be left solid, or holes can be poked to turn them into plant holders or tea light houses. The possibilities are endless with this fun clay handbuilding technique!
Clay Animals
Making fun clay animal figures is a great way to practice your sculpting skills as a beginner. Start with simple shapes like balls or eggs to form the bodies, then add legs, tails, heads, and other details. Turtle shells can be created by making oval slabs and decorating them with patterns. Snakes are easy by rolling out tapered coils then blending the coils together to create a smooth body.
Focus on the basic shape and proportion first before adding texture or patterns. Let the clay firm up a bit before detailing so it doesn’t deform as you sculpt. Use toothpicks or skewers to add fine details like scales on a snake. Modeling tools like loops and ribbon tools are also helpful. Allow your clay animals to dry completely before baking according to the clay instructions.
Some fun beginner animals to try include:
- Snakes
- Turtles
- Alligators or crocodiles
- Lizards
- Frogs
- Ladybugs
- Cats
- Dogs
- Mice
- Pigs
- Elephants
- Giraffes
- Horses
- Cows
- Lions
- Bears
- Hippos
- Monkeys
- Penguins
- Owls
Let your creativity run wild and make a little clay zoo. These animal figures also make great gifts and keepsakes.
Clay Magnets
Making clay magnets is a fun and easy clay project for beginners. You can make clay magnets by rolling small balls or pieces of clay and pressing them into silicone molds. Some popular magnet shapes are animals, food, letters, and geometric shapes. Let the clay magnets dry completely before removing from the molds.
To make the magnets functional, you’ll need magnetic strips. Cut thin strips of flexible magnet, available at craft stores. Press the strips into the soft clay before baking. Insert the magnet so there is clay covering both sides to secure it. This allows the clay magnet to stick to magnetic surfaces.
Another option is to glue magnets onto the baked clay pieces. Use a strong adhesive like E6000 that works on both clay and magnet. Add magnets to the back of the clay shape. Let the glue dry fully before using the clay magnets.
Bake the clay magnets according to the manufacturer’s instructions. Allow to cool completely before handling. The clay magnets can be displayed on the fridge, magnetic boards, lockers, and more. Making clay magnets is an easy way to create customized magnets in any shape.
Clay Jewelry
Making clay jewelry is a fun and easy way for beginners to get creative. You can make all kinds of jewelry pieces like beads, pendants, earrings, rings, and more. Clay jewelry is lightweight and comfortable to wear. The possibilities are endless!
To make clay beads, roll small balls or tubes of clay. Add textures by pressing designs into the clay with stamps, rolling over texture mats, or carving patterns. Let the beads dry completely before threading them onto cord to make necklaces or bracelets. You can also glue posts onto the back of beads to make earrings.
For pendants, cut clay into desired shapes using cookie cutters or freehand with a knife. Make patterns by layering colored clays. Let pendants dry fully, then sand the edges smooth. Use jewelry glue to attach a bail or loop at the top for hanging on a cord.
Clay rings are another easy option. Roll a coil and cut into segments for adjustable stackable rings. Or, cut strip of clay and glue ends together for solid bands. Let rings dry fully before wearing. Feel free to add beads, charms or textures.
Make sure to seal clay jewelry pieces with a glaze or sealant before wearing to prevent color transfer. Have fun being creative and wear your homemade clay jewelry with pride!
Finishing and Firing
One of the most exciting parts of working with clay is seeing your finished creations after baking and glazing. Properly finishing your clay projects will help preserve them for years to come.
After sculpting your clay, allow it to air dry completely before baking. Check package instructions, but air dry clay typically needs 24-48 hours to dry. Baking will harden the clay permanently.
Preheat your oven to the temperature specified on the clay package, usually 275°F to 325°F. Place pieces on a baking sheet lined with parchment paper or aluminum foil. Bake for the recommended time, checking occasionally to prevent burning. Clay may darken slightly during baking.
After baking, clay can be painted with acrylic paints. For shine and protection, apply a sealant like decoupage or varnish. Avoid sealants containing solvents that could interact with clay. Specialized air dry clay glazes are available for glossy finishes.
“Applying a clear acrylic sealer helps protect your finished clay creations,” says Gathering Beauty (source). Allow pieces to fully cure before handling.