Fine-Tuning Your Craft: Advanced Clay Sculpting Tips
Clay sculpting has been practiced as an art form for thousands of years, with evidence of ancient clay figurines dating back over 20,000 years (1). Early civilizations used clay for both functional pottery as well as decorative sculptures. Over time, sculptors developed specialized techniques for working with clay and creating intricate works of art.
Today, clay remains a popular medium for both amateur and professional sculptors. There are several types of clay used in sculpture, including earthenware, stoneware, and porcelain. While the fundamentals of sculpting with clay are relatively simple, truly mastering the artform requires practice and specialized skills.
In this guide, we will cover advanced techniques that take your clay sculpting abilities to the next level. We’ll explore sophisticated methods for planning and constructing complex sculptures, achieving delicate details, and perfecting the drying, firing, and finishing process. With dedication and the expert tips provided here, your sculptures can reach new heights of creativity and artistic excellence.
(1) https://www.jamescooksculpture.com/post/clay-sculptures-unearthing-the-roots-of-an-ancient-art-form-a-journey-with-james-cook-sculptures
Tools and Materials
To create advanced clay sculptures, it’s important to have the proper tools and materials. Specialized sculpting tools like loop tools, ribs, kidney tools, and wire loop cutters allow you to refine details, texture surfaces, hollow out forms, and cut precise shapes (Advanced Sculpting Set). Needle tools are great for etching fine lines and markings. Sculpting knives like ribbon tools allow you to slice thin sections. And wooden modeling tools can shape softer areas of the clay.
Choosing the right type of clay is also key. Oil-based clays like plasticine are great for detail work. Polymer clays like Sculpey can be baked in a regular oven and don’t require special firing. Earthenware clays are affordable and work well for hand-building. Porcelain clays are extremely fine and ideal for delicate sculpting. And stoneware clays are very strong, resistant to cracking, and perfect for large sculptures (Clay Carving & Sculpting Tools). Consider the characteristics of each when selecting clay for your project.
Planning Your Sculpture
Deciding on the right subject matter is an important first step when planning a sculpture. Consider what inspires you or what you want to express through the sculpture. Making some initial sketches can help refine your ideas and composition (Source). Rough sketches allow you to visualize the sculpture from different angles and make adjustments before starting the actual sculpting.
Gathering reference materials can also be very helpful in the planning process. Look for photos, drawings, or physical objects related to your sculpture subject. Pay attention to textures, shapes, proportions, and other details. Having strong visual references will give you a good starting point as you begin sculpting (Source). Just be sure not to copy directly from reference materials, but use them as inspiration to create your own original sculpture.
Take the time to carefully plan out your sculpture before gathering your clay. Having a solid vision and references will make the sculpting process easier and lead to better results.
Armatures and Structures
An armature is a framework that provides structure and support for a sculpture. Having a proper armature is crucial for creating sturdy, large-scale, and complex sculptures in clay. The armature acts as the skeleton that the clay is built around. There are several benefits to using an armature:
Armatures allow the sculptor to focus on designing the form rather than worrying about the structural integrity. The framework provides stability so the clay can be layered and shaped without collapsing or sagging. This is especially important for larger sculptures or pieces with extended limbs or protrusions. An armature enables creating poses and reaching dimensions that would be difficult to achieve with clay alone.
The interior armature core also helps reduce shrinkage, cracking and breakage when drying and firing the finished ceramic piece. The support resists warping or distortion caused by the weight and pressure of the clay. By planning the armature design, the sculptor can strategically reinforce areas that will bear the most weight or stress.
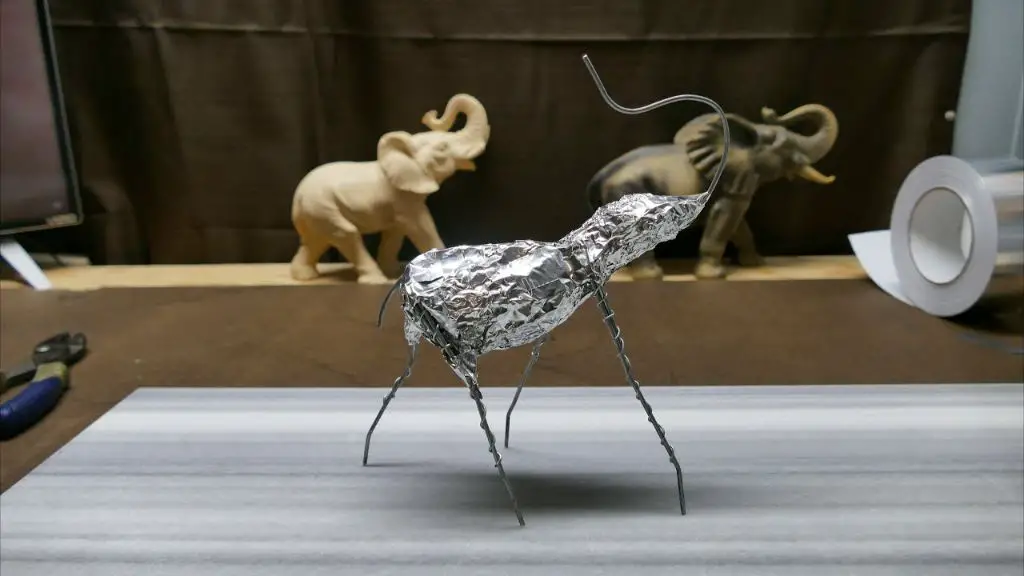
There are many material options when constructing an armature. Metal wire is very common and allows flexibility to bend and pose the framework. Thicker gauges provide more strength while thinner gauges form tighter curves. Other metals like aluminum and copper can be used as rigid sheets or cut into shape. Wood, plastic, cardboard tubes and foam can provide affordable alternatives or combine materials for customized support.
To get started, think about the approximate scale and stance of the intended sculpture. Sketch plans to determine the size, proportions and pose of the armature. Use pliers to bend and twist sturdy wire into shape. Stabilize joints by tightly wrapping thinner wire. Connect limbs using adhesive or more wire. Ensure the armature is well secured before applying clay.
Sculpting Techniques
Once you have planned your sculpture and built the armature, it’s time to start sculpting and shaping the clay. There are many techniques you can use to achieve different textures, details, and effects in your clay sculpture.
Detailed sculpting can be done with basic sculpting tools like loop tools, ribs, wooden modeling tools, and clay shapers. Use these tools to refine shapes, add contours, and create textures on your sculpture. Blending clay and smoothing seams is important for achieving a cohesive finished look. An artist’s paintbrush and some water can help blend clay and soften edges (Clay Sculpture Techniques and Tips).
You can also use homemade and found objects like combs, Skewers, plastic forks, and lids to imprint textures. Press objects into the clay at different angles and directions to emulate effects like scales, fur, feathers, wood grain, etc. Remember to keep texture details subtle enough for the sculpture to be properly fired.
Consider combining hand sculpting techniques like pinch pots, coils, and slabs to build up intricate shapes. Use slip and score techniques to properly join clay pieces. Hollow out forms to reduce weight and prevent cracking. Let gravity help stretch and shape the clay. Work systematically from large forms to smaller details.
Be patient, work slowly, and step back periodically to evaluate your progress. Advanced sculpting requires finding the balance between controlling the clay yet letting it flow naturally. With practice and experimentation, you will refine your personal sculpting style and skills over time.
Surface Treatments
After baking your polymer clay sculpture, the surface may have irregularities that need smoothing. There are several techniques for achieving a smooth, polished finish.
Start by gently sanding the surface with fine grit sandpaper like 220 or 400. Rub the sandpaper in small circles to blend and soften the clay. Be careful not to sand away details. After sanding, wipe away any residue with a dry cloth.
Next, you can use a clay scraper, craft knife, or clay shaper tool to remove any remaining bumps or imperfections. Carefully scrape in long strokes to level the surface.
Burnishing is another great way to create a glassy finish. Use a polished stone, plastic burnisher, or popsicle stick to vigorously rub the surface. The friction polishes the clay to a sheen. Try burnishing the entire sculpture or just accent areas.
To enhance color and surface effects, apply clay-safe stains, paints or glazes. Let them dry fully before sealing or protecting the finish. Metallic rub-ons can beautifully accentuate textures and details.
Lastly, spray on a protective sealant like acrylic, polyurethane, or UV resin. Multiple thin coats prevent yellowing over time. This locks in the surface polish and subtle colors.
With the right tools and techniques, you can achieve a smooth, vibrant, professional finish on your polymer clay sculptures. A refined surface truly makes the details pop.
Joining and Construction
When joining pieces of clay together, it’s important to consider the moisture level of each piece. Soft, wet clay can often be joined by simply blending and smashing the pieces together. However, joining drier clay requires more care and planning.
To join two pieces where one or both are partly or completely dry, a paper clay slip can be used as an adhesive. This is made by mixing paper pulp with water into a thick glue-like consistency (source). Apply the slip to both surfaces to be joined and press them together firmly. The paper fibers will bond with the clay as it dries. Reinforce the seam with small coils or balls of soft clay for extra strength.
For large sculptures, an internal armature made of wire, wood, or other materials can provide crucial structural support (source). Attach armatures using paper clay slip, clay slurry, or by directly embedding them into the soft clay. Pay special attention to weak points like wrists, ankles, or outstretched limbs by using extra slip or coils of clay for reinforcement.
Delicate Sculptures
When creating delicate sculptures with intricate details, it’s important to choose a clay that can hold fine details without cracking or breaking. Polymer clays like Sculpey and FIMO are often good choices for delicate sculpts according to Benes (2022). These clays can be conditioned to a very smooth, pliable state which allows sculpting of fine details down to 1mm in size. Water-based clays like air dry clay can also work for delicate sculpts but may require an acrylic sealant while drying to prevent cracking according to the Ceramic Arts Network article (2023).
Using clay sculpting tools is also key for getting crisp details without marring the surrounding clay. Sharp needle tools allow you to etch fine lines and textures. Small loop tools are helpful for smoothing features and curves in tight areas. Firm, flat shaped tools like ribbon tools can be used to imprint borders or edges precisely. Take care not to overwork the clay, as this can lead to cracking. Let the clay firm up slightly between detailing to hold shapes better.
When baking polymer clay sculpts, use a slow heating and cooling cycle to prevent stress cracks. Allowing air dry clays to dry naturally over several days, rather than force drying, will also reduce cracking issues. Handling delicate sculpts gently and supporting structurally weak areas with wire, foil or an armature will result in the cleanest finished pieces.
With the right clay choice, specialized tools, and careful handling, miniature clay sculptures with intricate decorative elements can be achieved. Patience and practice will develop the fine sculpting skills needed for detailed clay work.
Drying and Firing
Proper drying and firing are critical steps for finished clay sculptures. Rushing the drying process can lead to cracks and breakage. Allow adequate drying time before firing – clay should be dried slowly and evenly. There are a few techniques to prevent cracking:
- Let clay air dry for several days before firing. Do not expose sculptures to direct sunlight or heat.
- Place clay on racks or shelves for even drying – avoid setting directly on surfaces.
- Drape plastic over clay if drying too quickly. Misting clay lightly can also slow drying.
- Support overhanging parts and delicate areas during drying.
The typical timeline is 5-7 days for small pieces, and up to several weeks for large sculptures. Use a moisture meter to test when clay is ready for bisque firing. The target is less than 1% moisture.
Kilns allow precise control over firing cycles. Common types are electric and gas kilns. Programmable electric kilns are easiest for monitoring temperature and hold times. Start with a slow bisque firing to harden clay before applying glazes and a final glaze firing.
Always follow the kiln manufacturer’s instructions. Carefully place pieces in kiln and use stilts or kiln posts to avoid contact. Program a gradual preheat, final temperature around cone 06, and slow cooling cycle.
Conclusion
In summary, advanced clay sculpting requires dedication, practice, and learning new techniques. Finding a creative sculpture idea you’re passionate about is crucial for increasing your skills. Don’t be afraid to experiment with combining sculpting methods and tools to achieve your desired effects. The journey of mastering clay sculpting is rewarding, as you bring imaginative works to life. Continue challenging yourself to take your sculpting abilities to the next level. Refer to online resources and communities to get feedback and inspiration for future projects. With consistent practice and an openness to learning, you will elevate your clay sculptures and fine-tune your artistic talents.
The key is not giving up when facing obstacles. Sculpting can be a meditative process of trial and error. Every misstep provides an opportunity to grow. Patience and persistence will improve your techniques over time. Start with small studies before tackling complex large-scale sculptures. Take pride in your progress and let your passion for sculpting guide you to create engaging works of art.
For more tips, tutorials, and examples of outstanding clay sculptures, explore the resources listed below: