How Can I Make Clay At Home?
Introduction
Clay is a type of fine-grained natural earth that can be molded when wet and retains its shape when dry. It has been used for centuries to create pottery, sculptures, tiles, and other decorative or functional objects. The unique plasticity of clay when wet makes it a versatile material to work with at home.
Making homemade clay is an enjoyable DIY project that allows you to create customized clay for pottery, sculpture, jewelry, or other crafts. With just a few simple ingredients like flour, glue, and some mixing, you can make air-dry or oven-bake clay suitable for a variety of projects. The process is easy, forgiving, and lets you produce clay in any color or consistency you want.
Required Materials
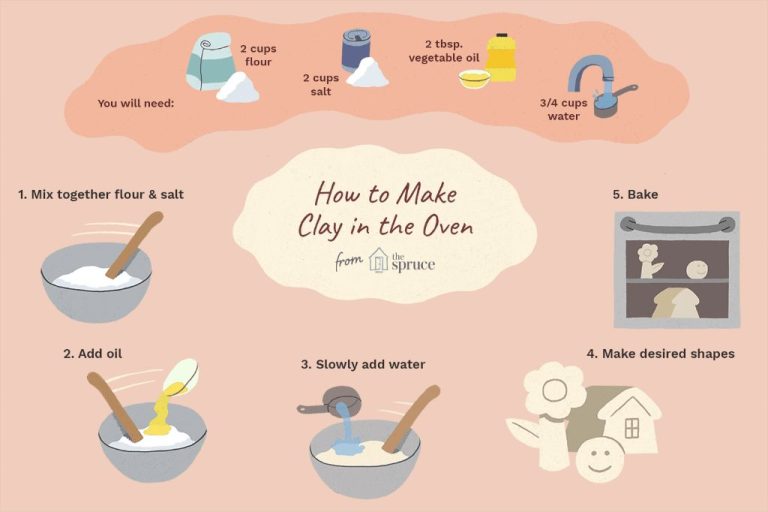
To make clay at home, you’ll need some basic household ingredients and supplies. Here are the main items you’ll need:
- Flour – All-purpose flour works well for homemade clay. The gluten in the flour provides stretch and elasticity.
- Salt – Table salt or sea salt. The salt hardens the clay when baked.
- Water – Lukewarm water activates the binding properties of the flour.
- Vegetable oil – A small amount of oil makes the clay smooth and flexible.
- Mixing bowl – A large bowl for combining ingredients.
- Spoon – A sturdy wooden or plastic spoon for mixing the clay.
- Food storage containers – For storing leftover clay.
Be sure you have all these supplies handy before starting your clay project. You may also want materials for shaping, coloring, and baking the clay once mixed.
Choosing the Right Clay Recipe
When making homemade clay, you have a few different recipes to choose from. Each type of clay has its own pros, cons, and characteristics to consider.
Some of the most common homemade clay recipes include:
- 2 parts baking soda + 1 part cornstarch – This is one of the simplest recipes, using ingredients you likely already have at home. It air dries quickly and has a smooth, doughy texture. However, it can crack easily if not handled carefully.
- 1 part flour + 1 part salt + 1 part water – Using all pantry staples, this clay offers a gritty, sandy texture resembling natural clay. It may dry more slowly than other recipes. Due to the salt, avoid prolonged skin contact.
- 1 part flour + 1/2 part glue + 1/2 part water – With a smooth, elastic texture, this clay retains details well when shaping. Drying time is slower, so projects may require overnight curing. The flour can leave behind a dusty residue.
- Paper clay – Made by mixing shredded paper with flour paste or joint compound. It air dries lightweight yet strong. However, the long strips of paper may show through finished pieces.
When selecting a recipe, think about the tactile experience you want from sculpting to the final dried finish. Consider drying time, durability, cracking, and surface texture. Cost and ingredient accessibility may also factor into your decision.
Mixing the Clay
Now comes the fun part – actually mixing up your homemade clay! Combining the ingredients takes a bit of work and patience to ensure you get the right consistency.
Follow these steps for mixing the clay:
- Place all dry ingredients into a large bowl or pot. A 5-quart bowl usually works well.
- Slowly add your wet ingredients like water or oil while stirring together with a spoon or your hands. The mixture will initially seem too dry.
- Keep mixing until the ingredients start coming together into a smooth ball. You want the texture to be like cookie dough – not too sticky but holds a shape when squeezed.
- Knead the clay for 3-5 minutes until it reaches an even, lump-free consistency. Add small amounts of water if it feels too dry.
- When properly mixed, the clay should smoothly stretch and bend without cracking. Test it by rolling a piece into a coil shape.
Troubleshooting tip: If your clay is too wet and sticky, incorporate a bit more flour or cornstarch. For clay that’s too dry and crumbly, work in a teaspoon of oil or water at a time until reaching the ideal texture.
Shaping and Molding
Once you’ve mixed your clay and allowed any bubbles to rise to the surface, you can start shaping and molding it into whatever you’d like. Here are some techniques for sculpting and forming your homemade clay:
Sculpting – For free-form sculpting, knead the clay briefly to soften it and make it more pliable. Use your fingers to pull, pinch, and shape the clay into your desired sculpture. Add water or oil to your hands if the clay sticks too much.
Rolling – To roll flat sheets or coils, use a rolling pin, acrylic rod, or dowel. Lightly flour the surface to prevent sticking. Start in the center and roll outward, turning the clay 90 degrees after each pass. Vary the pressure for different thicknesses.
Cutting – Let your clay sheets or coils firm up slightly before cutting shapes with a knife, pizza cutter, or cookie cutters. Use sharp tools for clean cuts.
Molding – For molds, press your softened clay firmly into the mold cavities to pick up all the detail. Smooth over the back after unmolding. Clay shrinks slightly in drying, so unmold promptly.
Texturing – Add interest by imprinting the surface with natural or fabricated tools. Press in items like shells, ropes, or textured fabrics. Use clay sculpting tools to carve patterns.
Some handy tools for shaping include acrylic rollers, clay sculpting tools, cookie cutters, knives, silicone molds, stamps, and texture mats. Get creative with improvised tools from around the house too!
Drying and Curing
Once you have shaped your homemade clay into the desired form, it’s important to let it dry fully before baking. If any moisture remains in the clay, it can cause cracking or even explode in the oven. Allow your clay sculptures to air dry for 24-48 hours. The larger and thicker the piece, the longer the drying time.
As the clay dries, a process called “curing” will begin. Curing allows excess moisture to evaporate and hardens the clay by realigning the clay particles. During the curing process, you may notice lightening or darkening of clay color. The sculptures will become firmer and less sticky to the touch when ready for baking.
Make sure clay is dried all the way through and not just on the surface before baking. You can test by touching the thickest parts of the sculpture to ensure no moisture remains.
Baking Instructions
Properly baking your homemade clay is essential for ensuring it fully hardens and becomes durable. Here are some tips for successful baking:
Temperature: Bake clay at the temperature specified in the recipe, usually between 200-300°F. If unsure, start with 275°F. Higher temperatures may cause cracking or burning.
Time: Bake for the time indicated in your recipe, checking periodically after the minimum time. Thinner pieces may bake faster while thicker pieces require longer. Typical baking times range from 10-30 minutes.
Equipment: Use an oven or toaster oven; do not microwave. baking sheets work well. Avoid high-sided pans which block airflow. Parchment paper can prevent sticking.
Testing doneness: Insert a toothpick into the center of the clay after the minimum baking time. If it comes out clean, it’s fully baked. If not, continue baking in 5 minute increments until the toothpick test is clean.
Let the clay cool completely before handling. The slower it cools, the less likely cracking will occur. Once cooled, the homemade clay will be hardened and ready for use in crafts and projects.
Applying Finish
Once your homemade clay creations are fully dried and cured, you can apply various finishes to give them the desired look and feel. Here are some finishing techniques to try:
Painting
Acrylic paints work great for painting air-dry clay. Make sure to use an acrylic sealer or varnish after painting to protect the paint and give a nice glossy finish. You can use paints to add color, designs, or details to your clay creations.
Glazing
For pieces made with oven-bake clay, glazes can be used prior to baking to give an attractive glossy finish. Glazes come in various colors and finishes like gloss, satin, or matte. Brush glaze on evenly before baking according to the clay manufacturer’s instructions.
Sealing
Applying a sealer or varnish is recommended as a final step for both air-dry and oven-baked clay pieces. This helps protect the finish and gives a nice sheen. Polyurethane, mod podge, and acrylic sprays work well as sealers for clay.
Get creative with painting, glazing, sanding, antiquing, and sealing techniques to give your homemade clay art the perfect finish and bring your vision to life!
Project Ideas
Homemade clay is extremely versatile and can be used to create all kinds of fun crafts and decorative items. Here are some ideas to get your creative juices flowing:
Figurines: Sculpt any shape of person, animal or object. Let dry, bake and paint for display. Figurines make great gifts too!
Jewelry: Make beads, pendants, rings or earrings. Add holes before baking so you can string your clay jewelry on cord or wire. Decorate with paint, glitter or other embellishments.
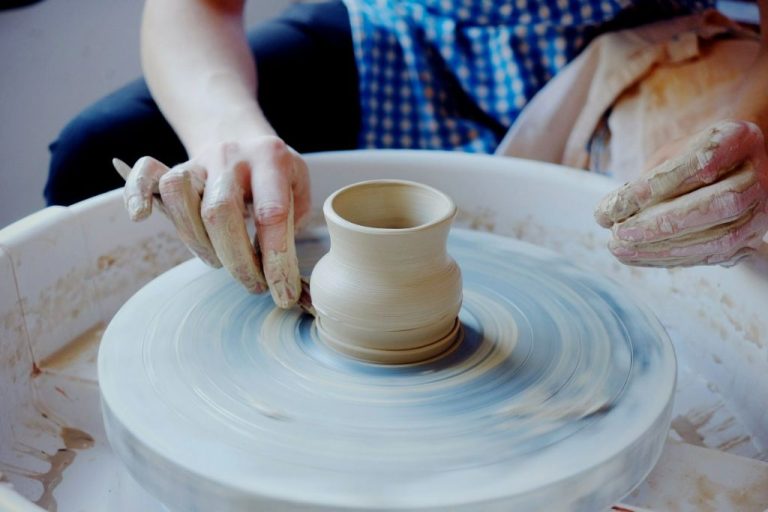
Bowls, pots and vases: Upcycle jars, bottles and containers by covering them with clay for a one-of-a-kind look. Or use clay to handbuild open bowls and vases from scratch.
Magnets: Make magnets in fun shapes to decorate the fridge or other magnetic surfaces.
Ornaments: Create personalized Christmas ornaments and holiday decorations out of clay.
Game pieces: Replace lost or damaged game pieces by making your own out of clay. Get creative with colors and designs!
Picture frames: Cover plain wood or metal frames with clay for customizable, crafty frames. Impress textures into the clay before drying for added interest.
The possibilities are endless! Let your imagination run wild and create whatever inspires you out of your homemade clay.
Storing Leftover Clay
After finishing your clay project, you may have some leftover clay. Properly storing the unused clay allows you to reuse it for future projects.
First, make sure the clay is sealed in an airtight bag or container. Any air exposure will dry out the clay. Wrap the clay tightly in plastic wrap before placing it in a resealable plastic bag or Tupperware container. Press out any excess air before sealing it up.
Store the clay in a cool, dry place away from direct sunlight. A basement, closet, or cupboard works well. The clay can be stored this way for up to one year.
Before reusing old clay, it helps to recondition it. Take the clay out of the packaging and knead it well with your hands. If it feels too brittle or dry, mix in a few drops of water at a time until it becomes pliable again. The clay is now ready to use for more DIY crafts and projects.


