How Can I Make My Air Dry Clay Look Better?
Air dry clay, also called modeling clay, is a lightweight, easy-to-use material perfect for crafting and modeling projects. Unlike traditional clay that requires firing in a kiln, air dry clay hardens naturally over time through evaporation. Once dry, it can be painted with acrylics or sealed for a finished look.
Air dry clay is an accessible and versatile material that allows crafters and hobbyists to create decorative and artistic pieces without any special skills or equipment. It can be molded by hand into endless shapes and designs. Common projects include jewelry, sculptures, dolls, decorative items, DIY crafts, and more. Kids enjoy using it for open-ended creative play as well.
With simple techniques, you can achieve beautiful and professional-looking air dry clay projects. This guide will cover tips and tricks for preparing your clay, achieving smooth finishes, adding color and texture, sealing, antiquing, gilding, and embellishing. Follow along to learn how to take your air dry clay projects to the next level.
Preparing the Clay
One of the most important steps when working with air dry clay is properly preparing and conditioning the clay before starting your project. Kneading and conditioning the clay serves several purposes:
- It softens and warms the clay, making it more pliable and easier to shape.
- It removes any air bubbles that may be trapped in the clay.
- It evenly distributes moisture throughout the clay.
- It makes the clay smoother with a more uniform texture.
Start by taking a block or ball of clay and kneading it vigorously with your hands. Fold the clay over on itself and press down firmly as you knead. You can also bang the clay against a hard surface to help release air bubbles. Continue kneading and conditioning the clay for 2-3 minutes until it becomes soft, smooth, and pliable. Properly conditioned clay will be easier to sculpt and shape without cracking or breaking apart.
Smoothing the Surface
Sanding and using acrylic medium or oil are two effective techniques for smoothing the surface of air dry clay projects. Both methods help fill in small cracks, bumps, and grooves for a flawless finish.
Lightly sanding air dry clay is one of the simplest ways to smooth the surface. Start with a fine grit sandpaper around 320-400 and gently buff out any imperfections. Be very delicate so you don’t sand away too much clay. Wipe away dust between sanding. You can also try wet sanding by dipping the project or sandpaper in water. This helps clog the sandpaper less.
Using an acrylic medium offers another foolproof approach to smoothing. Thin it slightly with water and brush a layer over the entire piece. As the medium dries it will fill in imperfections. You can apply multiple coats to build up a glassy smooth finish. Acrylic mediums dry clear so they won’t alter the clay color underneath. Oil provides similar smoothing benefits when brushed over the clay.
Adding Color
Adding color is one of the best and easiest ways to make your air dry clay creations stand out. There are several mediums you can use to add vibrant pops of color or more muted earthy tones.
Acrylic and tempera paints are good options for adding color. Thin the paints slightly with water so they don’t crack as they dry. You can brush the paint directly onto the clay or use a sponge for smooth, even coverage. Acrylic inks work great too for intense, saturated color.
Mica powder is a beautiful way to add a subtle shimmer. Mix it with a few drops of acrylic medium and paint it on. Try layering different colored mica powders for a multi-dimensional effect.
Soft pastels, like chalk pastels, can be used to add quick pops of color. Rub them directly on the clay or blend the pastel on paper and use a stiff brush to stipple the pigment onto the clay.
Creating Textures
One easy way to add visual interest to air-dry clay projects is by creating textures. Textures add dimension and make projects look more realistic and handcrafted. There are a few simple techniques you can use to add great textures to clay.
Impressing Objects
You can press small objects directly into the surface of the clay to create patterns and textures. Things like coins, seashells, buttons, rubber stamps, and textured fabrics work great. Press the objects firmly into the clay, being careful not to drag them through the surface. Make sure the clay is slightly moist and pliable when impressing objects.
Textured Rollers
There are a variety of textured rolling pins and texture sheets available for clay work. These tools have patterns like stripes, dots, waves, wood grain, etc. rolled into them. Roll the textured tools over the surface of the clay to imprint the patterns. Try layering different patterns for a more complex look. Use textured rollers sparingly to add accents, or roll over the entire surface for an all-over design.
Sealing
Sealing your air dry clay sculpture is an essential step to help preserve your creation and enhance its appearance. There are a few main benefits to sealing air dry clay:
- Protection – A sealant creates a protective barrier that prevents moisture damage and helps the colors stay vibrant.
- Durability – Sealing makes the sculpture more durable and resistant to chipping or peeling.
- Sheen – Sealants can provide a glossy or matte sheen that brings out the depth of the colors.
- Ease of cleaning – A sealant allows you to gently wipe away dust or dirt without damaging the clay surface.
There are a variety of sealants made specifically for clay that will work well:
- Acrylic spray sealants – Offer protection with a matte, satin, or glossy finish. Multiple thin coats work better than one thick coat.
- Polyurethane – Water-based polyurethane can be brushed on and provides a protective glossy coating.
- Finishing spray – Finishing sprays designed for clay provide UV protection and a satiny finish.
- Clear gesso – Brushed on gesso soaks into the clay and provides a good base layer for painting.
- Varnish – An acrylic varnish can seal and add shine. Avoid oil-based varnishes.
Be sure to read the manufacturer’s directions, and test any sealant on scrap clay before applying it to your finished piece. With the proper sealing, your air dry clay sculpture will maintain its beauty for years to come.
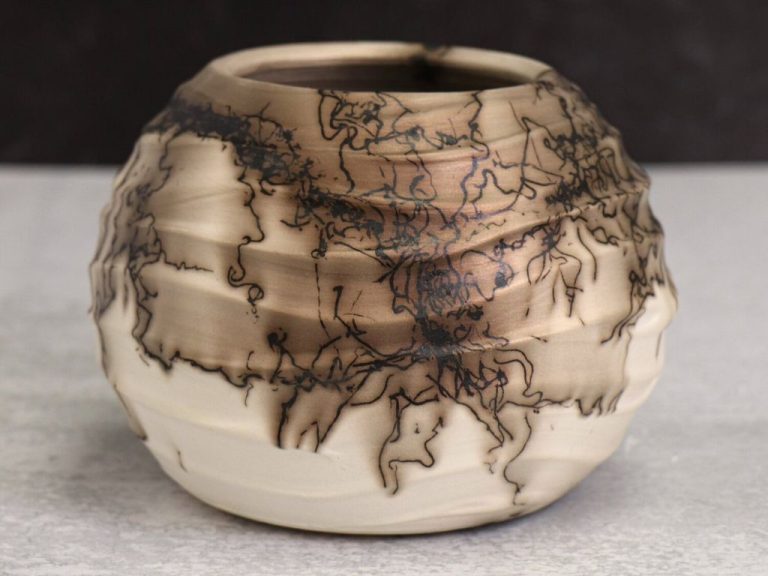
Antiquing
Antiquing is a great way to make your air dry clay creations look aged and vintage. Here are some techniques for antiquing your clay:
Staining
You can stain your air dry clay using acrylic paints diluted with water. Start with a dark color like black, dark brown or dark green. Water it down significantly and use a rag or brush to apply it over the surface of the clay. The stain will settle into crevices and details, creating an aged, weathered look. You can wipe away excess stain for a subtle effect.
Glazing
For an antique glaze effect, mix equal parts acrylic glaze medium and water. Apply this over the clay and let dry. The glaze will give the surface an irregular, scratched look, simulating aged ceramic glazes. Buff areas with a soft cloth for highlights.
Rubbing on Polish
Rub jewelers rouge, furniture polish or cream shoe polish onto the clay, concentrating on raised areas and crevices. This gives a burnished antique patina. Remove polish from the flat areas with a soft cloth to keep them looking worn.
Gilding
Gilding is a great way to add metallic accents and shine to your air dry clay projects. There are several gilding techniques you can try:
Gold/Silver Leaf
Gold and silver leaf add a touch of luxe shine. To apply leaf, first coat the surface with size or glue. Let it tack up until sticky but not wet. Carefully lay the leaf down and use a soft brush to press it onto the glue. Seal with a clear top coat like polyurethane or acrylic to protect the delicate leaf.
Rub n Buff
Rub n Buff is a waxy paste that comes in metallic colors like gold, silver, copper and more. It’s easy to apply – just use a soft cloth to rub it onto the surface. The warmth of your fingers helps pick up the product. Build up layers for an antiqued effect. Seal with a top coat when done.
Gilding Pens
Gilding pens have a paint marker tip filled with real gold, silver, copper or bronze leafing. They allow you to draw fine lines and details. Let the gilded areas fully dry, then seal to preserve the metallic finish.
Embellishing Your Air Dry Clay Creations
Adding embellishments is a fun way to customize your air dry clay projects and make them truly unique. Here are some ideas for beautiful embellishments to try:
Glitter
For an eye-catching touch of sparkle, consider adding glitter. To apply, brush a thin layer of glue or sealant where you want the glitter, then sprinkle it on generously. Let it dry fully before handling. Glitter comes in so many colors, shapes and sizes – get creative!
Beads
Beads can add color, texture and charm effortlessly. Large beads work great for knobs, buttons or focal points. Seed beads can be arranged into patterns or designs. Shop for beads online or at craft stores for endless options.
Charms
Look for small metal charms in fun shapes like hearts, stars, animals and more. Use strong glue to adhere them. Charms are perfect for personalizing projects.
Lace
For a delicate, feminine look, incorporate lace. Use scraps of lace ribbon or fabric. Cut out lace motifs using patterned lace and glue them on. Add filler behind lace to create dimension.
Conclusion
There are many techniques you can use to make your air dry clay sculptures look more visually appealing. Preparing the clay properly by kneading it well and avoiding air bubbles gives you a smooth surface to start with. Sanding the clay and using tools like rubber shapers produces an even, polished look.
Adding color through acrylic paints, inks, or powdered pigments brings an air dry clay sculpture to life. You can brush on color for broad coverage or add detail with sponges, Q-tips, or other tools. Distressing techniques like sanding or stippling after painting creates an aged, antique effect.
Textures made with molds, stamps, or manually poking the surface increase visual interest. Faux finishes like wood grain, stone, or metallic looks can be achieved through sponging, stippling, or dragging. Clear finishes like varnish, glaze, or resin give sheen and protection. Antiquing and gilding provide contrast and elegance. Embellishments like beads, buttons, shells or found objects make each piece truly unique.
With the wide range of options available, you can create stunning air dry clay pieces that look professionally made. Experiment and have fun as you enhance your sculptures’ appearance through these techniques!