How Can I Make My Own Clock?
Creating your own clock from scratch can be an incredibly rewarding hobby. Clockmaking has seen a resurgence in popularity in recent years as more people discover the joys of crafting and working with their hands. At its core, clockmaking allows you to combine artistry, engineering and old-world craftsmanship to produce a beautiful and functional timepiece. With some basic skills, patience and the right materials, anyone can make their own clock for their home, office or as a gift. This guide will walk through the entire process step-by-step. By the end, you’ll have the knowledge to create your own custom clock that you can proudly display.
Clockmaking has a long and storied history, dating back centuries. While mass manufacturing has made clocks inexpensive and ubiquitous in the modern era, there is still something special about a handcrafted, one-of-a-kind timepiece. The inner workings of a clock have always fascinated people. Being able to assemble the gears, hands, pendulums and other pieces into a fully working clock is very rewarding. Many hobbyists get started by taking apart old clocks to see how they work, which can then inspire them to try building their own. There is also an artistic element to clockmaking, as you can craft different decorative elements like the clock face, housing and other ornamental flourishes.
In recent years, many people have been drawn to take up clockmaking as it fits into the growing “maker” movement. Building your own clocks enables you to learn useful skills like woodworking, metalworking and engraving. The hobby allows for a great deal of creativity too. You can customize the style of your clock to match your tastes – from elegant Grandfather clocks to funky modern designs. Clockmaking also appeals to tinkerers and DIY enthusiasts who like working with their hands and making things from scratch. As mass produced products proliferate, crafting your own clock is a way to add uniqueness and personal style to your home.
This guide aims to give you all the key information you need to get started making your own clock. We’ll cover everything from sourcing materials, to assembling the internal mechanisms, to adding decorative touches. With a passion for learning and some diligence, you’ll gain the skills and techniques required to bring your clock designs to life. So let’s get started! The journey toward your own hand-crafted timepiece begins here.
Needed Materials
The main components needed to make your own clock are the clock movement, clock face, and clock hands. Here’s an overview of each part:
Clock Movement: The clock movement is the internal mechanism that drives the clock hands and makes the clock tick. You’ll need a battery-operated quartz clock movement, which provides accurate timekeeping. Choose a movement that fits the size of your clock face.
Clock Face: The clock face, also called the dial, is the background that sits behind the hands. You can purchase a pre-printed clock face or make your own printable template. Choose a design that matches your style.
Clock Hands: The hour, minute, and optionally second hands sit on top of the clock face and rotate around it. Make sure to get hands that fit the clock movement shaft size. Metal or wood hands are common choices.
In addition, you may need tools like a drill, craft glue, paint/stain, and other decor items for customizing your clock. Get all the necessary parts before starting your project.
Clock Movements
The most common types of clock movements are quartz, mechanical, and pendulum.
Quartz movements use a quartz crystal and integrated circuit to keep very precise time. They require a battery as their power source. Quartz clocks are inexpensive and accurate. However, the ticking motion of the second hand tends to be jerky compared to other movement types.
Mechanical movements operate through a series of gears, springs, and levers without any electronics. They are powered by the unwinding of a mainspring. Mechanical clocks can have a smooth, continuous motion of the second hand. However, they tend to be less accurate than quartz clocks and require periodic winding.1
Pendulum movements keep time using a swinging pendulum rod on a gear train. The pendulum regulates the motion of the gears. These are classic clock movements that are often used in grandfather clocks. Pendulum clocks have inherent inaccuracies but deliver a pleasing pendulum swing.
Assembling the Clock
Once you have all the necessary components, you are ready to assemble the clock. Here are step-by-step instructions for putting it all together:
1. Drill a 3/8 inch hole in the material you want to use as the clock face. This could be wood, metal, or any other rigid material. The hole needs to be centered where you want the hands to point to.
2. Insert the clock movement into the hole. The threads on the movement should stick out through the front of the material.
3. Place the retaining nut over the threaded portion of the movement on the backside. Tighten it down with pliers or a wrench to hold the movement securely in place.
4. Insert the hour hand over the hole for the hour hand pin. Place the minute hand over the hole for the minute hand pin.
5. Carefully press the hour and minute hands onto their respective pins until they are securely attached. Make sure the hands can move freely.
6. If your clock movement has a second hand, attach that over the smaller hole in the same manner as the other hands.
7. Attach any tabs, spacers, washers or other hardware that came with the movement. Refer to the instructions for proper placement.
8. Place the dial or clock face over the movement, aligning the shafts with the holes. It may snap or screw into place.
9. Insert the battery into the movement, observing proper polarity. The clock should start ticking right away.
Be patient and pay close attention to each step. With care, you will have a working clock movement installed and ready to keep time. Refer to the product documentation if anything is unclear. Let the fun of customizing the dial and hands begin!
Installing Clock Hands
Once you have assembled the clock and installed the movement, it’s time to add the clock hands. The hands include the hour hand, minute hand, and optional second hand. Proper installation of the hands is important for accurate timekeeping.
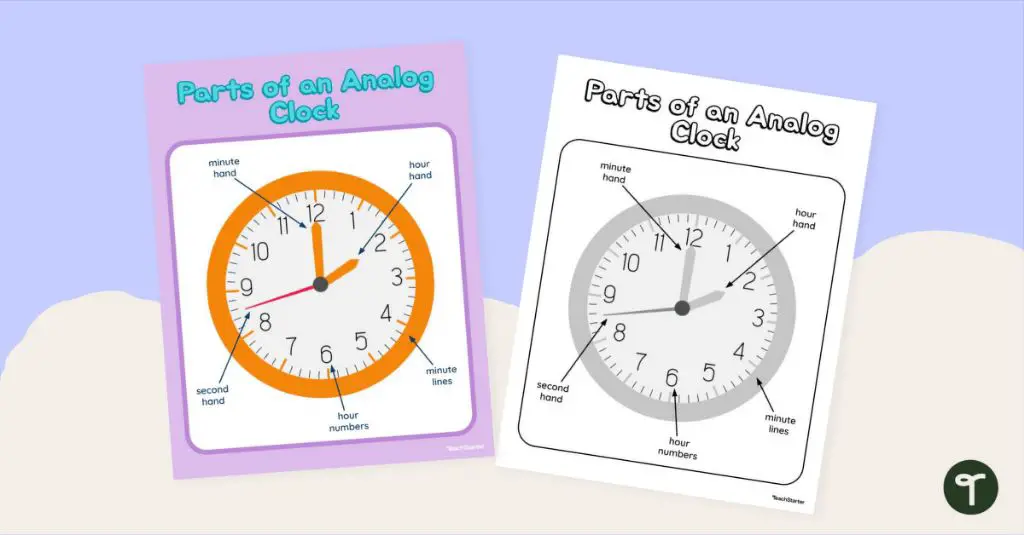
First, identify which hand is which. The hour hand is the shortest, the minute hand is medium length, and the second hand is the longest. Some kits may have arrows or labels indicating their lengths.
Carefully unpack the hands from their packaging. Be especially gentle with the second hand, as it is delicate. Place the clock hands on a soft surface while you prep the clock.
Locate the shafts on the clock movement where the hands attach. There will be one for each hand – hour, minute, second. Consult your instruction manual for specifics on your model.
Gently slide the hour hand onto the hour shaft, being careful not to bend the shaft. The hole in the base of the hour hand should have a tight fit on the shaft. Secure the set screw or nut to hold it in place.
Install the minute hand the same way, sliding it onto the minute shaft and securing. The second hand also slides onto its shaft and tightens down.
Be sure all hands can move freely without rubbing. Test the motion by gently spinning each hand. Adjust as needed until there is a smooth range of motion.
Your clock hands are now installed and ready to keep accurate time!
Adding Decorative Touches
A simple DIY clock can be transformed with decorative touches to make it truly unique. Here are some ideas for adding flair to your homemade clock:
Painting or staining the wood frame and backboard is an easy way to make the clock your own. Go for a solid color, ombre effect, or even a fun pattern. Make sure to use paint or stain formulated for wood. Allow proper drying time before proceeding.
Adding numbers around the clock face gives it a finished look. Use sticker numbers, freehand paint them, or consider getting creative with objects like buttons or seashells. Place numbers at each 5-minute interval for a clean look.
Consider attaching embellishments around the clock frame like faux gems, feathers, ribbons, sea glass, beads, leaves or fabric. Glue items on securely so they don’t fall off over time. This is a great opportunity to upcycle materials you have on hand.
Small touches like word art, inspirational quotes or your family name can add meaning. Paint or use vinyl letter stickers. Place your personalized touches thoughtfully so the clock hands aren’t obstructed.
The options for customizing your homemade clock are endless! Adding decorative details puts your personal stamp on it.
Troubleshooting
If you run into issues with your homemade clock, there are some common fixes you can try before starting over. Here are some of the most common troubleshooting tips for DIY clocks:
If the clock stops running or runs slow, check the battery. Make sure you are using a new, high-quality battery in the clock movement. Some movements need a more powerful battery than you might expect.
If the hands are loose or not moving properly, carefully remove them and re-install following the kit instructions. Make sure the hands are pressed firmly on the stems. You can use a slight bend or small piece of tape to add more friction.
Check that all gears inside the clock are aligned and turning properly. Sometimes a gear can skip or slip. Gently realign any gears that look off.
If the clock stops working when hung on a wall, there may be an issue with the pendulum swinging freely. Make sure the clock is securely mounted but has space around the edges for the pendulum to operate.
For any other issues, carefully re-read the assembly instructions and double check each step. Most kits come with troubleshooting tips. You can also search online clock forums for advice about your specific clock movement brand and model.
Customizing Your Clock
Some of the most fun and creative clocks allow you to put your personal stamp on them. Making a unique, one-of-a-kind clock lets you showcase your style and preferences. There are endless possibilities for customizing and personalizing your clock.
One approach is to use items that reflect your hobbies or interests. For example, if you love to cook, you could make a clock out of cooking utensils or fancy plates. Or if you’re a music lover, you could use mini musical instruments or old records as clock pieces. Get creative with things you’re passionate about!
You can also customize your clock around themes or colors you love. Make a beach-themed clock with sand, seashells, and driftwood if you adore the ocean. Or go bold with a clock made from paint swatches in your favorite color palette. Add shapes, colors, and textures that are meaningful to you.
When it comes to the clock face, look for one with a unique or intricate design that fits your style. Or decorate a plain clock face yourself with patterns, photos, or artwork. The options are endless for making the face your own.
Personalized messages and quotes are another way to customize your clock. Add lettering with special dates, family names, inspirational sayings, or favorite song lyrics. This adds sentimental value that makes your clock extra special.
Let your imagination run wild to create a personalized clock that’s distinctly you. The ability to customize your clock is what makes homemade clocks stand out.
Displaying Your Completed Clock
Once your clock is fully assembled and keeping accurate time, it’s time to display it proudly. Here are some tips for mounting, lighting, and locating your homemade clock for optimal visual impact:
For mounting, you can hang the clock on the wall by using a sawtooth hanger attached to the back. Make sure to use one sturdy enough to hold the weight of the clock. Alternatively, you can place the clock on a shelf, mantel, or tabletop using small rubber bumpers attached to the bottom to prevent sliding.
To highlight your clock, use directional lighting to illuminate it. Gooseneck lamps work well for focusing light directly on the clock face. LED strip lighting behind the clock will also make it stand out on the wall. Just avoid very bright or harsh lighting that could make the clock difficult to read.
When deciding where to display your clock, consider the size and select a location where people will frequently see and appreciate it. For large statement clocks, place them above the fireplace, by the front entryway, or at the end of a hallway. For smaller clocks, use them on bedside tables, desks, shelves, or mantels.
Get creative with your display! You can incorporate your homemade clock into a gallery wall with other DIY art pieces. Or surround it with decor items like flowers, books, or candles to complement the colors and materials used to create the clock.
Conclusion
In summary, making your own clock can be a fun and rewarding DIY project. With some basic materials, clock movements, and clock hands, you can create a custom timepiece to display in your home. Take the time to carefully assemble the parts and add any decorative touches. Troubleshooting any issues with keeping proper time is part of the process. With practice, you’ll be able to make unique clocks to give as gifts or to sell. For more information, refer to the clock-making guides from the National Association of Clock and Watch Collectors (https://www.nawcc.org/index.php/library/horological-information/162-beginners-corner).