How Can We Decorate A Pot?
Decorating pots is a fun and creative way to add interest to your indoor or outdoor spaces. With a little bit of imagination, you can transform a plain pot into a beautiful planter that showcases your style. Pot decorating has become increasingly popular in recent years for a few key reasons.
Pot decor allows you to add personal flair to functional items like planters. By decorating pots, you can match them to your home’s style, highlight favorite colors, or make plantings more visually dynamic. Decorated pots also make great gifts. Additionally, decorating pots yourself is an enjoyable hands-on craft and creative outlet. It provides a way to express your unique tastes.
Some benefits of decorating pots include being able to customize inexpensive containers, repurposing found objects creatively into planters, and engaging in an eco-friendly upcycling craft. Overall, decorating pots allows you to add artistry and personalization to your living spaces in an easy, enjoyable way.
Painting
Acrylic paint is commonly used for painting pots as it adheres well to ceramics and holds up to weather. When using acrylics, thin the paint slightly with water for easier application. Apply 2-3 coats with a foam brush using broad strokes to coat the pot evenly (Source:https://www.finegardening.com/article/painting-clay-pots).
Spray paint can also be used for quick and even coverage. Make sure to use spray paint formulated for outdoor use. Lightly sand glossy surfaces before spraying for better adhesion. Apply multiple thin coats rather than one thick coat, allowing drying time between applications (Source: https://www.firstdayofhome.com/easy-painted-flower-pots/).
Get creative with painting techniques like ombre, gradients, patterns, and shapes. Use painter’s tape and stencils for clean lines and crisper edges. Distressing techniques like sanding and dry brushing can add vintage charm.
Decorative Tape
Decorative tape is a fun and easy way to customize pots. Some popular types of decorative tape include washi tape, duct tape, masking tape, and clear tape. Washi tape comes in endless designs and colors, making it perfect for creative pot decorating. Duct tape and masking tape also come in fun patterns and can be used to create stripes or geometric designs.
When decorating with tape, start by cleaning the pot surface so the tape adheres well. Measure out and cut strips of tape to your desired lengths before applying them to the pot. You can create stripes, dots, geometric patterns like diamonds or triangles, floral designs, or spell out words and phrases.
Get creative with how you apply the tape too. Twist strips before adhering them, ruffle them up for texture, layer different patterns, or combine wide and thin strips. Use solid colors or assorted patterns depending on the look you want. Apply strips vertically, horizontally, or diagonally for interest.
Some key tips when decorating pots with tape: apply the tape smoothly without bubbles or wrinkles, rub it down firmly to maximize adhesion, and seal the edges with extra tape strips to prevent peeling. Change up the tape frequently for a fresh look. With so many colors and patterns to choose from, you can easily decorate pots in any style with creative tape designs.
Mosaics
Mosaics are a beautiful way to decorate the surface of a pot with tiles, glass, stones, or other small objects. To create a mosaic design, you first need to gather your mosaic materials. Ceramic tiles, stained glass, marbles, rocks, beads, or broken china work well for mosaics. Make sure the pieces are roughly uniform in size and shape.
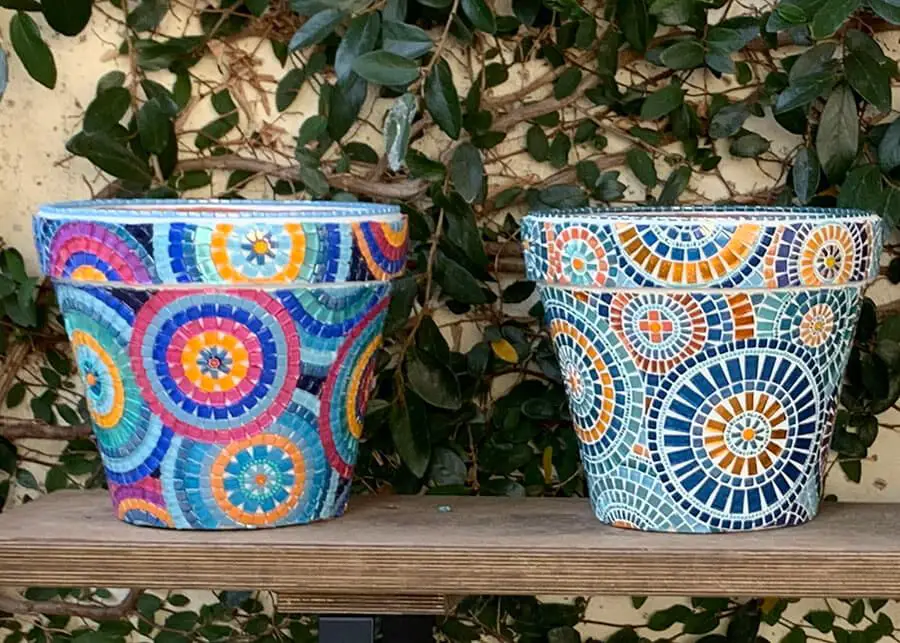
Next, plan your mosaic design. Simple abstract patterns, shapes, or figures work best. Draw your design lightly in pencil on the surface of the clean pot if desired. Apply a layer of mosaic adhesive like tile mortar to the surface of the pot and press your mosaic pieces into place following your design. Let it dry fully before grouting.
Fill in gaps between mosaic pieces with grout following package directions. Let it dry and then polish gently with a soft cloth. Add a sealant if desired to protect the finished mosaic pot. Hang outdoors or indoors to display your new mosaic pottery!
For design inspiration, geometric patterns, animal shapes, garden themes like flowers or butterflies, and abstract swirls all make striking mosaic pot designs. You can also spell out words or names with your mosaic pieces.
Decals and Stickers
Vinyl decals are a fun and easy way to decorate flower pots and planters. Some popular options for pot decals include:
- Floral motifs – Choose decals with delicate flower designs, vines, or leaves to embellish a basic pot.
- Monograms and words – Personalize a pot with initials, a name, or inspiring quotes.
- Geometric shapes – Bold stripes, polka dots, and geometric patterns make a statement.
- Bug and animal decals – Whimsical bees, butterflies, birds, or farm animals can add personality.
You can find inexpensive pot stickers and decals for sale at craft stores like Michaels, online at sites like Echo Valley, and even big box stores like Target and Walmart. Look for vinyl options that are weatherproof and designed for outdoor use.
When decorating a pot with decals, first clean the surface so the vinyl will adhere properly. Arrange decals creatively, mixing patterns and themes for visual interest. Decals look great on terra cotta, ceramic, plastic, and concrete pots. Place several smaller decals to create a collage effect, or make a statement with one oversized decal.
Etching and Engraving
Adding an etched or engraved design gives a personal touch to flower pots. There are various tools used for etching and engraving flower pots.
Etching Tools and Techniques
Etching uses chemicals to eat away the surface and create a design. Common etching tools include vinyl cutters to make etching stencils, etching cream containing acids or bases, and rubber tools for applying the etching cream.1 The process involves designing a stencil, applying the etching cream through the stencil to the pot, letting it sit to etch the design, then washing off the cream.
Engraving Tools
Engraving uses manual tools to carve out designs in the pot’s surface. Common tools are electric engravers, diamond point chisels, and rotery tools.2 These tools abrade and carve out material to create engraved lines and textures.
Designs to Etch or Engrave
Good designs for etching or engraving pots are names, initials, decorative borders, floral patterns, geometric shapes, and custom artwork. The designs can be personalized with names, dates, and meaningful symbols and phrases.
Collaging
Collaging on a pot is a fun and creative way to decorate it. You can use all kinds of paper, fabric scraps, photos, magazine clippings, tissue paper, wrapping paper, and more to create a unique collage design.
Decoupage or Mod Podge are great adhesives to use when collaging on pots. They will help adhere the collage materials smoothly and permanently onto the pot surface. Apply in layers to seal the collaged elements on.
You can create abstract collage designs, geometric patterns, or even do a themed collage with photos of loved ones or that coordinates with the plant the pot will hold. Layer different papers, fabrics, photos, and found objects to make it multidimensional.
Cover the entire outside surface of the pot, just the top rim, or a specific section for different collage effects. Add fun embellishments like buttons, beads, charms, or ribbon on top of the collaged papers for even more texture and interest.
Get creative with your collage materials and designs to make your pot truly one-of-a-kind. The options are endless!
Stamping
Stamping is a simple yet creative way to decorate pots and planters. There are two main techniques for stamping on pots:
Rubber stamping involves using premade rubber stamps with patterns or designs on them. The stamps are inked and then pressed onto the surface of the pot to leave behind the pattern. Rubber stamping allows you to quickly repeat designs around the pot in a consistent manner. Some common rubber stamp patterns for pots include floral motifs, geometric shapes, and scenic images like birds or butterflies.
Block printing involves carving a design out of a block of material like wood or linoleum. You then ink the carved block and press it onto the pot’s surface. Block printing creates a handmade, artistic feel. The design has indented areas that pick up ink and raised areas that don’t, forming the overall pattern. Block printing patterns can include detailed floral designs, landscapes, or custom motifs.
Both rubber stamping and block printing allow you to repeat motifs in a consistent way around a pot. You can alternate or reverse the designs for interest. Layering multiple stamped elements, like a scenic background behind a floral stamp, also adds depth and interest.
Stenciling
Stenciling is a fun and easy way to decorate pots. Stencils can be made from materials like plastic, cardboard, or vinyl. When choosing a stencil material, plastic and vinyl are good options for durability and reuse. Cardboard can work for simple, single use stencils.
There are many creative stencil patterns and shapes to explore for pots. Geometric shapes like circles, squares, triangles, diamonds, and stars make classic stencil designs. Silhouette stencils of plants, animals, or objects also look great. Repeating patterns with multiples of the same shape or alternating designs have a cool visual effect.
When stenciling a pot, first clean and dry the surface. Position and secure the stencil, then apply acrylic craft paint over it with a brush or sponge applicator. Carefully remove the stencil to reveal the design. Let the paint fully dry before adding another stencil layer. Seal painted pots with an acrylic sealer spray for protection.
Conclusion
Decorating pots can be a fun and creative way to add personality and visual interest to your indoor and outdoor spaces. This guide covered a variety of techniques, from painting and collaging to stamping and etching. You can use one method or combine several for a truly one-of-a-kind look.
Some tips when combining decoration methods: start with the messier techniques like painting first. Let those layers dry fully before adding decals, tape, or other materials on top. Use stenciling and etching to accent painted or collaged designs. And don’t be afraid to layer and overlap – the more textures and patterns, the better!
The benefits of decorating pots go beyond aesthetics. It allows you to upcycle found objects and create planters perfectly suited to your style. The process can be meditative, boosting your mood. And handmade pots add welcoming charm to your home or garden. With so many easy ways to customize basic containers, let your creativity run wild!

