How Can You Make Texture Effects In Clay?
Creating texture in clay can add visual interest and dimension to any ceramic project. Textures allow you to introduce patterns, simulate materials, and provide an interactive surface finish in your clay work. Clay’s plasticity makes it highly receptive to textural techniques at any stage of the sculpting process.
There are endless options for producing eye-catching textures using clay. You can imprint patterns by pressing items into the surface, make grooves and shapes using clay tools, achieve woven and layered effects with mokume gane, and more. Texture not only enhances the aesthetic appeal of finished pieces, but also improves grip and feel.
Textures require some trial and error, but mastering various techniques opens up creative possibilities and allows you to make your clay creations truly unique. This guide will walk through the major methods for making impressions, patterns, and designs in clay to turn any vessel, sculpture, or decorative object into a textural piece of art.
Gathering Materials
When working with clay textures, you’ll first need to gather the right materials. The two key items are the clay itself and tools or household objects to imprint textures.
Clay Types
The type of clay you choose will impact the finished texture. Polymer clay holds fine detail well for items like jewelry or figurines. Air-dry clays can capture textures but may crack as they dry. For sculpture or pottery, choose moist modeling clay that won’t dry out as you work.
Clay Tools
Dedicated clay tools like rollers, cutters, sculpting loops, and modeling tools will help shape and smooth clay. You’ll also need carving tools like knives, needles, or wood sticks to incise details.
Textured Items
To imprint patterns, gather textured household objects like coins, shells, buttons, rubber stamps, plastic nets, or anything with an interesting texture. You can also use commercial texture sheets. Avoid anything that could stick to the clay.
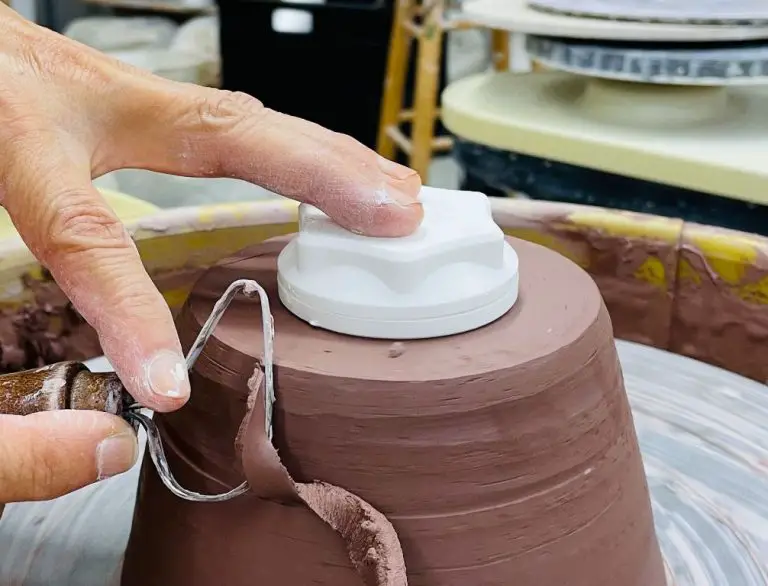
Rolling and Cutting Clay
One of the most basic techniques for texturing clay is to roll it out to your desired thickness and use cutters to create patterns and textures. Start by taking a lump of clay and smashing it down with your palm or a clay roller to form a rough slab. Using an acrylic clay roller, roll the clay repeatedly in different directions, applying even pressure, until you have a smooth, flat, evenly thick sheet of clay.
The thickness you roll the clay to will depend on the effect you want. Thinner sheets like 1-3mm are good for making delicate textures, appliques, and sheets you can drape over forms. Thicker slabs like 5-10mm are better for structural pieces, stamping, and carved textures. For most handheld texture tools, aim for 4-6mm thickness.
Once your clay is rolled out, use a variety of cutters to create customized textures. Clay cutters come in all shapes like circles, squares, stars, hearts, leaves, etc. Press the cutters straight down into the clay, rocking gently if needed to cut all the way through. Lift the cutter straight up to remove the cut shapes. Gather up the excess clay and re-roll it to recycle your clay. Arrange the cutout shapes on your project or overlap them to form new patterns.
Cutters are great for quickly texturing large surface areas. You can also use cookie cutters and household objects like bottle caps as custom clay cutters. Get creative with cutting shapes or outlines of objects to form unique textures in clay!
Pressing Textured Items
One of the easiest ways to add realistic texture to clay is by pressing items from nature into the surface. Leaves, ferns, flowers, bark, seashells, sand dollars, feathers, and lace all make great textures.
To press an item into clay:
- Roll out a slab of clay to your desired thickness.
- Choose your textured item and press it firmly into the clay, removing any trapped air bubbles by pressing around the edges.
- Carefully peel the item off the clay, leaving its impression behind.
- You can press multiple items into one slab of clay, just leave space between each impression.
- Let the clay completely dry. When dry, the texture will be permanently embedded.
- Fire or bake the clay according to package directions.
When pressing delicate natural items like leaves, they may not withstand the clay drying and firing process. The leaf texture will remain, but the original leaf may disintegrate. For items you want to preserve, gently press them into uncured clay, then remove before letting the clay fully dry.
You can also press man-made materials like lace, burlap, sequins, buttons, keys, coins, etc. into clay. Just be sure they can withstand the highest baking temperature needed for the clay. Plastic items may melt.
Get creative with the textures you press – the options are endless! Combining various natural and man-made items will add beautiful depth and realism to your clay creations.
Using Clay Tools
There are a variety of specialized clay tools that can impart appealing textures into clay. Some of the most common and useful tools include:
Clay Rollers
Clay rollers allow you to roll out smooth, even sheets of clay in a variety of thicknesses. Using different rollers like ribbed acrylic rollers can impart parallel line patterns. You can also use rollers with unique patterns for different effects.
Clay Cutters
Clay cutters allow you to cut precise shapes out of rolled clay. Using various cookie cutter style shapes or letter/number cutters can create interesting patterns and textures.
Silicone Molds
Silicone molds are very useful for imparting texture. Press clay into molds to easily achieve wood grain, lace, geometric and many other 3D surface patterns.
Clay Extruders
Clay extruders are a useful tool for creating long coils, ropes, and lattice patterns. They work by pushing the clay through a shaped die to create a continuous form.
To make ropes, pass a block of clay through a round die. Move the extruder at a steady pace to keep the clay rope even. Ropes can be stacked, twisted, and woven together to make thick cords or netting. Allow the ropes to firm up slightly before handling.
For coils, use a large round die and move the extruder in a circular pattern as you squeeze out the clay. Coil the extruded form by winding it around itself. Pinch the coils together lightly to help them adhere. Coils can be used to make bowls, vases, or decorative shapes.
For lattice effects, choose a die with multiple holes to create a woven pattern. Allow the clay strands to overlap at different angles as you extrude. Use a flat die to make wide ribbons you can layer in a lattice design. Let the clay firm up some before handling the lattice gently.
The endless shapes possible with an extruder make it a versatile way to add complex textures quickly. Experiment with different dies and extrusion techniques to create your own custom effects.
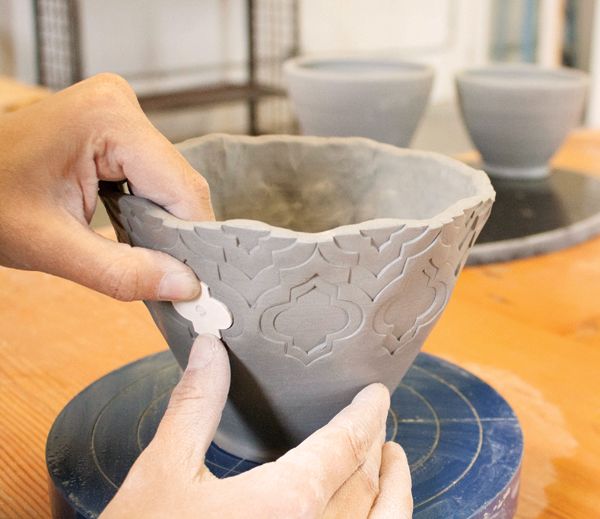
Incising and Carving
Incising and carving the surface of clay is a great way to add decorative texture effects. Using various tools, you can incise lines, patterns, or designs into the surface of both wet and leather hard clay.
To incise lines and patterns, start with leather hard clay so it has some firmness but is still able to be carved into without cracking. Use a needle tool, sculpting tool, or even the end of a paintbrush to etch lines and mark designs into the surface. You can incise fine delicate patterns or bold geometric shapes.
For deeper textures, use loop and ribbon modeling tools. These tools have a sharp edge on one side for carving, and rounded edge on the other for smoothing. Press the sharp edge into the clay at an angle and carve lines or patterns into the surface. The curved tools allow you to gouge swirling textures.
Consider incising textures like crosshatching, dots, waves, spirals, or geometric shapes. You can carve low-relief textures or cut all the way through the clay to make pierced effects. Allow the carved clay to dry completely before firing.
Mokume Gane
One of the most visually striking techniques for creating texture in clay is Mokume Gane. Mokume Gane involves stacking and blending layers of clay to reveal unique patterns.
To achieve the Mokume Gane effect, start by rolling out sheets of polymer clay in contrasting colors, such as black and white. Stack the sheets of clay on top of each other and press them together firmly. Use an acrylic roller or brayer to compress and bond the layers.
Next, use a blade or clay cutter to slice into the stacked clay at angles, revealing the layered pattern. Gently pull the clay apart, stretching and distorting the pattern. You can also twist or fold the clay. The revealed pattern resembles the flow of woodgrain, with striking stripes and blended color variations.
Mokume Gane allows you to achieve beautiful layered textures. Experiment with stacking more colors of clay and try various angles of slicing to create signature patterns. When cut, the cross sections of the clay reveal unique designs in each piece.
Mica Powders
Mica powders are a great way to add shimmering color effects to polymer clay. The powdered mica flakes reflect light, creating a luminous, pearlescent sheen. Mica powders are available in a huge variety of colors from bright neons to earthy neutrals.
To use mica powders, you simply dust them onto the surface of baked or raw clay. You can mix the powders into liquid clay for colorful swirls, or layer them with liquid clay in mokume gane patterns. Metallic mica powders look especially striking on dark clay backgrounds.
For simple color effects, brush mica powder over solid clay pieces with a dry brush. Work it into crevices and textures for added dimension. You can also make custom mica blend powders by mixing colors. Blend metallic, iridescent and color shifting micas for dazzling combinations.
To create colorful sketches or designs, use a paintbrush to apply liquid clay as an adhesive base. Then sprinkle on mica powders through a fine mesh sieve. Let the powders adhere before gently tapping off the excess. This creates a colorful raised texture you can enhance with more layers.
With mica powders, the possibilities for making striking clay textures truly shine.
Finishing Touches
Once you’ve created your desired textures, there are a few finishing techniques that can enhance the look. Focus on sanding, buffing and adding a clear coat.
Sanding
Lightly sanding clay smooths out any rough areas and prepares the surface. Start with a medium grit sandpaper (around 150 grit) and gently rub over the entire piece. Then use a finer grit (220 or higher) for a smooth finish. Sand in small circular motions and be careful not to remove too much clay.
Buffing
Use a soft cloth or buffing wheel to bring out a shine. Buffing compacts the clay and enhances the color. Apply a thin coat of mineral oil or beeswax to prevent sticking. Gently buff back and forth until you achieve the desired sheen.
Clear Coat
Applying a clear acrylic sealant or varnish will help protect the finish and make colors pop. Use a brush or foam applicator to smoothly coat all surfaces, letting each layer dry in between. 2-3 thin coats is ideal for full coverage without pooling. Allow the clear coat to fully cure before handling.