How Do I Make Apothecary Labels?
Apothecary labels have a long history dating back to the 16th century when apothecaries began dispensing medicines in glass jars or bottles with labels indicating the contents. These elaborate labels were designed to showcase the apothecary’s skills and wares. By the 17th century, the labels started including a cartouche with Latin abbreviations for the ingredients 1.
Today, apothecary labels continue to be popular for home decor, gifting homemade products like bath salts or lotions, labeling spice jars in the kitchen, or creating an old-fashioned aesthetic for events. Making customized apothecary labels allows crafters to personalize jars and bottles with vintage-inspired designs.
Materials Needed
There are a few key materials you’ll need to make your own apothecary labels:
Paper, vellum, or transparency film – The type of material you print your labels on will determine the look and feel of the final product. Paper gives a more rustic, textured look while vellum is smooth and translucent. Transparency film allows light to pass through for a modern apothecary style.
Ink pad or printer – You can hand write or stamp labels using an ink pad, or print them from a computer using a regular printer or label printer. Choose ink that is non-toxic and made for the surface you’re printing on.
Adhesive – Look for acid-free, archival quality permanent adhesive to attach your labels and ensure they last. Adhesive sheets for printers or glue sticks work well.
Designing the Labels
When designing apothecary labels, there are a few key considerations:
- Label size and shape – Standard label sizes range from 1” diameter circles to 2” x 4” rectangles. The shape and size will depend on the size and shape of your containers. Circular, oval, rectangular, and square labels are common.
- Font selection – Choose a font that is legible and fits with your overall style. Serif fonts like Times New Roman are traditional, while sans-serif fonts create a more modern look. Use a font size that is readable, often 12-14pt.
- Required label information – Apothecary labels typically include the product name, net weight, directions for use, ingredient list, and any warnings. You’ll also want to include your business/brand name. Make sure to organize this information cleanly.
When designing your labels, focus on creating an attractive, cohesive look that reflects your brand. Refer to examples of apothecary label designs online for inspiration. Utilize templates if desired, but customize the fonts, colors, and arrangement to create labels with your unique style.
Creating the Artwork
The artwork is what really makes your apothecary labels stand out. You have two main options for creating the artwork – hand lettering or designing digitally on a computer.
Hand lettering the labels allows you to give them a classic, vintage apothecary look. This takes practice to master the typography skills needed to letter neatly and beautifully. You can use calligraphy pens, brushes, or markers to hand letter the text. This gives you full creative control over the style and look of the lettering. You can add lovely flourishes and embellishments to make your lettering pop.
Designing the artwork digitally on a computer offers more flexibility and options. You can use graphic design software like Adobe Illustrator or Photoshop to layout your text and graphics. This allows you to choose from a wide selection of fonts and incorporate different colors, shapes, lines, and graphics. You can bring in vintage clip art, botanical drawings, or other decorative elements to embellish the labels. Going digital makes it easier to resize and reproduce the artwork.
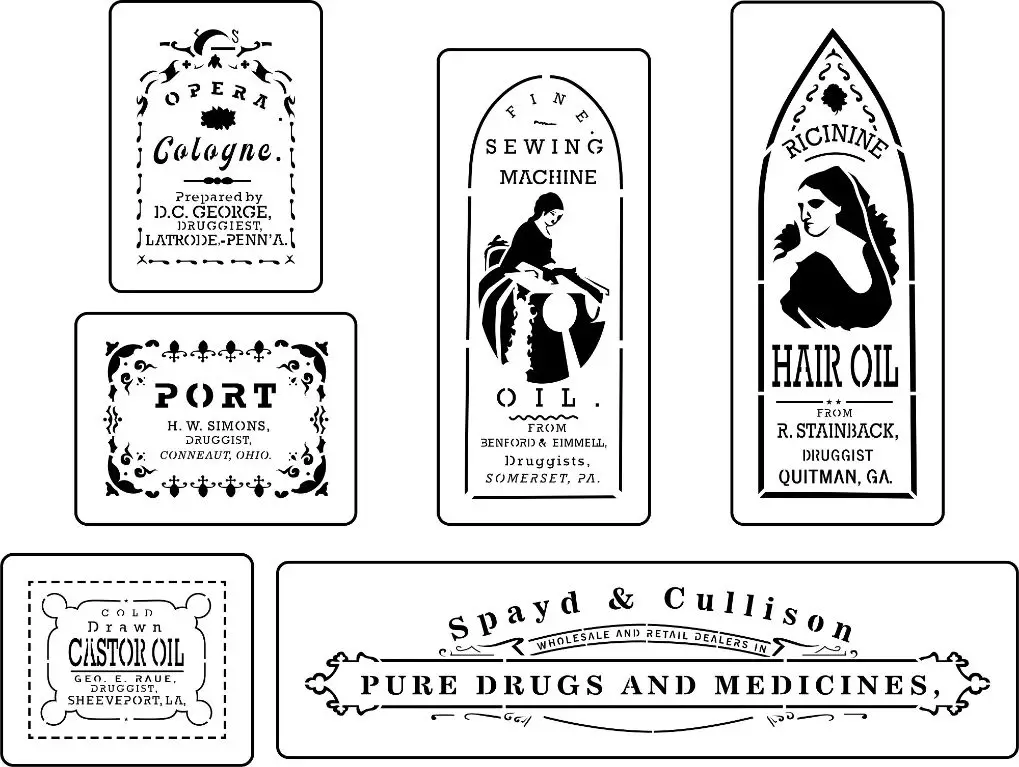
Whether you hand letter or design digitally, think about how you can incorporate relevant graphics and iconography. For example, you could include outline drawings of herbs, flowers, bottles, spoons, and other apothecary symbols. This visual imagery helps bring your labels to life and reinforce the theme. Get creative with borders, backgrounds, illustrations, and other embellishments. Keep in mind any size constraints if printing on small labels.
Printing the Labels
There are a few different methods you can use to print your apothecary labels:
Inkjet Printing
Many home printers use inkjet technology, which works by spraying tiny droplets of ink onto the paper. Inkjet printers are affordable and widely accessible. However, inkjet prints may smear or run if they get wet. The ink may also fade over time when exposed to light. Consider laminating inkjet printed labels if you need them to be more durable.
Laser Printing
Laser printers use toner, which is fused to the paper using heat. Laser printed labels stand up better to moisture and abrasion compared to inkjet prints. The toner also resists fading. However, laser printers tend to be more expensive than inkjets. You’ll need to print onto label sheets designed for laser printers.
A good laser printable label sheet is the Avery Address Labels for Laser Printers.
Hand Stamping
For a vintage look, you can hand stamp your labels using individual letter stamps and an ink pad. This takes more time and effort, but allows you to recreate the charm of old-fashioned apothecary labels. Make sure to use archival ink that is fade resistant and won’t bleed when wet.
A good ink pad for hand stamping labels is the Ranger Archival Ink Pad.
Applying Adhesive
There are two main options when it comes to applying adhesive to homemade apothecary labels:
Using self-adhesive label sheets is often the easiest and most convenient method. Self-adhesive sheets come pre-coated with an adhesive backing, so all you need to do is peel and stick the labels once they are cut out. Products like Avery labels recommend following some simple steps like cleaning the surface, applying firm pressure, and avoiding bubbles and wrinkles when using their self-adhesive sheets.
For non-adhesive paper, you’ll need to apply your own glue. Glue sticks, spray adhesives, and liquid glues designed for paper can work well for handmade labels. When applying glue, use a light, even coat across the back of the label before pressing firmly onto the container surface. Avoid excess glue seepage around the edges. Let the labels set and dry fully before sealing and finishing your apothecary jars or bottles.
Cutting the Labels
Once your labels have been printed, the next step is to cut them to size. There are two main options for cutting apothecary labels – using a die cutting machine or cutting them by hand.
Die cutting machines utilize steel-rule dies to cut through multiple layers of paper or cardstock at once. This allows you to cut many labels simultaneously, making the process much faster. If you plan to produce a lot of labels, investing in a die cutting machine is recommended. There are manual models as well as electronic, programmable ones. You’ll need to purchase or make custom dies in the specific shapes and sizes needed for your labels.
For hand cutting labels, an X-Acto knife and metal ruler or cutting mat can be used. This works well if you just need to produce smaller quantities. Lay the printed labels out on a cutting surface and carefully measure and cut along the edges. It’s important to use a sharp new blade and cut against a strong metal edge for clean cuts. Hand cutting each label individually will be time consuming compared to die cutting.
No matter which cutting method you choose, be sure the labels are cut neatly and consistently to create a professional finish.
Labeling Containers
When labeling containers such as bottles or jars, it’s important to consider the material. Glass and plastic surfaces require different adhesives and preparation for the label to properly adhere. According to https://www.epilabelers.com/videos/uii-labeler-applying-labels-to-containers/, plastic containers are usually easier to apply labels to than glass.
Proper label placement is also key. The label should be positioned consistently in the same spot on each container for a uniform look. For round containers like bottles, the front and back label should be aligned and leave a small gap between them. Read https://labeller.co.uk/when-should-product-labels-be-applied-to-containers/ for tips on applying labels to already filled containers using a wraparound labeling machine.
Consider any text or artwork that should stand out most prominently on the main product label. Leave sufficient blank space around the label edges so it doesn’t wrap around the sides. Test different label positions to determine the optimum placement before mass production.
Sealing and Finishing
After applying the labels to containers, it’s important to seal and finish them properly for protection and aesthetics. Two common methods for sealing apothecary labels are clear coatings and lamination.
Applying a clear coating like polyurethane or acrylic provides a protective barrier against moisture, oils, and handling. This helps prevent smearing, fading, or peeling of the labels. Be sure to use a coating formulated for the label material. Apply 2-3 thin coats, allowing each to fully dry before adding the next. Too thick of a coating may cause bubbling or yellowing over time.
Lamination creates a plastic film shield over the labels. This also resists damage from water, oils, and general wear and tear. Use a high quality laminate designed for home use labels, applying with a laminating machine per the instructions. Be wary of getting air bubbles during lamination, which can be prevented by working slowly and using a roller. Allow laminated labels to fully cure for 24-48 hours before use.
Both sealing methods will provide a polished, professional finish for handcrafted apothecary labels. Proper application is key to avoiding issues like chipping, peeling, or discoloration down the road. With the right products and techniques, sealed labels can retain their beauty for many years.
Troubleshooting
Making custom apothecary labels can run into some common issues. Here are some tips for troubleshooting:
Preventing Running Ink
Water-based inks like those used in inkjet printers can bleed or run when exposed to moisture. Let printed labels dry completely before applying them to containers. Consider using a laser printer for crisp, smudge-proof text. You can also apply a protective sealant spray after printing to help prevent ink running.
Stopping Curling Edges
Label sheets can absorb moisture and curl up at the edges. Store unused sheets in a sealed bag or container to prevent humidity exposure. When printing, make sure the paper feed tray isn’t overloaded which can cause sheets to bend. Adjust printer settings to use minimal ink saturation. Gently flatten any curled sheets before cutting out labels.
Improving Adhesion
Make sure container surfaces are clean and dry before applying labels. Rough or textured surfaces may need extra adhesive. Try aerosol spray adhesives for a stronger bond, or use double-sided tape behind labels. Heat can also help adherence – carefully warm the label adhesive with a hair dryer before pressing onto containers.