How Do You Crimp A Connector?
Crimp connectors are small metal sleeves that are crimped onto the ends of electrical wires to create a conductive connection Source. Rather than soldering or twisting wires together, crimp connectors provide a quick, simple, and secure method for joining wires in electrical and electronic projects.
Properly crimped connections are critical for reliability and safety. This guide will cover the key steps for crimping wires correctly, including selecting the right connector type and size, stripping and inserting the wire, making a quality crimp, and testing the connection. Following best practices for wire crimping will ensure robust, long-lasting electrical connections.
Safety First
When crimping electrical connectors, safety should always be the top priority. Wearing proper protective equipment like safety glasses is crucial to avoid injury (7 Safety Precautions when Using Crimping Pliers – DoItYourself). Make sure to disconnect power to the circuit you are working on. Use the proper crimping tools designed for the connector you are installing, as using pliers or other improvised tools can result in a faulty connection or damage to the wire (Precaution for Crimping Process – JST Manufacturing). Follow all safety precautions provided by the tool manufacturer, such as securing the tool properly before crimping (Customer Manual SAFETY PRECAUTIONS Latch Head – TE Connectivity). By putting safety first and using the right tools and procedures, you can crimp connectors efficiently while avoiding electrical or physical hazards.
Select the Right Connector
Choosing the right connector is crucial for making a solid crimp connection. The connector must match the wire size and type for your specific application. There are several types of electrical crimp connectors:
- Butt connectors – used to join two wires together
- Spade terminals – connect wires to screw terminals
- Ring terminals – connect wires to bolts
- Pin terminals – fit into holes in devices
The most common electrical crimp connectors have a metal barrel with a plastic insulation cover. The barrel comes in different sizes to accommodate wire gauges from 22 AWG to 6 AWG. Choose a connector that matches your wire size. Using one that is too large or too small can result in a poor connection.
You’ll also want to select the proper insulation type. PVC is common, but for high heat applications look for nylon insulated connectors (source: https://www.elecdirect.com/crimp-wire-terminals). Make sure the connector is rated for your expected operating voltage.
Finally, consider the environment. Plated connectors resist corrosion better for outdoor use. And high temp, high vibration applications may require a more heavy duty connector.
Strip the Wire
When stripping the wire, it’s important to use proper wire strippers that are the right size for the wire gauge you are working with. As the guide Proper Installation of Sealed Crimp Connectors recommends, only strip off 5/16″ of insulation from the end of each wire. Stripping off too much insulation can lead to shorts or other connection issues. Go slowly and be careful not to nick or cut into the copper conductors, as this will weaken the wire.
Insert into Connector
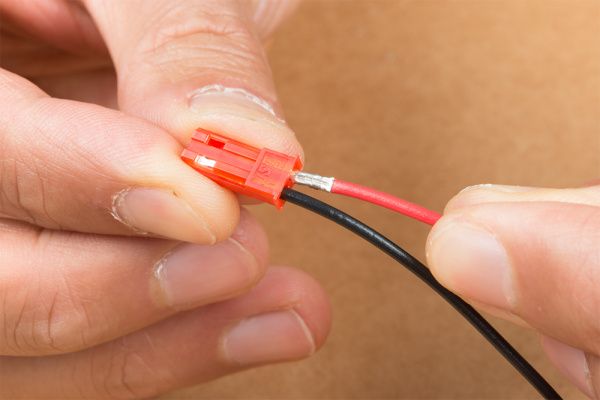
When inserting the stripped wire into the connector, it is critical to ensure that all strands of the wire are fully inside the connector. Any loose strands sticking out can cause problems later on. Take a close visual inspection to guarantee no copper strands are visible outside of the connector.

Also be sure to insert the wire completely to the end of the connector. Many connectors have an inspection window you can look through to double check that the wire is fully inserted. If your connector does not have an inspection window, tug gently on the wire after insertion to confirm it is gripped snugly and cannot slide back out.
Getting all the wire strands fully into the connector and inserting the wire fully are vital steps. Any errors here can lead to a poor connection or loose strands that could short out against other wires or metal surfaces. Taking care at this stage ensures a solid, lasting crimp.
Crimp It
Proper crimping is essential for a solid, lasting electrical connection. Make sure to use the correct crimping tool for the job. The tool should match the connector type and wire size. Choose a ratchet-style crimp tool for the best results, as these will apply consistent, even pressure.
Position the stripped wire ends fully inside the connector. The bare conductor should be visible through the inspection window. Squeeze the handles together in one smooth motion, ensuring the jaws close completely. Avoid partial crimps that don’t fully compress the metal barrel.
According to this tutorial video, the crimp should deform the connector and wire into a uniform mass. Inspect the crimp to confirm the metal teeth have bitten through the insulation to grip the core. Re-crimp if necessary to achieve a tight, secure joint.
Take care not to overcrimp, as this can cut or damage the wire. A properly executed crimp will hold the wire firmly without distorting or cracking it.
Tug Test
After crimping the connector, it is important to test the strength of the crimp by gently tugging on the wire. This helps ensure the metal teeth have bitten through the insulation and made a solid electrical connection with the wire strands inside. According to Wire Crimp Pull Testers, pull-off force should be measured to ensure the crimp meets specifications. Use your fingers to lightly pull on the wire while holding the connector. There should be no movement or looseness. If the wire slips out even slightly, cut it off and redo the crimp. Proper crimping requires the metal teeth to indent the wire, so a tight connection is crucial. Always double check with a tug test before moving on.
Add Heat Shrink
After crimping the connector, slide a piece of heat shrink tubing over the wire and connector before applying heat. Heat shrink tubing acts as an insulator and protects the connection. Make sure to use a heat shrink tube with an inner diameter that matches the size of the connector. Slide the tubing so it sits centered over the crimped connection.
Then use a heat gun or lighter to apply heat to the tubing. As it heats up, the tubing will shrink down and form tightly around the connector and wire. Heat the entire length of tubing until it has fully shrunk down and sealed the connection. The heat causes the tube to shrink to an exact fit while also melting the inner liner to seal out moisture and prevent corrosion.
Adding heat shrink creates a neat, professional finish for the connection. It insulates the wire and helps protect it from vibration, abrasion, and moisture. This completes the crimping process and ensures a solid, durable connection. For optimal results, choose high-quality adhesive-lined heat shrink tubing to create a waterproof seal.
[Heat shrink wire connectors near me](https://www.zdnet.com/home-and-office/how-to-fix-broken-wires-the-easy-way-with-heat-shrink-butt-connectors/).
Insulate the Connection
After crimping the connector, it’s important to properly insulate the connection. Exposed metal conductors can lead to shorts or shocks if they make contact with other wires or conductive materials. To prevent this, wrap electrical tape around the crimped connector. Ensure you cover any exposed metal.
Electrical tape is an easy and effective way to insulate crimped connections (Amazon). Wrap the tape around the connector with at least a 50% overlap until all bare metal is thoroughly covered. Aim for at least two full wraps of tape for adequate insulation. Press the tape firmly as you wrap to help it adhere and conform to the shape of the connector. Using electrical tape in this manner will protect the connection from moisture, debris, and contact with other conductive surfaces.
Take care when insulating crimped connectors to fully cover exposed metal. Proper insulation helps prevent dangerous shorts and shocks from occurring down the line.
Conclusion
Following the proper steps and techniques for crimping connectors is crucial to ensure a secure, long-lasting connection. To recap, be sure to select the right connector and wire gauge, strip the wire properly, insert it fully into the connector, use the correct crimping tool and technique, perform a tug test, add heat shrink tubing, and fully insulate the connection. Avoid common mistakes like under-crimping, over-crimping, crimping on insulation, or using the wrong tools. Proper crimping requires precision, practice, and care. Taking the time to do it right will prevent connection failures down the road. With the right knowledge and preparation, crimping connectors can be easy and efficient while yielding professional, durable results.


