How Do You Dress Up A Pot?
Decorating plain flower pots, also known as “dressing up pots,” refers to creatively embellishing simple, generic pots to make them more visually interesting and attractive. This fun do-it-yourself project allows you to customize basic garden pots by adding color, texture, charm and personality. Dressing up pots is an easy way to showcase your style, get creative and add a personal touch to your indoor or outdoor plant displays. With simple materials like paint, tape, rope, ribbons and more, you can transform bland flower pots into beautiful works of art.
Pick The Right Pot
When dressing up a pot, first consider what type of pot you want to decorate. The material, shape, and size of the pot will impact what decoration methods work best. According to Indoor Pottery: Our Beginner’s Guide from Mulhall’s, some popular materials for indoor pots include ceramic, concrete, and terracotta. Ceramic and terracotta pots are porous, so they allow air and moisture to pass through. Concrete pots provide a modern look and come in various shapes and sizes.
The shape of the pot also matters – a rounded pot can be embellished all over, while a rectangular pot may look best with accents on just the front. Consider both tall, narrow pots for a single statement plant and short, wide pots for arrangements. Measure the dimensions to visualize how your decorations will fit. For beginners, stick to small or medium sizes that are easier to handle.
Clean The Pot
Before decorating a terra cotta pot, it is crucial to thoroughly clean it first. Any dirt, dust, or debris left on the surface can prevent paint or other decorations from properly adhering. Additionally, cleaning the pot removes any residues or bacteria that could impact plant growth. According to the article at https://plaidonline.com/articles/how-to-prepare-paint-terra-cotta-clay-pots, you can soak terra cotta pots in a bleach solution for 24 hours to fully sanitize and clean them.
Start by scrubbing the outside of the pot with warm, soapy water and a stiff brush to remove any dried dirt or mineral deposits. Rinse thoroughly. Then fill the pot with the bleach solution, making sure the interior is fully submerged, and let it soak overnight. This disinfects and cleans all surfaces. The next day, rinse very thoroughly with clean water to remove all bleach. Allow the pot to fully dry before beginning any decorating.
Taking this important step to deeply clean the terra cotta ensures that your decorations turn out their best and makes the pot safe for plants.
Add Paint
When it comes to painting terra cotta pots, there are three main types of paint that work well: acrylic, spray paint, and enamel paint. Acrylic paint is a popular choice as it adheres well to the porous surface of terra cotta and comes in a wide variety of colors (1). Thicker acrylics work best since they provide good coverage. Look for outdoor formulas that are UV resistant (2). Apply several thin coats of acrylic paint and allow each coat to dry fully before adding the next. Spray paint can also be used to paint terra cotta pots. It provides an even, smooth finish and is available in glossy and matte versions. Make sure to use spray paint formulas designed for outdoor use. Enamel paint offers a shiny, durable finish on terra cotta. Allow the paint to cure fully before using the pot. Test different paints to see which one adheres best.
(1) https://plaidonline.com/articles/how-to-prepare-paint-terra-cotta-clay-pots
(2) https://www.bhg.com/decorating/do-it-yourself/accents/how-to-paint-terracotta-pots/
Use Decorative Tape
A fun and easy way to dress up a plain pot is by using decorative tape. Patterned tapes like washi tape or duct tape can add a pop of color and interest to your pot.
Washi tape comes in a huge variety of colors, patterns, and designs. You can wrap strips of washi tape around the outside of the pot horizontally, vertically, or diagonally for a striking look. Overlap the strips slightly as you adhere them for full coverage. Washi tape can also be used to make geometric shapes or patterns on the pot.
Duct tape also comes in many colors and patterns these days. Just like with washi tape, you can wrap strips around the pot or create designs. One idea is to cut or tear the duct tape into triangular flags and adhere them all over the pot for a fun, whimsical look.
The great thing about decorative tapes is that they stick right on without any additional adhesive needed. Just make sure the pot surface is clean before application. Change up the tape whenever you want to give your pot a fresh new look!
Attach Embellishments
Embellishments like buttons, shells, and beads can add personality and charm to a plain pot. Glue on random assortments of pretty embellishments for a eclectic look. Some ideas include:
- Seashells collected from the beach
- Colorful glass beads in assorted sizes
- Vintage buttons in pretty shapes and colors
- Charms and trinkets found at craft stores
- Faux pearl beads in white or colors
- Marbles or polished stones
Apply strong glue like E6000 or hot glue on the back of each embellishment and press firmly onto the pot surface. Allowtime to fully dry before adding more. Build up layers of embellishments for lots of visual interest. Refer to this example for inspiration on attaching eclectic embellishments.
Make Designs With Rope
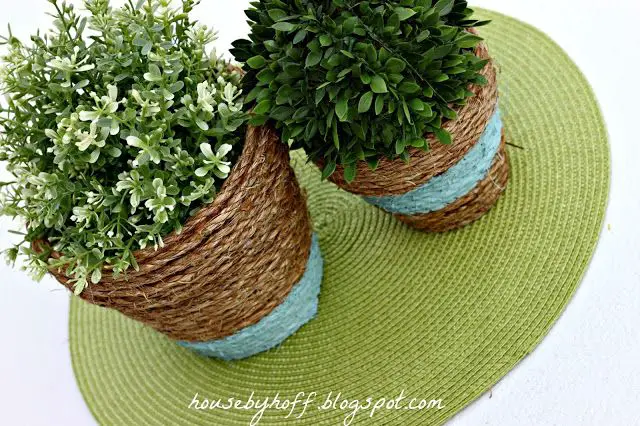
A fun way to decorate a pot is by wrapping it with rope. This gives the pot a natural, rustic look. To wrap a pot with rope, start by gathering your supplies – rope, scissors, and hot glue.
Cut your rope into manageable pieces. Determine the length needed to wrap around the circumference of your pot. Make sure you have enough extra rope to account for overlapping as you wrap.
Apply a line of hot glue around the top rim of the pot. Press one end of the rope into the glue to adhere it. Slowly wrap the rope around the pot, adding glue as needed, until you reach the starting point.
Overlap the rope slightly as you wrap to cover any gaps. You can wrap vertically, diagonally, or in a criss-cross pattern. Wrap a few layers until you achieve the desired look. Trim any excess rope.
To finish, run a neat line of hot glue along the bottom edge to seal it. Let the glue fully dry before using the pot. The rope gives the pot an organic, handmade style perfect for displaying plants or flowers.
For guidance, see how to wrap rope planters from sources like https://abeautifulmess.com/diy-rope-wrapped-planters/ and https://www.makingjoyandprettythings.com/rope-wrapped-painted-diy-planters/.
Add Charm With Ribbon
Ribbon is an easy way to add flair and color to a plain pot. There are many creative ways to use ribbon to dress up a pot.
You can tie a ribbon around the rim of the pot in a bow or knot for a simple accent. Use ribbons in complementary or contrasting colors to the pot itself. Satin and grosgrain ribbons work well for this. Go for wide ribbons to make more of an impact.
For a more decorative look, cut ribbon into strips and glue or tie them vertically around the pot like ruffles. Stagger the lengths for visual interest. Ribbons with patterns or textures like burlap can add charming rustic flair.
Cut ribbon into flower shapes and adhere them to the pot using hot glue for a floral accent. Make roses, carnations, daisies or any bloom you like. Add leaves and filler flowers for a full bouquet effect.
You can also use curling ribbon like you would on a gift basket or package to conceal the pot. Wind it vertically, horizontally or diagonally and finish with a big bow on top. Metallic curling ribbons will give a festive touch.
Adorning a plain pot with ribbons allows you to customize it to any decor. Get creative with different styles, colors, patterns and textures of ribbon to dress up a pot.
Consider Decoupage
Decoupage is a fun and easy way to decorate a pot. It involves using cutouts from paper napkins, tissue paper, or photos and adhering them to the outside of the pot with decoupage glue or Mod Podge. To decoupage a pot, start by cleaning and drying it thoroughly. Tear or cut out the designs you want from napkins, paper, or photos. Brush a layer of decoupage glue onto the pot and smooth the cutouts onto the glue. Use a paintbrush to brush on more glue over the top of the cutouts to seal them. Smooth out any air bubbles or wrinkles. You can layer cutouts for a collage effect. Add two to three more layers of glue over the top, allowing each layer to dry before adding the next. This seals and protects the decoupage. Allow the pot to dry fully before using, usually 24-48 hours. For more details, see this tutorial: https://modpodgerocksblog.com/decoupage-terra-cotta-pots/
Seal and Protect
After decorating your terra cotta pot, it’s important to seal it with a protective coating. This helps protect the paint, embellishments, and overall design from damage caused by sun, rain, dirt, and regular use.
Terra cotta is porous, so any paint or decorations you’ve added will soak in and fade over time if left unsealed. According to Dappled Skies and DIYs, sealants like polycrylic spray or shellac spray create a protective barrier that prevents moisture from seeping in and ruining your decorations.
When choosing a sealer, look for water-based and non-toxic options like Polyacrylic sprays made for crafts. Avoid chemical solvents that could be harmful. Apply 2-3 coats of sealer, allowing each coat to fully dry before adding more. This ensures complete, even coverage according to experts at My Chemical Free House.
With a good sealant, your decorated terra cotta pot will withstand the elements while showcasing your creativity and unique style.

