How Do You Fire A Microwave Kiln?
What is a Microwave Kiln?
A microwave kiln is a small, portable kiln that is designed to be placed inside a standard household microwave oven to enable firing and fusing of ceramics, glass, and other materials. Unlike traditional kilns that use external heating elements, a microwave kiln relies on microwave energy to quickly and evenly generate internal heat within the material being fired (Glacial Art Glass).
The key difference from a traditional kiln is that the microwave kiln heats the material from the inside-out, rather than the outside-in. This allows for very rapid heating, so firing cycles that would take hours in a conventional kiln can be achieved in minutes. It also results in uniform heating, reducing stresses and cracks.
Some key benefits of microwave kilns include:
- Much faster firing times compared to traditional kilns
- Energy efficiency – uses a standard household microwave
- Compact, lightweight, and portable
- Uniform heating for quality results
- Lower equipment costs
Overall, a microwave kiln provides a fast, affordable, and accessible way to fuse and fire small-scale ceramic and glass projects.
Microwave Kiln Materials
Microwave kilns can be used to fire a variety of ceramic materials at low temperatures. Some of the most common materials fired in microwave kilns include:
- Low-fire clay bodies – Bisqueware, terra cotta, earthenware clays can be fired up to cone 04/1022°C (1875°F). Stoneware and porcelain are generally not recommended.
- Precious metal clays – Silver, gold, bronze clays.
- Lusters and china paints – Used for decorative effects on bisqueware.
- Glass – Small glass pieces, frit, dichroic glass.
The ideal materials for microwave kilns are those that can sinter and mature at low temperatures below cone 04. Microwave heating works by exciting water molecules in the clay body, so materials with higher porosity and absorbency like low-fire clays and PMCs are more effectively fired (Source 1). Dense materials like stoneware and porcelain do not absorb microwaves well and are prone to thermal shock and cracking.
Smaller, thinner pieces of bisqueware and glass are recommended as they heat and cool quickly in the short microwave firing cycles. Larger or thicker pieces may develop stresses and crack. When selecting materials, aim for those specially formulated for microwave kilns according to manufacturer instructions (Source 3).
Microwave Kiln Size and Design
Microwave kilns come in a variety of sizes and designs, optimized for different purposes. The size and capacity of the kiln will determine how much work you can fire at one time.
A typical microwave kiln may be around 4-5 inches high with around a 3 inch diameter firing chamber. This allows firing of smaller jewelry pieces, beads, and components. Some kilns may have multiple layers to increase capacity. Larger kilns with 6-8 inch diameters are available as well for larger projects [1].
Key design features include fully insulated walls made from materials optimized for microwave use, such as fiber blanket insulation. The lid or door should have a safety latch as well as good insulation. The shelves are made of kiln furniture such as kiln posts and ceramic fiber paper optimized for microwaves. Rotating turntables help ensure even heating. Vents allow for release of binder fumes during firing. Controllers allow programming of time and power settings [2].
Setting up the Kiln
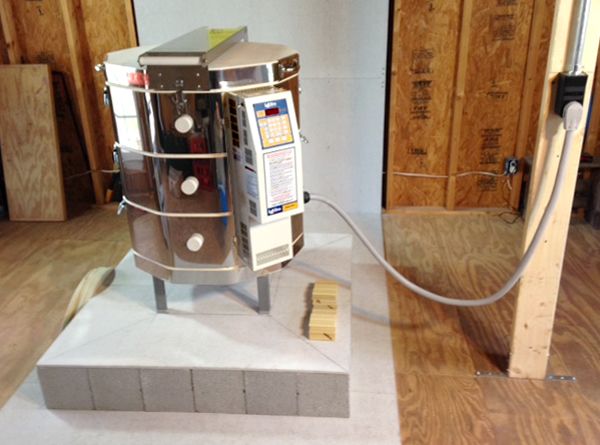
Setting up a microwave kiln properly is important for safety and achieving the best results. Consider the following when determining the kiln location:
The kiln should be placed on a sturdy, fireproof surface away from cabinets or walls. Leave at least 12 inches of clearance on all sides for adequate airflow and ventilation [1]. Operating the kiln near flammable materials can be dangerous.
Locate the kiln away from countertops or ranges that may vibrate or shift when the microwave is in use. Vibration can cause the kiln shelf to move, potentially damaging the glass pieces.
Microwave kilns require good ventilation to disperse heat, moisture, and fumes. Operating the kiln under an exhaust fan or near an open window is ideal. Never restrict airflow around the kiln.
The kiln shelf or posts should be arranged according to the manufacturer’s instructions. Shelves are often made of reinforced silicon carbide. High-temperature kiln wash should be applied to the shelf surface before first use to prevent glass from adhering [2]. Proper setup helps ensure even heating and firing success.
Loading the Kiln
Proper arrangement and spacing of the glass pieces within the kiln is crucial for a successful firing. According to Ceramic Industry, “Position the glass pieces on the kiln base. For your first firing, load only one test piece. (Later, you can try firing three or more pieces per firing.) Allow 1/2″ between pieces for expansion during firing.”
Be sure to leave ample room between each piece, at least 1/2 inch, to account for expansion as the glass heats up in the microwave. Tightly packed pieces can fuse together or cause cracking or breakage. Start with a single test piece for your first firing. Once you gain experience, you can try loading multiple pieces while maintaining proper spacing.
Firing Schedule
When first firing your microwave kiln, it’s important to follow proper heating times based on the material you are fusing. According to the Glass Fusing in a Microwave Kiln guide, here are some recommendations:
For glass fusing projects using sheet glass, aim for short firing times of 2-4 minutes at 100% power. Thicker glass projects may require 4-6 minutes.
When tack fusing glass powders or frit, use 30 second bursts at 50% power, allowing the material to cool for 60 seconds between bursts. Repeat as needed until the material is fused.
For a first test firing, start on the low end of the time range. Check the material and continue with short additional bursts as needed. It’s better to underfire and refire again than to overfire and risk ruining the material.
Be very cautious when removing your project from the kiln – both the glass and the kiln will be extremely hot! Allow sufficient cooling time first.
Microwaving Process
The microwaving process for firing a microwave kiln involves carefully following a step-by-step procedure to ensure proper fusing and annealing. Here is a guide to firing a microwave kiln:
- Center the loaded kiln in the microwave on a microwave-safe shelf or stand. Do not place directly on the microwave floor.
- Input the pre-programmed firing schedule into the microwave controls. Most microwaves have an auto cook feature that allows programming timed cooking segments.
- Set the microwave power level according to the schedule, usually around 50-70% power.
- Start the firing schedule program. Microwave kilns typically take 10-20 minutes to complete a firing.
- Monitor the temperature during firing using cones or a pyrometer. Temperatures will reach over 1400°F.
- Do not open the microwave door until firing is complete. The sudden temperature change can cause glass to crack or shatter.
- After firing, anneal glass by allowing kiln to cool slowly inside the closed microwave before removing.
Carefully monitoring temperature during the microwaving process is crucial. Glass requires steady rising heat to fuse properly and slow cooling to anneal without cracking. Use cones, witness strips, or a pyrometer to track temperature. Adjust microwave time if needed to control the heating rate and avoid thermal shock.
Safety Tips
Microwave kilns present some unique safety hazards to be aware of. Proper precautions should be taken to avoid potential electrical and burn risks when firing your kiln.
Be extremely cautious when handling the hot kiln, as the exterior can reach temperatures over 200°F. Always use protective gloves or tongs when removing projects from the kiln after firing. Allow adequate time for cooling before touching the kiln or contents with bare hands (at least 45-60 minutes). Avoid placing the hot kiln on surfaces that could scorch or ignite [1].
Ensure your microwave is properly ventilated during firing. Opening a window or using a vent hood can help clear fumes and prevent a buildup of hazardous gases. Do not leave the microwave unattended during lengthy firing cycles. Shut off the microwave immediately if you detect burning odors or see smoke [2].
Take care not to overload the kiln, as this can lead to electrical shorts or fires. Use kiln posts to elevate shelves if needed. Position pieces with space around them for even heating. Follow the kiln manufacturer’s instructions for safe loading.
Troubleshooting
Microwave kilns can sometimes run into issues during the firing process that lead to under-firing or over-firing. Here are some common firing problems and potential fixes:
Under-firing is when the glass does not reach the proper temperature for fusing. Glass that is under-fired will have rough, sharp edges and may not have fully melted together. To fix under-firing, try firing the piece again at a higher power level and for a longer duration. You may need to experiment to find the right settings for your particular kiln and glass (https://diamondtechcrafts.wordpress.com/2011/08/10/microwave-kiln-uh-ohs-and-how-to-deal-with-them/).
Over-firing happens when the kiln gets too hot, leading to scorched or burnt glass. Glass that is over-fired may have bubbled, turned brown, or lost its original color. Unfortunately, over-fired glass cannot be salvaged. To prevent over-firing, carefully follow the firing schedule and check the glass often. Reduce power levels or time if you see signs of overheating (https://www.glacialartglass.com/blogs/tips-and-tutorials/blog-advanced-tips-and-tricks-for-microwave-kilns).
Other common firing problems include cracks, breaks, craters, and kiln hotspots. These issues can often be minimized by loading the kiln properly, using kiln furniture, and rotating or stirring glass during longer firings.
Advantages of Microwave Kilns
Microwave kilns offer several advantages over traditional kilns that make them an appealing option for many artists and hobbyists. Some of the main benefits include:
Speed and efficiency – Microwave kilns can fire projects extremely quickly, often in just 10-20 minutes. This is because microwaves produce heat directly inside the material, rather than heating the air first. The rapid firing time allows for greater efficiency and productivity.
Lower energy use – Microwave kilns only need to operate during the short firing time, rather than running for hours to maintain a high temperature like a traditional kiln. This results in significantly lower energy usage and cost savings.
Compact size – Microwave kilns are designed to fit inside a standard microwave oven, taking up very little space. Their small footprint makes them ideal for small studios, garages, or hobby work at home where space is limited.
With their speed, energy efficiency and small size, microwave kilns offer an accessible and convenient option for artists, crafters and hobbyists looking to fuse, slump or cast glass, melt metal clay, fire pottery and more. Their advantages make them a popular introductory kiln for beginners before potentially investing in a large traditional kiln.