How Do You Get Clay To Stick To Wheels?
Getting clay to properly stick to the pottery wheel can be one of the most frustrating challenges for beginner and experienced ceramic artists alike. Proper adhesion is essential for centering, opening, and manipulating the clay. Without adequate sticking, clay will wobble, slip, and detach completely from the wheel head, making throwing impossible. There are several techniques and tricks to promote better clay-to-wheel adhesion, from proper wedging and centering, to maintaining ideal moisture content and applying adhesives. Mastering these methods requires patience and practice, but is necessary for throwing stable, symmetrical, and thin-walled pots.
Preparing the Clay
Before clay can be centered and attached to the pottery wheel, it must be properly prepared. This involves wedging and kneading the clay to remove any air bubbles that may be trapped inside. Air bubbles can lead to cracking or exploding in the kiln later on. To wedge clay, repeatedly cut the clay in half, smash it back together, and press out any air pockets. Do this by hand or with a clay wedging table. Knead the clay for 5-10 minutes until it has a uniform consistency with no visible air bubbles. The clay should be soft and pliable but not sticky. Well-prepared clay will stick to the wheel better during throwing. For more tips, see this article on clay preparation.
Centering the Clay
Proper centering is crucial for getting clay to stick to the wheel. Centering refers to making sure the clay is evenly distributed and balanced on the wheel before throwing.
There are a few techniques for centering clay on the wheel:
- Apply downward pressure with the palms of your hands on either side of the clay, pushing in as the wheel rotates. This takes practice, but helps distribute the clay evenly.1
- Use centering tools to apply pressure and shape the clay. Popular tools include ribs, rounded kidneys, and loops.
- Coning the clay involves shaping it into a cone formation while centering. This helps remove air pockets.
- Opening the clay by pushing fingers into the center while centering. This also eliminates air pockets.
Take your time when centering, it can take a while to get it right. Rushed centering often leads to lopsided pots. Be patient and keep hands wet to avoid sticking.
Wetting the Wheel
One of the most important techniques for getting clay to properly stick to your wheel is wetting the wheel head thoroughly before throwing. Using water or clay slip to wet the wheel creates a slick, even surface for the clay to adhere to. The water provides lubrication between the clay and the wheel, allowing the clay to move smoothly without sticking unevenly or dragging across a dry wheel head.
Make sure to wet the entire wheel head, not just the center. Use a wet sponge to wipe water across the surface until there is a consistent layer of moisture over the entire area where you will be centering and throwing your clay. The wheel should shine but not have any pooling water. Spinning the wheel while wetting can help spread the moisture evenly.
Wetting is crucial because it prevents the clay from suctioning onto a dry wheel head which can cause cracking and uneven throws. Proper wheel lubrication will lead to centered, smooth clay that can be manipulated and shaped without resistance or drag. Re-wet the wheel periodically while throwing longer pieces. The wet wheel allows clay to adhere but still have mobility.
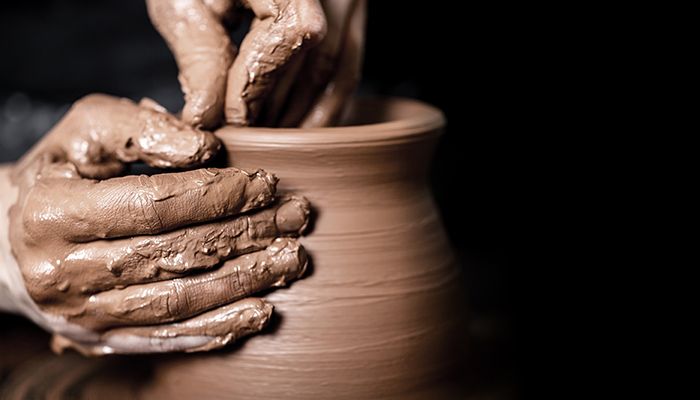
Applying Pressure
Applying the right amount of pressure when working with clay on the wheel is crucial for getting it to stick properly. As noted by The Crucible in their wheel throwing guide, you want to apply pressure from the outside of the clay while maintaining stability on the inside as you shape it against the wheel. The pressure should be firm but gentle – too much force and you risk cracking the clay.
When pulling up the walls of a thrown piece, start slowly and let the clay guide you. Push outwards while applying a steady, even pressure with your fingers on the inside to elongate the clay upwards. Rotate the wheel continuously to keep shaping an even wall. Reddit user u/itealaich recommends applying enough pressure so that you can feel the clay yielding and conforming to your hands, but not so much that it becomes overly worked and prone to issues.
The right amount of pressure comes with practice and getting a feel for the clay’s limits. Be patient, keep the wheel moving, and focus on keeping contact between the clay and wheel head as you shape it. Consistent, firm but gentle pressure is key for proper adhesion and forming thrown pieces.
Maintaining Moisture
Keeping the clay moist as you work is crucial for getting it to stick to the wheel. According to the Ceramic Arts Daily forum, “I work with varying amounts of wetness in the clay, and water when throwing. When throwing cylinders, I use clay that is wedgable, but stiff.” The stiffness helps maintain the form, but too stiff and it will dry out and crack.
A “dry thrower” may use slip rather than water to maintain moisture, as advised on Reddit: “Your hands should always be moist. I am a “dry” thrower and use slip rather than straight water.” Slip is a liquefied clay mixture that can be applied to the clay on the wheel to keep it malleable without over-wetting.
Be sure to frequently dip your hands in water and regularly spritz the clay with water or slip as you work it. The wheel spinning can quickly dry it out. Monitor the clay’s consistency and wetness level, adjusting moisture as needed. With practice you’ll learn the ideal moisture balance for throwing your clay.
Avoiding Cracking
Clay can crack for a few reasons while working on the pottery wheel. Uneven drying is one of the main causes according to this source. When some parts of the clay dry faster than others, it creates tension and causes cracks. The key is keeping the clay evenly moist as you work.
Another cause of cracking is the clay being too dry before you start working with it. As this Reddit thread discusses, dry clay is more prone to cracking, especially around thicker areas. Make sure your clay has the right consistency before centering it on the wheel.
To prevent cracks, maintain consistent moisture in the clay by frequently wetting your hands and smoothing over the surface. Go slowly and avoid overly thick sections. If cracks do form, blend them into the surface before the clay fully dries. Letting it dry completely will make cracks worse. Staying attentive and keeping the clay pliable is key.
Correcting Slippage
Clay can be slippery and tricky to manage at first. If you find your clay keeps slipping off the wheel while centering, don’t get discouraged! There are a few simple techniques you can try to get better traction and adhesion:
First, make sure your wheel and hands are wet enough. Having moisture between the clay and wheel will create some suction and friction. However, too much water can also cause slipping, so find the right balance. Wipe any excess water off the wheel before placing clay (1).
Next, try scoring and slipping the interface. Use a serrated rib tool to scratch grooves into both the wheel and bottom of the clay. Apply slip (liquid clay) to the scored areas – this will help the clay grip the wheel (2).
You can also throw a rough clay donut to act as a “clay chuck.” Place this donut on the wheel, then center your main ball of clay on top. The friction between the two clay surfaces will help stabilize your piece (3).
Finally, avoid applying too much downward pressure when first centering. Let the clay find its own center, only pushing gently. Excess force can cause the clay to squeeze out from under your hands (4).
With practice and patience, centering clay will become much easier. Don’t get discouraged – slipping is very normal at the start. Try out these tips and enjoy the thrill of that first successful center!
Alternative Adhesives
For some projects, water alone may not provide a strong enough bond between the clay and the wheel. Luckily, there are a few alternative adhesives that can help the clay adhere more securely:
Vinegar – Adding a tablespoon or two of vinegar to the water can help break the clay’s surface tension. The acetic acid in vinegar allows the clay to grip the wheel better. Be careful not to use too much vinegar, as this can make the clay too sticky.
Vegetable oil – Applying a thin layer of vegetable oil to the wheel can help clay adhere initially. As you work the clay, the oil will be absorbed, allowing moisture and pressure to take over in securing the bond. Avoid mineral oils, which can leach into and discolor the clay.
Cooking spray – Non-stick sprays containing lecithin can be used similarly to vegetable oil. Apply a light misting to the wheel head before mounting the clay. The lecithin allows for temporary sticking power.
Commercial clay slip – Special ceramic slip products are made to assist with adhesion. Slip mixtures contain clay, water, and binders specifically designed to help clay bodies grab onto porous surfaces like wheel heads. Slips can be brushed on prior to throwing.
Concluding Advice
Here are some final tips for getting your clay to properly stick to the wheel:
First, always make sure your clay is well-centered and pressed down firmly before beginning to throw. This ensures maximum contact between the clay and wheel surface (Source).
Next, keep the wheel and clay surface damp but not overly wet – too much water can cause slipping. Lightly mist the clay with water as needed (Source).
Avoid applying too much downward pressure as you begin throwing. Let the clay’s natural stickiness do the work at first. Then you can increase pressure as the piece takes shape.
Finally, watch for cracking around the base as this indicates the clay is losing moisture. Quickly mist with water and smooth over any cracks to maintain stickiness.
Following these simple techniques will help ensure your clay stays secured to the wheel throughout the throwing process. With practice, getting it to stick will become second nature. Happy throwing!