How Do You Make A Ceramic Teapot From Beginning To End?
Making a ceramic teapot from start to finish is a rewarding process that allows you to create a beautiful, functional piece of art. While it requires patience and practice, ceramic teapot making is an accessible craft if you follow some key steps.
The basic process involves choosing the right clay, planning the teapot design, preparing the clay, forming the basic teapot shape, refining the form, drying, bisque firing, applying glaze, and a final high temperature firing. The right clay and tools, like a potter’s wheel and kiln, are essential equipment. An artist’s eye for design is also important in crafting a teapot that is both visually appealing and pours well.
With an understanding of the complete teapot making process, some creativity, and persistence through trial and error, you can produce your own elegant ceramic teapot that will be both a joy to create and to use.
Choose the Clay
Choosing the right clay is one of the most important steps in creating a ceramic teapot. There are many different types of ceramic clays to select from, each with their own properties and characteristics.
The three main categories of ceramic clay are earthenware, stoneware and porcelain. Earthenware clays are very porous, soft and prone to chipping. They fire at lower temperatures. Stoneware clays are denser, harder and less porous than earthenware. They fire at higher temperatures. Porcelain clays are very dense and non-porous. They fire at the highest temperatures and produce a pure white color.
Some factors to consider when selecting a clay body are plasticity, shrinkage rate, color, firing temperature and intended use. For teapot making, a stoneware or porcelain is recommended as they are less porous than earthenware and can withstand repeated contact with hot liquids. Plasticity refers to how easily the clay can be worked and shaped. Higher plasticity makes sculpting easier. The shrinkage rate is the amount the clay will reduce in size during drying and firing. Low shrinkage is desired.
Premixed commercial clay bodies are readily available and very convenient to use. They are blended for optimal workability and firing results. Some common clay body names are White Stone, Red Stone, Porcelain, Terracotta, etc. Pay attention to the manufacturer’s specifications regarding firing temperature, shrinkage and other properties when selecting a clay body.
Design the Teapot
When designing your teapot, there are several elements to consider including the size, shape, spout, handle, lid, and decorative details. The size depends on how much tea you want your pot to hold and how many cups you plan to serve. Consider if you want a small personal teapot or larger pot for sharing tea with others.
The shape can be based on your own creative vision or traditional teapot styles like spherical, elongated, or flat-bottomed. Some shapes pour better than others. An elongated spout is ideal for precise pouring. The handle should feel comfortable when lifting and tilted slightly upwards for easy grip.
The spout and handle need to be well-balanced in size and placement. Position the handle on the opposite side of the heavier spout so the teapot doesn’t tilt when lifted. The lid can be a simple domed shape or decorative finial. Knobs on the lid make it easy to remove.
Consider hand-sculpting decorative elements like leaves, flowers, animals, or patterns. Stamped or etched designs also add visual interest. Glazing later provides limitless color options from solid hues to painterly designs.
Prepare the Clay
Preparing the clay is an important step before beginning to shape your ceramic teapot. The goal is to thoroughly mix the clay and remove any air pockets that may cause cracking or exploding during the firing process.
Start by wedging the clay. Take a lump of clay and cut it in half. Smash one half onto the wedging table and cut the clay again. Fold the clay over itself and press down firmly using the heel of your hand. Repeat this process, cutting and smashing the clay over and over. This mixing action evenly distributes moisture and removes air pockets.
Next, form the clay into a ball shape and throw it repeatedly from hand to hand. The impact will force out any remaining air bubbles. Slam the clay down on the wedging table between throws. You can also knead it with your hands like dough to work out air pockets.
It helps to wedge and knead clay in small batches instead of one large block. Keep going until the clay feels smooth, uniform and free of lumps or bubbles. Well prepared clay is essential for constructing your teapot.
Form the Basic Shape
There are a few main methods for forming the basic shape of a ceramic teapot:
Throwing on the Wheel
One of the most common techniques is throwing the teapot body on a pottery wheel. This involves centering a lump of clay on the wheel and using your hands to shape it into a hollow vessel form as the wheel spins. Skilled potters can use the wheel to form elegant rounded teapot bodies and spouts. Handles and other accent pieces may be added after the main form is complete.
Using Molds
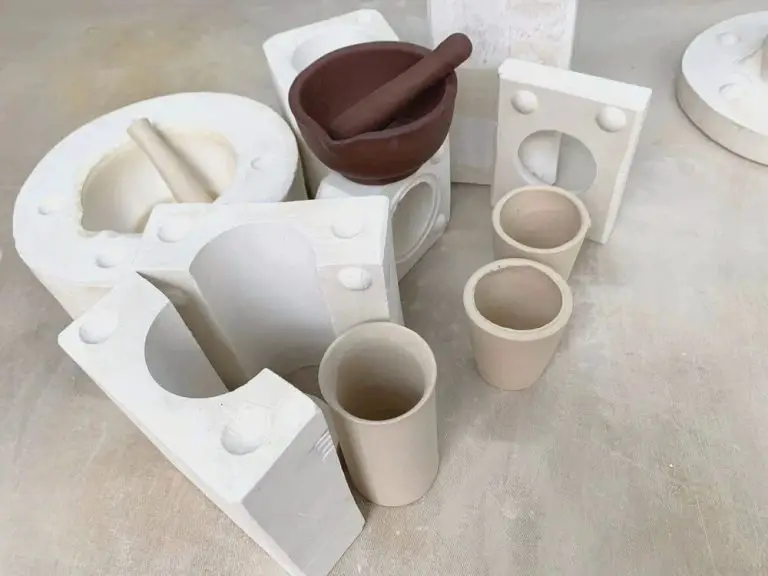
Another option is to press or pour clay into a teapot-shaped plaster mold. The mold determines the overall form, while details can be added by hand later. This allows efficient and consistent production of teapot shapes. The clay is usually rolled into slabs or soft “pancakes” then carefully pressed into the mold cavity.
Handbuilding
It’s also possible to handbuild a teapot body without the aid of a wheel or mold. This involves rolling out coils and slabs of clay, then joining them together by scoring, slipping, and blending the seams. Pinching, draping, or paddling the clay can create desired forms. Handle and spout pieces can be built separately then attached. Handbuilding allows complete freedom and customization in the teapot design.
Refine the Form
After the basic shape of the teapot has been formed, the next step is to refine the form by smoothing the surface and adding functional and decorative elements.
Use a metal rib or kidney tool to smooth away any lumps, cracks, or scratches on the surface of the clay. Apply even pressure and smooth strokes. Be careful not to overwork the clay or make it too thin.
Add a spout, handle, knob, and lid to make the teapot functional. These can be crafted by hand or made using molds. Attach each piece securely using slip.
The spout should have a wide base that tapers to a narrow pouring tip. Make sure the inside passage is smooth.
The handle should feel comfortable and balanced when lifting the filled teapot.
The lid can be domed, flat, or figural. Cut a hole for venting steam.
Decorate the teapot with textures, stamps, or carvings if desired. Add raised decorative elements like flowers, animals, or geometric patterns. Incise line patterns or words using various tools.
Allow all attached parts to dry and become leather hard before continuing to the drying stage.
Dry the Teapot
After the basic teapot shape has been formed and refined, the next step is to slowly and carefully dry the teapot. This process must be done with great care to avoid cracking and warping of the clay. There are a few techniques that can be used:
Controlled Air Drying
Air drying the teapot at room temperature is the most common technique. The key is to dry the teapot very slowly and evenly. Place the teapot in a warm (not hot), dry area out of direct sunlight. Turn the teapot periodically so it dries evenly. Control the humidity and air circulation around the teapot. Drying too quickly can cause cracking.
Wrapping Clay
For more controlled drying, the teapot can be wrapped in plastic after it firms up slightly. Plastic wrap or a plastic bag works well. The wrap keeps moisture in and slows the drying. Check periodically and unwrap for some time to prevent excess moisture buildup. The wrap can be kept on for much of the drying stage and removed near the end for final drying.
It typically takes 5-7 days for a teapot to air dry fully. Tap the teapot and listen for a clear ringing sound which indicates it is dried and ready for bisque firing.
Bisque Fire the Teapot
The bisque firing is the first firing stage for the ceramic teapot. This initial firing hardens the clay body and makes the teapot easier to handle without deforming. The bisque firing is done at a lower temperature, typically in the range of 1600-2100°F (871-1149°C), depending on the type of clay used.
For bisque firing, most ceramic artists use a front-loading electric kiln. These kilns allow excellent control over the temperature and firing schedule. The teapot should be fired slowly, over 8-12 hours, to burn out any moisture in the clay and prevent cracking. A slow ramp down in temperature at the end is also important.
During bisque firing, any organic matter in the clay burns off, chemical changes begin to take place, and the teapot becomes porous. At this stage, it can absorb any glazes or stains applied to the surface. Bisque firing prepares the teapot for the final firing where it will become vitrified and watertight.
Apply Glaze
Glazing is an essential step in creating a ceramic teapot. The glaze serves both decorative and functional purposes by adding color, texture, and making the teapot non-porous. There are many types of glazes to choose from including transparent, opaque, matte, and glossy.
When selecting a glaze, consider the desired aesthetic as well as the clay body and firing temperature. Popular glaze options for stoneware teapots include celadons, temmokus, shinos, and ash glazes which can create anything from a smooth monochrome look to a complex cracked pattern.
To apply the glaze, first make sure the bisqueware is free of any dust. Use a soft brush to apply the glaze in overlapping strokes. Apply 2-3 thin, even coats allowing each coat to dry before adding the next. Too little glaze can lead to unsightly bare patches while too much glaze can cause drips and running. Carefully wipe excess glaze from the base and spout. Once fully dry, the glazed teapot is ready for its final firing.
Final Firing
The final firing stage is the most crucial step in completing your ceramic teapot. This second firing permanently sets the glaze and hardens the clay body of the teapot. For stoneware clays, aim for a final firing temperature between 2200-2300°F (1204-1260°C). Make sure the kiln is capable of reliably reaching and holding this cone 10-11 temperature range. Gas, electric, or wood-fired kilns can all work, as long as they provide an oxidizing atmosphere and don’t allow any air pollution inside. Carefully load your teapot and monitor the kiln during firing. Soak at the peak temperature for the recommended hold time to fully mature the clay and glaze. Then allow a slow cooldown over at least 24 hours. The final firing transforms the decorative but fragile bisqueware into a fully vitrified and functional ceramic teapot ready for tea.


