How Do You Make A Clay Studio?
A clay studio is a workspace dedicated to the creation of ceramic art and pottery. It provides artists with the necessary space and equipment for working and designing with clay (Collins Dictionary). Clay studios can vary greatly in size and features depending on the needs of the artist, from a small corner in a home workspace to a large dedicated building. The main purpose of a clay studio is to give ceramic artists a clean, safe, and inspiring place to make their creations from start to finish.
Space Requirements
When setting up a clay studio, one of the most important considerations is determining the ideal size and layout of the space. According to CeraSpace, a good rule of thumb is to allocate at least 50 square feet per person in the studio. This provides enough room at worktables and adequate space for moving around. For beginners or small home studios, even a 10′ x 10′ room can work with some creative planning and multi-functional furniture.
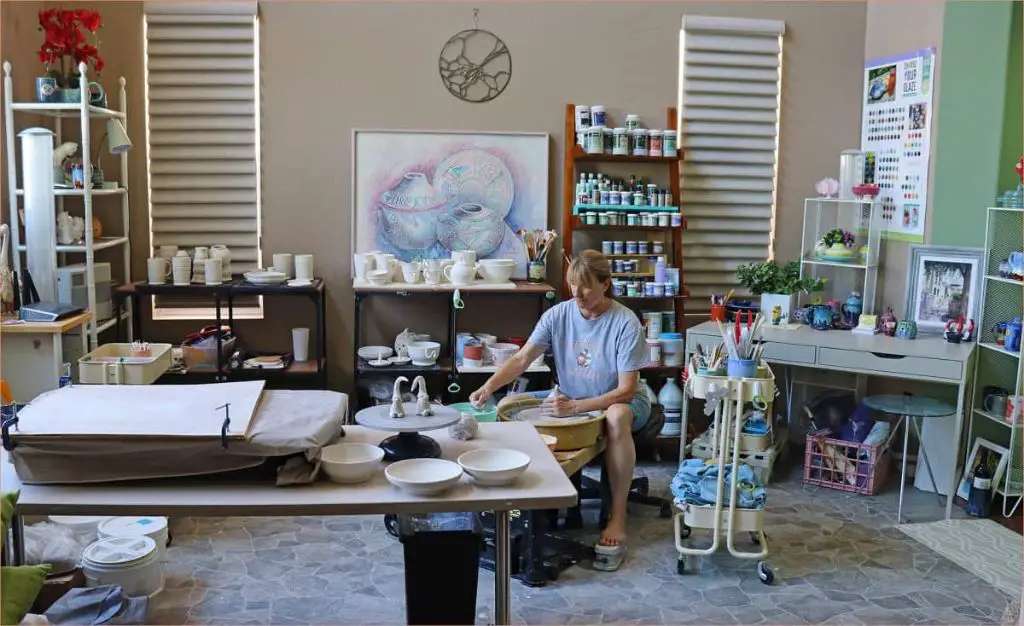
The layout should allow for separate work zones – an area for wedging clay, a central worktable space, a spot for wheels, and additional tables for glazing/decorating. Having defined work areas helps keep projects organized and the studio tidy. Wall space can be maximized with floor-to-ceiling shelving for tools, glazes, and clay storage. Good lighting is also key – both natural light from windows and adjustable overhead task lighting at workstations.
With some clever planning, even tight spaces can function beautifully as clay studios. Focus on choosing multi-use furniture, allowing ample room to move between work zones, and installing adequate lighting.
Flooring
Selecting the right flooring is one of the most important decisions when setting up a clay studio. The ideal flooring for a ceramic studio is durable, easy to clean, and able to withstand the demands of a wet working environment.
Some of the best options include:
- Polished concrete – This industrial style flooring is highly durable, water-resistant, and easy to clean. It can withstand heavy equipment and cleanup (Source: https://community.ceramicartsdaily.org/topic/583-ceramic-studio-flooring/).
- Linoleum – Made from all-natural materials like solidified linseed oil, cork dust, and wood flour, linoleum is water-resistant and easy to clean. It’s a great budget friendly option (Source: https://saltstoneceramics.com/blogs/the-blog/setting-up-your-studio-part-1).
- Ceramic or quarry tile – Glazed ceramic and quarry tiles are naturally water-resistant. They are durable options that are easy to clean.
Avoid using wood floors, laminate, or carpet which can warp, deteriorate, or stain when exposed to water and clay. Selecting the proper studio flooring will provide a stable foundation for working with clay.
Walls and Storage
Prepping and protecting the walls in your clay studio is crucial. Clay dust and moisture can easily damage drywall and paint. Covering walls with a protective material like FRP panels, tile, or metal protects walls from stains and makes cleaning easier. FRP (fiberglass reinforced panels) are a popular option as they are waterproof and easy to install. Look for FRP panels rated for wet environments. If going with tile, use a porcelain or ceramic tile rather than natural stone which can be damaged by clay.
Proper storage in a clay studio keeps tools organized and materials easily accessible while working. Install shelving high enough to fit work tables underneath. For drying pots, consider a drying rack shelving system which allows air circulation. Wall mounted rails or french cleats make it easy to hang tools. To corral smaller items, use storage containers, baskets, jars and small parts organizers (Pinterest, 2022). Having a dedicated space for every item eliminates clutter. Include closed storage like cabinets for storing clay, chemicals, finishing supplies, and valuables.
Lighting
Proper lighting is essential for doing intricate pottery work. The ideal lighting setup will evenly illuminate your studio without casting distracting shadows on your work area. Most potters recommend using a combination of natural light from windows or skylights and artificial lighting.
North-facing windows are ideal for natural lighting as they provide a cool, even light throughout the day. If possible, supplement window light with daylight-balanced fluorescent or LED lights mounted on the ceiling or walls. Avoid incandescent and halogen bulbs as they emit a warm, yellowish light that distorts clay colors. Track lighting is useful for illuminating specific workstations. Position track heads above areas like the wheel and work table (source).
Avoid intense spot lighting which creates harsh shadows. Diffuse bulbs or use diffuser panels to soften lighting and reduce glare. Keep lighting bright but not blinding – around 100 watts per 50 square feet is a good target for an art studio (source). Install dimmer switches to adjust light levels. Supplement overhead lighting with desk lamps or movable spot lights to illuminate detailed work.
Proper lighting is key for evaluating clay color and texture while working. It also helps reduce eye strain and fatigue during long studio sessions.
Equipment
The primary pieces of equipment you’ll need for a clay studio are a potter’s wheel, a kiln, and various hand tools. The wheel allows you to throw pots and bowls by spinning clay while shaping it with your hands. The kiln is used to fire and harden clay work after shaping and decoration. Hand tools like ribs, cutters, and sculpting knives give you precision and detail for finishing work.
For potter’s wheels, the main options are kick wheels or electric wheels. Kick wheels are manually powered by pumping a foot pedal, while electric wheels have a motor to spin the clay. Electric wheels range from basic starter models around $300-500 up to heavy-duty wheels over $1000. Reputable brands include Brent, Shimpo, and Speedball. The wheel should be sturdy with a wide, balanced wheel head around 12-14 inches for stability [1].
Kilns also vary from small hobby models starting around $300 up to large industrial kilns over $2000. Small tabletop kilns may only accommodate a few pieces, while larger options can fire a couple dozen pieces at once. Look for good insulation, durable construction, and features like controls for adjusting temperature. Top brands include Skutt, L&L, and Evenheat. Make sure to get kiln furniture like shelves and posts [2].
Basic hand tools include ribs for smoothing, loop tools for carving details, cutters for trimming excess clay, and sculpting and decorating tools. A basic starter set of tools will run $50-100. Invest in quality tools with wood or rubber handles for comfort and control.
Work Tables
The work table is one of the most important pieces of equipment in a pottery studio. It needs to be sturdy, have the proper height, and accommodate different working positions. According to Thrive Clay Studio, there are a few key considerations for designing pottery work tables:
- Use a “no truck” design that has legs set in from the edges so you can sit close and center your weight while working.
- Build the tabletop 28-32 inches tall so it is comfortable for handbuilding as well as throwing seated.
- Construct the tabletop from plywood, MDF or other smooth composite board materials to resist warping.
- Use a tabletop depth of 24-30 inches for adequate workspace.
- Allow 30 inches or more between the legs for comfortable leg room.
- Apply a waterproof finish like polyurethane to protect the wood.
Solid hardwoods like maple and poplar make good work table legs and supports. Avoid materials like pine that can warp. Building your own customizable work tables allows you to create an efficient and inspiring studio workspace.
Clay Storage
Proper storage of clay is crucial for maintaining the right moisture content and workability. Clay dries out quickly when exposed to air, so it should be stored in sealed plastic bags or airtight containers. Most clays come packaged in thick plastic, but you may want to double bag the clay or place it in a plastic bin with a tight-fitting lid. According to Bailey Pottery, the best practice is to “store your clay in tightly sealed bags to preserve the moisture content.” Likewise, Seattle Pottery Supply recommends sealing clay “tightly in a thick plastic bag” inside a plastic storage container.
Store clay in a cool, dark place around 55-65°F. Avoid temperature fluctuations that can cause condensation inside the bag. Keep different types of clay separate and labeled clearly. Prepare only what you need for current projects to prevent unused clay from drying out.
Before using clay that has been stored, it helps to wedge or knead it. Wedging mixes the moisture evenly and removes air pockets. Cut off a workable amount of clay and smash it into a thick slab on a wedging table. Fold the slab in half and push it forward, repeating until the clay feels uniform. Well-wedged clay has an even consistency and no cracks or dry spots.
Safety and Cleaning
A clay studio needs proper ventilation and air quality control to keep clay dust from accumulating. Install an air filtration system and open windows regularly for fresh airflow (20 Ways to Stay Safe in the Pottery Studio). Keep a first aid kit on hand for minor cuts and injuries. Bandages, antiseptic cream, and eye wash solution should be available.
Clean clay spills right away so wet clay doesn’t dry and become difficult to remove. Scrape dry clay off surfaces and sweep powdered clay to avoid accumulation. Wet mop floors frequently. Allow kilns to cool completely before cleaning out sintered clay. Wear proper protective equipment like gloves and a mask when cleaning (Essential Guidelines for a Safe and Healthy Pottery Studio). Maintain a clean studio to promote health and safety.
Inspiration
A pottery studio should inspire creativity and get your artistic juices flowing. Decorating your studio with aesthetically pleasing items can help set the mood. Consider hanging artwork, photographs, or shelves with collected objects around the space. Paint the walls an energizing color or in a peaceful, neutral tone. You can find plenty of pottery studio inspiration on sites like Pinterest. For example, this pinboard from The Clay Geeks has lots of fun decor ideas to spark creativity: https://www.pinterest.com/theclaygeeks/pottery-studio-inspiration/.
Fill your studio with visual reminders of why you love working with clay. Surround yourself with pieces you’ve made, books on techniques, and photos of finished work. Place a comfortable chair and table in a corner where you can sit with a cup of tea and flick through ceramics magazines. The goal is to create an energizing workspace that gets your creative juices flowing.

