How Do You Make A Mould For Casting?
A mold is a hollow container that gives shape to liquid or pliable raw material when it sets and hardens. Molds are commonly used in manufacturing processes like injection molding, blow molding, compression molding, and rotational molding to create identical plastic or metal parts in large volumes. The purpose of a mold in casting is to produce dimensionally accurate castings by shaping the liquid casting material into the desired form as it solidifies.
The main steps involved in making a mold for casting are: designing the original model, building a mold box and pouring system, preparing the mold material, pouring the mold material into the mold box, allowing it to set and cure, separating the mold from the model (demolding), cleaning and preparing the mold, then finally using the finished mold for casting liquid metal into the cavity.
Materials Needed
The most common materials used for making molds include:
Mold Making Materials
– Silicone – Silicone is versatile and durable. It is flexible and can capture fine details. The downside is it can be more expensive than other materials.
– Rubber – Rubber molds are affordable and can pick up good detail. They are less durable than silicone. Rubber is prone to shrinking over time.
– Plastic/Resin – Plastic molds like polyurethane resin are rigid and long-lasting. They involve more steps to create the mold. Plastic can be brittle if thin.
– Plaster – Plaster is inexpensive and accessible. It can capture detail well. Plaster molds are fragile and have lower durability.
Other options include concrete, epoxy resin, latex, and more. The optimal material depends on the application and object being molded. Key factors are durability, cost, molding detail, and number of uses needed.
Safety Precautions
When making molds, it is crucial to take proper safety precautions. Mold making often involves working with hazardous materials that can be toxic if inhaled or make contact with skin. Proper ventilation is essential, and respirators should be used if working in an enclosed space (Safety Precautions for Injection Molding). Gloves, safety goggles, and protective clothing should be worn to prevent skin contact. All safety protocols when handling hazardous materials should be strictly followed.
Work areas must be well-ventilated when working with mold making materials like silicone rubbers, polyurethane resins, and epoxy resins. Local exhaust ventilation should be used if possible. Take extra precautions when mixing materials by working inside a fume hood. Never eat or drink when working with hazardous materials, and be sure to wash hands thoroughly before doing so (Precautions required in the processing of mold making).
Read safety data sheets carefully and follow all listed precautions. Use properly rated respirators if ventilation is not adequate. Take steps to minimize dust from materials like alginate. Have a safety shower station available in case of spills. Follow safe material handling procedures and use proper personal protective equipment at all times (Safety in the Mold Shop). With vigilance and care, mold making can be done safely.
Make the Original Model
The original model is what the mold will be made from. For a high quality mold, the original model needs to be carefully sculpted or fabricated. The model should be made from a durable material like clay, wax, plastic, resin, or wood (reference). The surface of the model must also be smooth and free of imperfections. A smooth surface will allow the mold material to capture very fine details.
When sculpting the original model, it helps to think about how the mold will be separated. Undercuts and deep recesses should be avoided if possible. If the original model has complex geometry, it may need to be a multi-part mold. All parts of the model must be accessible to remove from the mold. Any supports or registration keys needed for alignment of the mold halves should be added to the model.
Prior to making the mold, seal porous materials like clay or wood. Apply mold release agents like petroleum jelly or silicone spray to the model’s surface. This will prevent the mold material from sticking. Take time to ensure the original model’s surface is flawlessly smooth. Any small defects will transfer to the castings.
Build the Mold Box
The mold box serves as a container to hold the liquid silicone as it sets into the desired shape for the mold. It needs to be watertight and sturdy enough to withstand the pressure of the liquid silicone.

To build the mold box:
- Using plywood or MDF, cut pieces to create a box in the dimensions needed for your mold.
- Make sure the sides fit tightly together. You may need to sand or plane the edges to get a tight seam.
- Glue or screw the pieces together, adding corner braces if needed for extra strength.
- Seal any gaps in the corners with caulk or silicone sealant [1].
- Line the inside of the box with duct tape, packing tape, or plastic sheeting to waterproof it. Smooth out any air bubbles or wrinkles.
- Optional: Add registration keys – small blocks of wood attached to the sides of the box to help align two halves of a mold.
The mold box should now be ready to contain the liquid silicone for making your mold.
Prepare the Mold Material
The most common mold making materials are silicone rubber, polyurethane resin, and plaster. Follow the manufacturer’s instructions closely when preparing the mold material.
For a silicone rubber mold:
- Make sure to use platinum-cure silicone, not tin-cure, for castings like resin or plaster. Tin-cure silicone can inhibit the cure.
- Thoroughly mix equal parts of the silicone base and catalyst/curing agent as directed. Mix vigorously for 3-5 minutes to fully incorporate.
- The consistency should be like a thick cake batter or dough when properly mixed.
- Let the material sit for a bit so any air bubbles can rise to the surface before pouring.
For polyurethane resin:
- Carefully measure out the polyurethane resin and polyurethane catalyst according to the manufacturer’s recommended mix ratio.
- Thoroughly mix the two components together, scraping the sides and bottom of the container. Mix for 2-3 minutes.
- The mixed resin should have the consistency of pancake batter when ready to pour.
For ultracal plaster:
- Gradually sift the plaster powder into the water while mixing to avoid clumps.
- Mix for 2-3 minutes until a smooth, creamy consistency is reached.
- Let sit briefly so bubbles can rise to the surface.
Be sure to pour the prepared mold material slowly and carefully to minimize air bubbles. Tap the mold to release any trapped air before the material sets.
Pour the Mold Material
When pouring the mold material into the mold box, it is important to pour slowly and carefully to avoid creating air bubbles in the liquid material. Air bubbles can lead to defects in the final cast part. According to [How-To: Mix Mold Rubber and Pour Molds](https://www.smooth-on.com/tutorials/mixing-mold-rubber-and-pouring-molds/), you should pour “in a steady stream from one spot at the edge of the contained cavity to allow the material to gradually fill from one side.”[1] Allowing a thin stream of material to pour in gradually from one spot gives air bubbles a chance to escape, rather than being trapped in the liquid. Pouring too quickly, especially from higher up, can introduce more bubbles.
You should pour only into one section of the mold box at a time if making a multi-part mold. Allow each section to fully set up before pouring the next section. Refer to the product instructions for specific set times based on material used. In general, silicone rubbers take 30-45 minutes to set, while urethane rubbers take 3-4 hours. Do not pour the next section until fully cured. [2] Once completely set, the mold material will be solid and you can proceed to the next steps of making the cast part.
[1] https://www.smooth-on.com/tutorials/mixing-mold-rubber-and-pouring-molds/
[2] https://batesvilleproducts.com/resource/3-pouring-methods/
Demolding
Demolding is the process of safely removing the original model from the cured mold material. There are some key steps to follow for proper demolding:
First, make sure the mold material is fully cured before attempting to demold. Curing times vary based on the material used – silicone molds typically cure within 24 hours, while urethane resins may take 2-3 days to fully cure. Refer to the product instructions for recommended cure times.
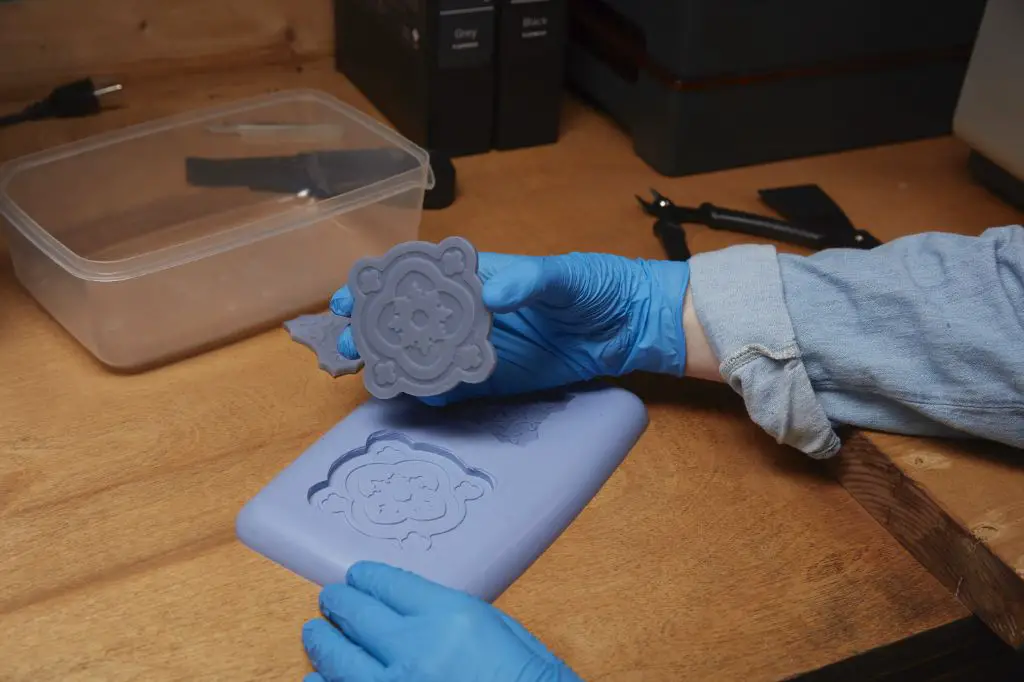
Next, wearing gloves for protection, gently flex the mold to break the seal between the model and the mold. Slowly peel back the mold from one edge, taking care not to warp or tear the material. For complex molds, it may help to use a thin tool like a putty knife to gently pry the model free.
Go slowly and steadily during demolding to avoid damaging the mold or model. Avoid using excessive force or tools that could scratch the mold surface. Some release agents or mold lubricants can assist with demolding if needed.
Once the part is removed, inspect both the mold and model for any defects before moving to the next step of casting. A clean demold is critical for creating accurate castings. Refer to best practices like those on BoldMaker.com for more demolding tips.
Prepare for Casting
Before you can cast your finished mold, you’ll need to prepare it properly. Two important steps here are applying a mold release agent and joining the mold pieces together.
According to https://www.instructables.com/Introduction-to-Mold-Making-Casting/, mold release agents are essential for ensuring your finished cast can be removed from the mold without sticking or tearing. Common mold release agents include petroleum jelly, silicone sprays, and specialized commercial release agents. Apply a thin, even coat to all mold surfaces that will contact the casting material.
Once the mold release is applied, you’ll need to securely join all the mold pieces together if making a multi-part mold, as explained in this tutorial. Use rubber bands, tape, clamps or mold straps to hold the mold halves together and prevent leakage of the casting material. Seal any seams with clay or silicone caulk.
Next Steps
Once you have created your mold and prepared it for casting, the next steps involve selecting your casting material and actually filling the mold. The most common casting materials include:
-
Resin – Epoxy and polyurethane resins are commonly used. They cure at room temperature and produce detailed castings. Smooth cast resins are good for beginner casters.
-
Metal – Metals like aluminum, brass, bronze, and steel can be melted and poured into a mold to make metal castings. Ensure proper safety precautions when casting hot metal.
-
Plaster – Dental and casting plaster is an affordable option good for simple geometric shapes. Plaster can capture fine details but is more brittle than other materials.
Once cured and removed from the mold, castings will require some degree of finishing work. This may involve removing mold lines, filing and sanding to smooth surfaces, and polishing or painting for an attractive final appearance. Be sure to consider your desired final result when selecting casting materials and finishing techniques.
With some practice and experimentation, you can become adept at using molds to create detailed cast objects in resin, metal, plaster, and more. Pay close attention to safety, follow all manufacturer instructions, and enjoy the creative possibilities of casting!


