How Do You Make A Pot Look Nice?
Add Plants or Flowers
Choosing the right plants or flowers is key to making a pot look its best. When picking plants, consider colors that complement the pot’s hue or provide an attractive contrast. For example, bright pink geraniums can highlight a navy blue pot. Texture is also important. Fine, delicate foliage like asparagus ferns can soften the look of a bulky ceramic planter. Trailing plants like ivy spilling over the sides can make a pot look fuller.
Scale and proportion matter too. Low, rounded pots suit compact, bushy plants like boxwood or lavender. Tall, columnar pots call for long stems and trailing vines. Match smaller pots with petite choices like violas, succulents, or mini hostas. Big, bold plants like hibiscus or grasses help anchor oversized urns.
For year-round interest, use evergreen plants like purple heuchera or conifers. Shade-lovers like impatiens, begonias, and coleus feature vivid colors. Sun-worshippers like petunias, marigolds and zinnias also provide bright blooms. Research to find varieties suitable for the pot’s location.
The foliage, blooms, height and growth habit of plants can drastically alter a pot’s appeal. Carefully choose plants and flowers that enhance the pot in terms of color, texture, proportion and aesthetic.
Clean the Pot
One of the easiest ways to make a pot look nicer is to start by giving it a good cleaning. Over time, pots can accumulate dirt, deposits, stains, and grime. Taking the time to clean the pot will help make it look newer and more attractive for your plants or decorations.
For plastic, ceramic, concrete or resin pots, try using a mix of vinegar and water. The acidic vinegar helps dissolve hard water stains and other deposits. Mix equal parts vinegar and water in a spray bottle and spray the pot, letting it sit for 5-10 minutes before scrubbing with a brush. Rinse well. This helps the pot look clean and new. How to Clean and Disinfect Plant Containers
Another eco-friendly option is using baking soda. Make a paste of baking soda and water, apply it to the pot, let sit for 15 minutes and scrub away. Baking soda is a gentle abrasive and will help lift stains without harsh chemicals. Rinse thoroughly afterwards.
For clay or terra cotta pots, use a vinegar and water solution but don’t let it sit too long, as the acidity can damage the clay over time. Scrub gently with a plastic brush. Avoid using bleach, as this can interact with the clay and cause discoloration.
Use Decorative Gravel or Stones
Adding decorative gravel or stones to the top of a pot can enhance its visual appeal in several ways. Different colors and sizes of gravel and stones provide contrast and texture against the pot itself and the plants. For example, using white pea gravel on top of a terra cotta pot adds brightness, while larger dark rocks on a light-colored pot create striking contrast.
Smaller gravel in colors like blue, green or red can provide pops of color to liven up a plain pot. Larger stones and pebbles in neutral colors like gray can give an elegant, sophisticated look. Mixing different sizes and colors of gravel together creates visual interest and depth.
The gravel also serves a practical purpose – it helps hide unsightly soil and provides drainage. Be sure to select a gravel size that won’t easily fall through any drainage holes in the bottom of the pot. The key is to experiment with different colors and sizes to find the right accent for your potted plant’s look.
As one Decorative Pebbles seller on Amazon explains: “Our plant pebble tray rocks, small decorative stones, and river pebbles for plants are ideal for enhancing your potted plants, vases, and planters. Indoor and outdoor options allow you to highlight your pots.” https://www.amazon.com/Decorative-Pebbles-Plants-Vases-Succulents/dp/B07SVS372W
Paint or Stain the Pot
Painting or staining terra cotta pots is an easy way to update their look. The porous surface of terra cotta absorbs paint and stain well. There are a few tips to follow depending on the look you want:
For a bright, vibrant look, use acrylic craft paints made for terra cotta like FolkArt Terra Cotta Acrylic Paint (https://www.finegardening.com/article/painting-clay-pots). Thin the paint slightly with water for even coverage. Apply 2-3 coats with a foam brush and allow to fully dry between coats. Add decorative details with acrylic paint pens.
For a weathered, antique look, use a terra cotta stain (https://www.bhg.com/decorating/do-it-yourself/accents/how-to-paint-terracotta-pots/). Wipe the stain over the pot using a rag. Remove excess for an uneven, variegated look. Seal with an outdoor polyurethane for protection.
For a glossy finish, apply a shellac coating over acrylic paint. Hold the spray shellac 6-8 inches from the pot and apply 2-3 light coats. This protects the paint and gives pots a porcelain-like sheen.
Distress painted pots with sandpaper once dry for a timeworn look. Use stencils and sponges to create patterns and textures on pots before painting.
Add Accent Pieces
Adding accent pieces like garden gnomes, wind chimes, bird houses, and other decorative items can enhance the look of a potted plant. These types of accessories complement the pot and plant, adding visual interest and personality to the display. Some popular accent pieces to consider include:
- Garden gnomes – These whimsical statues come in all sizes and designs, from traditional red pointy hats to funny poses. Place a cheerful gnome next to a potted plant for a playful look. See lovely options at Accent Decor’s outdoor planters.
- Wind chimes – The pleasant tinkling sounds and metallic shine of wind chimes can accentuate a potted plant on a patio or porch. Opt for nature-inspired chimes with leaf, dragonfly, or bird designs. Gardener’s Edge has a nice selection.
- Bird houses and feeders – These provide both form and function when placed near a potted plant. Opt for handsome wooden craftsman-style houses or colorful mosaic feeders. Position near a matching pot for a coordinated vignette.
When selecting accessory pieces, choose options that match the style and scale of the potted plant. For example, a large dramatic pot with an ornamental grass would suit a bold, oversized accent piece. Meanwhile, a petite succulent planted in a classic terra-cotta pot could pair well with a small handmade wind chime. Allow the accents to complement, not overwhelm the star of the show – the lovely potted plant.
Use Contrasting Colors
When selecting colors for your pots and plants, using colors that contrast well can make the arrangement pop. Some ideas for creating contrast with color in your pots include:
Complementary colors: These are colors opposite each other on the color wheel, like red and green or blue and orange. Putting complementary colors next to each other makes them really stand out. For example, you could plant red flowers in a green pot.
Analogous colors: These are groups of colors that are next to each other on the color wheel, like blue, blue-violet, and violet. Using analogous colors creates a cohesive, harmonious look. For instance, you could plant purple and blue flowers in a blue-violet pot.
Triadic colors: These are three colors spaced equally around the color wheel, like red, yellow, and blue. The contrast between triadic colors is bold and vibrant. You could combine a red pot, yellow flowers, and blue accents.
Monochromatic colors: This involves using shades, tones, and tints of one color. For example, planting white flowers in a black pot creates a dramatic monochromatic look. Or use light pink flowers in a terra cotta pot for a softer monochromatic color scheme.
Don’t be afraid to experiment with bold and unexpected contrasts. The key is balancing richly saturated colors with neutrals and natural textures. For inspiration, check sites like Pinterest for winning color combos.
Repurpose Household Items
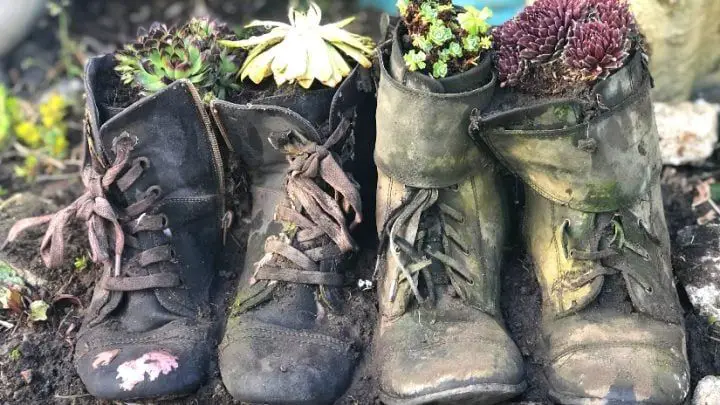
One creative way to make a pot look unique is to repurpose everyday household items and turn them into planters. From boots to colanders, repurposing common items most people already have at home is an inexpensive, eco-friendly way to make one-of-a-kind planters. Here are some examples of household items that can be repurposed as planters:
Old rubber boots make for whimsical planters that add a fun, rustic touch to any space. Simply clean out the insides, drill a few drainage holes in the bottom, and fill with soil and plants. The tall, slender shape makes boots ideal for holding long-stemmed flowers or trailing vines. For more info, check out this article on repurposed boot planters.
Metal colanders and strainers are already bowl-shaped and have built-in drainage holes, making them perfect candidates for conversion to planters. Hang a colander on a wall or fence by its handle for cascading flowers, or set one on a patio or windowsill to hold a lush mini garden. Get creative by stacking different sized colanders together for a tiered effect. Learn more about colander planters here.
For a shabby chic look, distressed old buckets, watering cans, and pots make charming planters. Even plastic bins, cinderblocks, and wire baskets can be transformed into unique planters with a little imagination. Visit garage sales and thrift stores to find vintage items that can be upcycled into stylish, budget-friendly planters.
Arrange Multiple Pots
Arranging a group of pots together can create a lovely focal point in your yard or on your patio or porch. Here are some tips for aesthetically grouping pots of different sizes, shapes and heights:
Vary heights – Including pots of varying heights and sizes creates more visual interest. Place larger, taller pots in the back and shorter pots in front. You can place pots on overturned clay saucers to boost their height.
Use odd numbers – Odd-numbered groupings of pots are more pleasing to the eye than even pairings or groupings. Try arranging pots in groups of 3, 5 or 7 for the best effect.
Repeat plants or colors – Grouping pots of the same plant variety or color together creates cohesion. For example, arrange all blue pots or pots of pink flowers together.
Contrast textures – Use a mix of textures like glossy and matte pots, or smooth and ribbed pots. This adds depth and dimension.
Angle pots – Turning some pots at an angle makes the arrangement more dynamic. Just be sure the plants still get adequate sun.
Add height variations – Boost smaller pots by placing them on overturned clay pots or ceramic tiles. Or nestle smaller pots right inside larger ones.
Leave space between pots – Allow a few inches between pots for the best flow rather than clumping them all together.
Try stair arrangements – Lining up pots on stair railings or steps creates a lovely cascading effect. Place the largest pots at the bottom.
Anchor the group – Use the largest, heaviest pot as an anchor at the center or back of the arrangement.
Bring pots together – Optically tie the grouping together by placing pots close enough so some plant leaves or branches touch each other.
Add Notes or Decorations
A fun way to personalize a flower pot is to add your own special notes or decorations. Using chalkboard paint on terracotta pots creates a fun surface for writing messages with chalk. You can write the plant’s name, watering instructions, or inspirational quotes. Chalkboard paint comes in a variety of colors like classic black, green, blue, pink, and more.
Alternatively, use acrylic or ceramic paint pens to freehand designs onto pots. Paint names, patterns, animals, symbols or anything you’d like for a handmade touch. Let your creativity run wild and make each pot distinct.
Decorate terra cotta pots by adhering craft materials with glue. Try gluing on lace, burlap, beads, buttons, sea shells or pebbles. Affix a pretty doily with decoupage or attach raffia bows. The options are endless for personalizing a basic flower pot.
For a different look, wrap a pot with colorful wired ribbon, fabric scraps, crocheted covers, or jute stenciled with designs. You can also use stickers, washi tape, or decals to decorate the outside of pots in your own personal style.
Adding your own special notes or decorations to a flower pot is an easy DIY way to make it look chic and unique. Have fun putting your own creative spin on pots through paint, crafts, fabric or any embellishments you fancy.
Consider Shapes and Textures
One way to make a potted plant arrangement look more visually interesting is by pairing pots with different shapes and textures. Mixing round, square, rectangular, conical and other uniquely shaped pots adds variety and dimension (source). Using pots made from different materials like terracotta, ceramic, concrete, metal or wood also creates contrasting textures.
For example, pair a classic round terracotta pot with a concrete rectangular planter for an eye-catching look. Or combine a textured ceramic pot with a sleek metal one. Grouping pots of the same color but different shapes and textures helps unify the look while still providing visual diversity.
When pairing contrasting pots, make sure to use pots of varying heights and sizes as well. This creates a more dynamic planted arrangement. Place larger pots in the back and smaller pots in front for proper scale and balance. With some creativity, mixing pot shapes and textures can take a simple potted plant display from basic to bold.


