How Do You Make A Simple Keychain With String?
A simple string keychain is a fun, customizable accessory that can be made at home with minimal supplies. String keychains are comprised of beads and other charms threaded onto a piece of string or cord. A key ring is then attached to the end to hold your keys.
To make a basic string keychain, you’ll need some supplies:
- String, yarn, or cord
- Beads, charms, buttons, or other accessories to thread
- A key ring or clasp
With just these few components, you can create a personalized keychain that reflects your style. String keychains are inexpensive to make, allow for lots of creativity, and also make great gifts.
Selecting String
When making a simple string keychain, the first step is selecting the right type of string. Cotton or nylon string are good options as they are durable yet easy to tie and knot. For length, aim for at least 24 inches of string so you have plenty of room to create your keychain pattern. The thickness of the string will impact how well it holds knots and beads. Aim for a medium thickness string that’s about 2mm across – thicker than standard thread but not as thick as yarn. This will be sturdy enough to hold keys and other small items without breaking or fraying easily.
Choosing Beads
When making a simple string keychain, any lightweight beads can work. Glass beads, plastic beads, and wooden beads are popular options. Ceramic and metal beads may be too heavy for a keychain. Opt for small to medium sized beads, around 5-10mm in diameter. Tiny seed beads can cause stringing challenges while large beads over 15mm will make a bulky keychain. Round, cube, cylinder, and leaf shapes keep the keychain lightweight. Avoid using very long beads like tubes or spikes so the keychain lies flat. Mixing and matching colors, textures, and shapes creates visual interest.
Aim for beads with holes large enough to easily thread onto your string. While you can use beads with smaller holes, stringing can become frustrating. Test a few sample beads before committing to any one type. Ensure the bead holes have smooth edges to prevent the string from fraying.
When selecting beads, keep in mind the overall length you want for your keychain. Plan for around 20-30 beads for a keychain about 6 inches long. The more beads you add, the longer your keychain will become. Avoid choosing too many heavy beads, as the weight will stretch out the string over time.
Preparing the String
Before beginning your keychain project, it’s important to properly prepare the string. Here are some tips:
Pre-cut your string to the desired finished length, plus a few extra inches. It’s easier to trim off excess later than to add more string if it’s too short. A good starting length for a basic keychain is around 30 inches.
To prevent the string from fraying at the cut ends, apply a small dab of clear nail polish or fray prevention sealant. Let it fully dry before proceeding.
Some people prefer to tie a knot or small loop at one end of the string before starting. This provides an anchor point and prevents beads from sliding off that end while working. Skip this step if you plan to use a bead knotting tool that grips the end of the string.
Properly preparing your string ahead of time will make the keychain construction process smoother and help prevent aggravation from dealing with fraying or length issues during creation. With your materials ready, you can relax and enjoy the creative process.
Making Keychain Pattern
Now that your materials are prepped, it’s time to start making your keychain pattern. Here are some simple designs to get you started:
Simple Knot Keychain
This is the easiest keychain pattern. Simply tie the two ends of your string together in a knot. For extra security, you can tie multiple knots on top of each other.

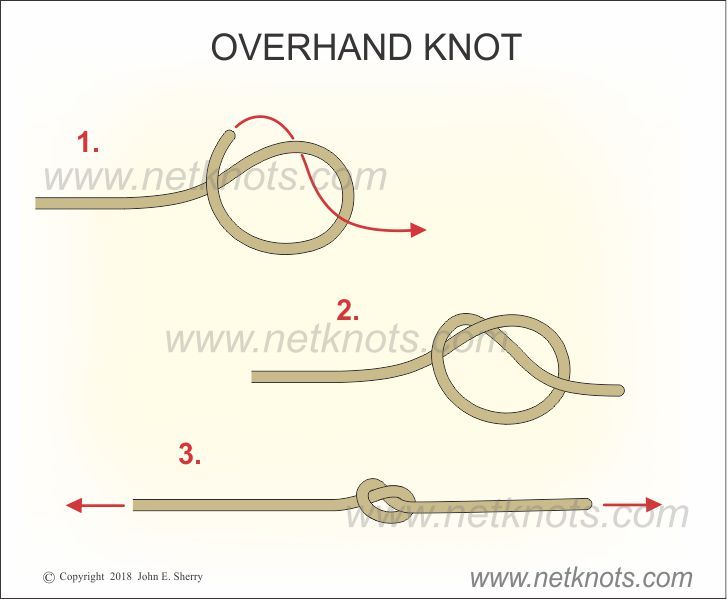
- Take one end of your string and make a loop.
- Pass the other end of the string through the loop.
- Pull to tighten the knot.
- Trim any excess string after the knot.
Braided Keychain
A braided keychain makes for a cute accessory. With this pattern, you cross the strings over each other to create a braid.

- Start by grouping your strands of string into three sections.
- Cross the right section over the middle one.
- Then cross the left section over the new middle section.
- Continue alternating crossing the side sections towards the middle to create the braid.
- When you’ve reached your desired length, tie the ends together in a knot.
Feel free to get creative with your own patterns too! You can make chevrons, crisscrosses or other shapes by alternating how you thread the strings.
Adding the Key Ring
Once you have finished stringing all your beads and have tied the ends securely, it’s time to add the key ring. The best time to attach the key ring is at the very end, after you’ve finished the entire keychain. Trying to attach it midway while you are still stringing beads can cause the key ring to get in the way.
To open the key ring, hold each end and gently pull apart to create an opening. Slide one end of the string through the opening and position the key ring at the end. Then gently pull the ends back together to close the ring securely. Make sure to press the ends completely together so there is no gap – this will prevent the key ring from accidentally opening later on. Give it a gentle tug to ensure it is sturdily closed.
Attaching the ring at the very end with a tight closure gives you a finished, professional looking keychain that will hold your keys securely. The closed ring safely prevents the beads from sliding off, keeping all your hard work intact!
Customizing Your Keychain
Once you’ve created the basic beaded keychain, there are many ways to customize it and make it your own. Here are some ideas for personalizing your keychain:
Add charms or tassels for some extra flair. Charm dangles are a fun way to express your personality. Choose charms that represent your hobbies, interests, or goals. Or add a tassel made from decorative cording or ribbon to the end of your keychain for a stylish touch.
Color coordinate your keychain beads and accessories to match your style or mood. You can go for an overall color theme, like blue and green beads with matching blue tassel. Or create an eclectic mix of colors that reflects your unique taste.
Consider adding some key identifiers to your keychain to easily distinguish which key is which. Attach letter beads, color coded beads, or charms to identify car, home, work or other common keys. This makes it easy to grab the right key every time.
The options are endless when it comes to making your beaded keychain truly unique to you. Let your creativity shine by customizing it with charms, color themes, and key identifiers.
Caring for Your Keychain
Handmade string keychains require some care and maintenance to keep them looking their best. Here are some tips for cleaning and preserving your keychain:
Washing: Over time, your keychain may get dirty from regular use. To clean, gently hand wash it with mild soap and warm water. Avoid submerging the keychain or using harsh detergents. Pat dry with a towel and allow to fully air dry before using again.
Drying: Do not machine dry your string keychain, as high heat can damage the string fibers. Hang or lay flat to air dry after washing.
Protecting the String: Take care not to expose your keychain to sharp objects like keys, as they may snag or fray the string over time. Consider adding a protective charm or bead between the keys and string to prevent damage.
Inspect for Wear: Periodically inspect your keychain for any worn sections of string or loose/broken beads. Catching issues early allows for quick repairs to preserve the life of your handmade keychain.
With proper care, your string keychain can remain in great condition for years to come. Be gentle, avoid harsh cleaners, dry thoroughly, and watch for wear.
Troubleshooting Issues
Like with any handmade item, errors can occur when making string keychains. Fortunately, there are some easy solutions for common issues that arise.
One problem that can happen is knots becoming loose or slipping on the string. To prevent this, it’s important to tightly tie secure knots and add a dot of clear nail polish or fabric glue to each knot. This helps stiffen the fibers and prevent loosening over time. Also avoid pulling or tugging excessively on knots which can cause them to unravel.
Fraying string is another nuisance but can be fixed with a dot of superglue on any loose threads. Take care not to get glue on unaffected areas to avoid stiffening the entire string. If the fraying is extensive, consider replacing that section of string or the entire piece. When cutting string, heat seal the ends with a lighter to prevent unraveling.
Lastly, beads can sometimes break or fall off the string. If a bead falls off, simply re-string it and make sure to tie tight knots on both sides to secure it. For cracked or broken beads, apply a dot of clear nail polish as glue to mend it. Badly damaged beads should be removed and replaced.
With some simple preparation and care, your handmade string keychain can last for years to come. Address any issues promptly and it will continue being a personal and stylish accessory.
Final Takeaways
Making your own string keychain is an enjoyable craft project that allows for creativity. Here are some final tips to summarize:
Aim for a tight, secure knot like the overhand knot when finishing your keychain (Source). This will help prevent it from unraveling. You can also experiment with other knots like a square knot for extra hold.
Consider customizing your keychain by using varied beads, charms, colors and patterns. The options are endless!
Adjust the length of your keychain based on personal preference and how you intend to use it. A longer keychain allows you to wrap it around your wrist. A shorter one keeps keys compact.
Take care of your keychain by avoiding excessive pulling or friction that can cause the string to fray. Periodically check for wear and replace if needed.
Making DIY keychains is a fun way to create a personalized accessory. Let your creativity shine through your choices of materials and design.

