How Do You Make Air Dry Clay Not Crack When Drying?
Air dry clay, also known as clay that dries hard or cures to hardness without heating, is a popular modeling and crafting material. Made from natural clays and additives, it can be molded when wet and allowed to dry to a solid, durable form. However, one of the main challenges when working with air dry clay is its tendency to crack and split as it dries. This happens primarily due to shrinkage, as the clay loses moisture and contracts. But there are ways to prevent or minimize cracking through proper clay preparation, drying methods, and sealing techniques.
Types of Air Dry Clay
There are three main types of air dry clay:
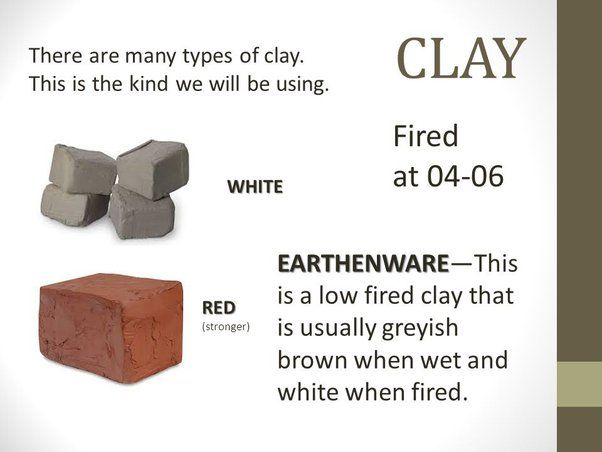
Clay
Clay air dry modeling clay is made from natural clay. It has high plasticity and flexibility. Clay is smooth in texture, doesn’t harden completely, and remains somewhat porous after drying. It can chip or crack easily if dried too quickly and is generally better for sculpting than making sturdy structures.
Paper Clay
Paper clay is made from clay and cellulose fiber. The addition of fiber makes paper clay very strong when dry. It doesn’t shrink or crack as much as regular clay and results in lightweight yet durable pieces. The fiber content gives paper clay a coarse, gritty texture compared to smooth clay.
Homemade Clay
Homemade air dry clay uses simple kitchen and household ingredients like flour, salt, water, and glue. Homemade clay is inexpensive and fully customizable in texture and properties. It can be brittle when dried, prone to cracking, less strong than commercial clays, and more susceptible to mold if not dried properly.
Causes of Cracking
There are several common reasons that air dry clay may crack during the drying process:
Shrinkage
As air dry clay loses moisture during drying, it shrinks and contracts. This shrinkage creates stress on the clay that can cause cracks and fissures. Thicker areas tend to crack more as they shrink. Using consistent thickness throughout a sculpture reduces cracking.
Trapped Moisture
If moisture gets trapped in the center or bottom of a clay piece, this section will dry slower than the outer areas. The uneven drying causes the exterior to contract while the interior is still swollen with moisture. This imbalance results in cracks and splits.
Temperature Changes
If air dry clay is subjected to sudden temperature changes while drying, this can introduce cracking. Keeping the drying environment at a stable, room temperature prevents cracks from forming.
Improper Storage
Allowing air dry clay to completely dry out or freeze in storage can damage its structure and make it prone to cracking. Always store clay in an airtight container at room temperature.
Preparing the Clay
Properly preparing your air dry clay before sculpting is an essential step to help prevent cracking. Here are some tips:
Kneading
Before sculpting with your clay, take some time to knead it. Kneading helps to warm up and soften the clay, making it more pliable to work with. It also helps to evenly distribute moisture and conditioners throughout the clay. Knead for 5-10 minutes until the clay is smooth, soft, and has an even consistency.
Consistency
The ideal consistency for air dry clay before sculpting is smooth, soft, and pliable, but not sticky. If your clay is too dry, it can crack more easily. Add a few drops of water and knead it in to reach the desired consistency. Don’t add too much water or the clay can become sticky.
Rolling
Before sculpting, roll your clay out evenly to your desired thickness. Using a rolling pin helps remove air pockets. Roll gently and rotate the clay occasionally. The thinner the clay, the faster it will dry. For most projects, a 1/4” thickness is a good starting point.
Thickness
Sculpt your projects at an even thickness whenever possible. Dramatic differences in thickness can cause cracking and breakage during drying. If you need both thin and thick areas, build up thin sections gradually.
Drying Methods
There are a few different methods you can use to dry air dry clay sculptures and projects:
Air Drying
Air drying involves leaving your clay sculptures out at room temperature to harden. This is the most common method. The pro is that it’s simple and doesn’t require any special equipment. The con is that it can take 1-3 days or longer for pieces to fully dry depending on size, shape, and climate. Air drying has the highest risk of cracking since extended drying times allow cracks to develop.
Baking
You can speed up the drying process by baking sculptures in a home oven at low temperatures (110-200°F). This can cut drying times down to just a few hours. The advantage is faster drying, but the disadvantage is you need access to a kitchen oven. Only bake small pieces to avoid cracks and follow the clay manufacturer’s instructions.
Microwaving
Microwaving is another option for quick drying. It can harden clay in minutes, but can also cause cracks or explosions if moisture builds up too quickly. Only microwave very small pieces for short periods, and never microwave clays with any metal or wire in them.
Preventing Surface Cracks
When air dry clay dries, it shrinks slightly causing stress on the outer surface which can lead to cracks. There are a few techniques you can use to prevent surface cracks while drying:
Misting – Lightly mist the surface of the clay with water before allowing it to dry. The water helps keep the surface moist and flexible while the interior dries. Avoid over-saturating the clay. Use a spray bottle set to a fine mist.
Wrapping in plastic – Cover the clay in plastic wrap or place it in a plastic bag while drying. This retains moisture and prevents too much air from reaching the surface as it dries. Make sure not to fully seal the plastic so that some air can still circulate.
Glycerin – Mix a few drops of glycerin into the clay before modeling. Glycerin acts as a humectant to retain moisture in the clay. About 1 teaspoon per 1lb/500g of clay is sufficient. Too much can make the clay sticky.
Preventing Internal Cracks
Internal cracks occur deep within the clay as it dries and are often caused by inconsistent thickness or improper baking. Here are some tips to prevent internal cracks:
Maintain Consistent Thickness
When rolling out clay, ensure it is an even thickness throughout the entire sculpture or project. Thicker areas take longer to dry, which can cause cracking in thinner areas that dried faster. Roll clay to an uniform 1/4 to 1/2 inch thickness.
Control Baking Temperature
Dry clay slowly at room temperature away from direct heat. Avoid placing projects in the oven, direct sunlight, or near heating vents to dry. The outside dries rapidly, trapping moisture inside. Bake clay in the oven only after thoroughly dried to prevent cracking.
Add Vent Holes
Poke holes in the clay before baking to allow inner moisture to escape. Use a toothpick or skewer to gently pierce deep inside the thickest areas. Add multiple vent holes to give moisture plenty of ways to escape without cracking the clay.
Reinforcing Clay
Adding reinforcement materials into clay can help strengthen it and prevent cracking as it dries. Some common materials used to reinforce air dry clay include:
Wire
Fine wire mesh, hardware cloth, or thin wires can be pressed into wet clay to reinforce it. The wires add structure and help hold the clay together as it shrinks and dries.
Wood
Objects like toothpicks, popsicle sticks, or thin wood can be inserted into clay as it dries. The wood absorbs moisture, reinforces the structure, and helps prevent cracking.
Cloth
Lightweight cloth like cheesecloth, muslin, or scraps of fabric can be pressed into wet clay before drying to add strength. The fibers reinforce the clay as it dries.
Paper
Strips of paper, tissue paper, or paper towel can be blended into clay. As the clay dries, the paper supports the structure to reduce cracks.
Sealing and Finishing
Applying a sealer, varnish, or gloss finish can help minimize cracks in air dry clay projects. Sealers penetrate the clay surface to harden and strengthen it. Varnishes and gloss finishes form a protective coating that helps hold everything together.
Acrylic polymer sealers are a good choice for sealing air dry clay. They soak into the clay and bind to the particles, making it harder and less porous. This helps prevent cracks from forming as the moisture evaporates. Apply 2-3 thin coats of sealer, allowing it to fully dry between coats.
Polyurethane and epoxy resin can also be used to seal air dry clay. They form a thick, plastic-like coating over the surface. This adds strength and flexibility to the outer layer, preventing cracks. Work in a well-ventilated area when using these sealers.
Varnishes and gloss finishes create a hard shell on the clay’s surface. This holds everything together tightly as it dries. Water-based polyurethane works well for air dry clay. Apply 2-3 coats for best protection. Allow each coat to fully cure before adding the next.
Spray sealers and finishes ensure an even application over the entire surface. This prevents weak spots where cracks can develop. Work in thin layers, and always go with the recommended number of coats for maximum durability.
Sealing and finishing should be the last step when working with air dry clay. It helps locking everything in place once the project is complete. Be sure to thoroughly prep and smooth the clay before applying any protective finish.
Troubleshooting Cracks
If cracks do appear in your air dry clay creation, don’t panic! There are ways to troubleshoot and repair the cracks to salvage your project.
Assessing the Cracks
First, carefully examine the cracks to determine what type they are and how severe. Surface cracks are cracks only in the outer finish layer of the clay and can often be easily repaired. Internal cracks penetrate deeper into the clay body and may require more extensive repair.
Also assess whether the cracks are hairline and small or large and gaping. Smaller cracks will be easier to repair than large split seams in the clay.
Repairing the Cracks
For small surface cracks, you can mix a small amount of water with clay dust from sanding to create a filler. Press this filler firmly into the cracks and smooth over. Once dry, sand and re-finish the surface.
For larger cracks, you may need to cut or drill small holes at the ends to prevent further spreading. Clean out the crack and fill with clay filler or epoxy clay designed for repairs. Smooth over the surface once dry.
Preventing Future Cracks
To avoid more cracking in the future, ensure adequate internal support for the clay structure and avoid overly complex shapes. Also use reinforcement techniques like wire or foil armatures if needed. Allow the clay to dry slowly and evenly in a humidity controlled environment.
With some patience and care, air dry clay cracks can be repaired and your creation can be salvaged! Just be sure to take steps to prevent cracks on your next project.