How Do You Make Christmas Ornaments Out Of Clay?
Clay ornaments are a fun craft to make for the holidays or other special occasions. Working with clay allows you to sculpt unique shapes and designs that reflect your own personal flair. The process involves sculpting the clay, baking it to harden, and then painting for a glossy finish.
Air dry clay and polymer clay are two common types used for ornament making. Air dry clay is water based and hardens naturally over time when exposed to air. Polymer clay requires baking in the oven to set. Both work well, so choose whichever fits your project needs and skill level.
Making your own custom clay ornaments is very rewarding. In this guide, we’ll walk through the entire process from start to finish. Follow along to learn how to craft beautiful keepsake ornaments out of clay this holiday season!
Gather Materials
Before you can start making your clay ornaments, you will need to gather the necessary tools and materials. The required items are clay, baking supplies, and paint. Some optional items include glaze, glitter, and clay sculpting tools.
The type of clay you use depends on your preference and skill level. Polymer clay is very popular for ornament making since it hardens when baked at relatively low temperatures. Air-dry and oven-bake modeling clay are other good choices.
For baking your ornaments, you will need an oven, baking sheet, parchment paper or aluminum foil, and an eye hook or string for hanging the finished piece. Acrylic craft paints work well for adding color. Glazes or glitter give a glossy finish and extra sparkle. Clay sculpting tools like a rolling pin, clay cutters, or sculpting picks allow you to add finer details and textures.
Before starting your project, gather these materials together so you have everything you need ready to go. This will make the ornament creation process quick and easy.
Prepare the Clay
Before you can start shaping your clay ornaments, you’ll need to properly condition the clay so it’s soft and malleable enough to work with. Here are some tips for preparing polymer clay before crafting:
– Start by kneading the clay firmly with your hands to soften it up and make it more pliable. Knead it like you would knead bread dough, folding the clay over itself and pressing down firmly as you work it in your hands.
– If the clay is quite stiff, you can also run it through a clay roller or pasta machine on the thickest setting. This will help flatten and warm the clay, making it easier to condition.
– To mix colors together, twist or roll two or more colors together into a rod or ball. The clay will begin to blend and marbleize.
– If the clay starts to feel sticky while you’re working with it, dust your hands lightly with cornstarch or baby powder. This prevents the clay from sticking to your fingers.
– You can also condition clay by letting it rest under a lamp or other gentle heat source for 10-15 minutes before working with it. The warmth makes clay very pliable.
Once your clay is soft, conditioned and ready to use, you can roll it out and start shaping it into ornament designs.
Create the Ornament Shape
There are many ornament shapes you can make out of clay, such as balls, gingerbread men, stars, or custom shapes. The key steps are:
If making a ball, roll the clay into a smooth sphere by rolling it between your palms. Make sure there are no cracks. For a gingerbread man, roll out a flat slab of clay about 1/4 inch thick and cut out the shape with a cookie cutter or knife. Gently smooth the edges with your finger.
For a star, roll out a snake shape and then bend it into a star, pinching the ends together. Other fun options are snowflakes, angels, trees, or bells. Cut out the custom shape using a knife or cookie cutter.
Whatever the shape, make sure the clay walls are an even thickness throughout. The ornaments should be durable but not too thick or they won’t bake properly. Let the shaped clay sit for 10 minutes before decorating to firm it up.
Add Details
Once you have the basic shape for your ornament, it’s time to add more interest by indenting, carving, or attaching additional pieces of clay. Here are some ideas for adding details:
- Use a toothpick, skewer, or other thin tool to indent lines, dots, or shapes into the surface of the clay. This can be used to create textures, patterns, or designs.
- Carefully carve away clay using a craft knife, loop tool, or other carving tools. This allows you to create shapes like leaves, petals, stars, hearts, etc. that add dimension.
- Attach additional balls or shapes of clay by gently pressing and smoothing the seams. Build up layers, attach clay coils, or add cut-out shapes to create flowers, animals, and other 3D effects.
Take your time when adding details to ensure clean lines and prevent unintended fingerprints or smudges. Consider sketching your design first if carving intricate patterns. Let your creativity run wild to make your ornament truly unique!
Bake the Ornament
Once your clay ornament has been shaped and detailed, it’s time to bake it to harden and cure the clay. Follow the baking instructions on your clay’s packaging for exact temperature and times. In general, air dry clays can simply be left out to dry and harden, while oven-bake clays need to be placed in the oven on a baking sheet or tray.
Here are some tips for proper baking:
- Preheat your oven to the clay manufacturer’s recommended temperature, usually around 225°F to 275°F.
- Lightly coat your baking sheet or tray with cooking spray or parchment paper so the clay doesn’t stick.
- Place the ornament on the prepared baking sheet, leaving at least 1 inch of space between pieces to prevent sticking.
- Bake for the recommended time, checking at the minimum end time. Oven-bake clays can burn or scorch if overbaked.
- Allow the ornament to cool completely before handling or painting.
- Avoid putting cold clay directly into a hot oven or baking clay too quickly. Allow the clay to warm up as the oven preheats to prevent cracking.
- Bake clay ornaments on lower racks in the center of the oven for even heating.
- If you notice scorching or burning, reduce the baking temperature slightly next time.
Proper baking helps harden the clay fully and provides a durable surface for painting and finishing the ornament.
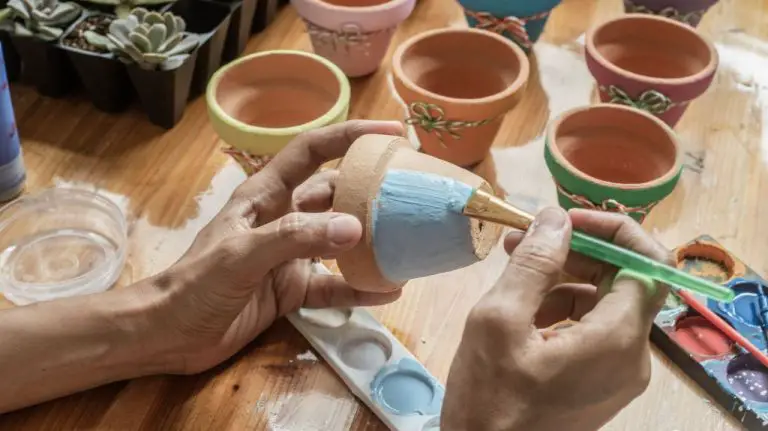
Paint the Ornament
Once the clay has been fired, it’s time to paint the ornament. There are several types of paint that can be used on polymer clay:
- Acrylic paint – Acrylics are water-based and fast-drying. They work well for hand-painting details and creating designs on clay. Acrylics can be thinned with water for a smoother consistency.
- Enamel paint – Enamel paint is oil-based and provides a glossy, glass-like finish. Enamels adhere well to polymer clay but take longer to dry. They are good for achieving an all-over smooth, durable color.
- Glazes – Ceramic and porcelain glazes can be used to coat polymer clay and give a shiny finish. Glazes require high heat to set properly so check the glaze instructions before using.
There are a few techniques that can be used when painting polymer clay ornaments:
- Hand-painting – Using a small brush to paint designs, dots, stripes, etc. Allow layers to dry between colors.
- Smooth coat – Washing the entire ornament with thinned acrylics or enamel paints using a brush, sponge, or airbrush.
- Sponging – Cutting shapes out of a sponge, dipping in paint, and stamping onto the clay.
- Stenciling – Using a stencil and sponge brush to create patterned designs.
- Spraying – Using spray paints designed for plastic to achieve a smooth, even coat of color.
Experiment with different paint mediums and techniques to achieve your desired look. Seal painted ornaments with a clear glaze or varnish for protection.
Add Finishing Touches
Once the clay ornament is painted, you can add some extra flare with finishing touches like glitter, varnish, and ribbon. This final step will give your ornament an extra pop of pizzazz.
Glitter is a classic and easy way to make your clay ornament sparkle. After the paint has fully dried on your ornament, brush a thin layer of tacky glue over the entire surface. Immediately sprinkle glitter generously over the glue so it fully covers the ornament. Let it dry completely. Gently shake off any excess glitter over a sheet of paper to save it for later. The glitter will shimmer beautifully on your ornament.
Applying a varnish coat will give your clay ornament a glossy, finished look. Use a spray-on polyurethane varnish and apply 2-3 thin coats, allowing each coat to fully dry in between. The varnish will protect the paint and glitter and give your ornament a polished, professional sheen.
Ribbon is the perfect finishing touch for hanging your clay ornament on a tree. Take a 6-8 inch length of pretty ribbon and thread or glue it through the top loop or hole. Tie it into a bow or knot. Consider using wired ribbon so you can adjust the loops. Your clay ornament now has a festive hanger!
Assemble Ornament
After you’ve baked and painted your ornament, it’s time to assemble the final piece. This involves attaching any caps, ribbons, or hooks that you want to use to hang up or display the ornament.
Attaching the Cap
If your ornament has a removable cap, carefully glue the cap in place on the top of the ornament. Use a strong adhesive like E6000 glue and apply a thin layer around the lip of the cap and around the inside of the ornament opening. Press the cap in place and hold for 30-60 seconds. Allow several hours for the glue to fully set before hanging.
Adding the Ribbon
Cut a length of pretty ribbon to your desired length and thread it through the cap opening. You can tie a knot, or secure it with hot glue. For a decorative finish, curl the ribbon ends with scissors.
Attaching the Hook
Most clay ornaments also require a hook for hanging on the tree. Attach a hook to the center top of the ornament, either by inserting the hook into the clay before baking if using an ornament mold, or by gluing the hook in place after baking. Make sure the hook is securely attached before hanging to prevent any accidents.
Display and Enjoy
After you’ve created your beautiful clay ornaments, you’ll want to show them off in the perfect spot. Here are some ideas for displaying your handmade creations:
On the Christmas tree – Clay ornaments look lovely hung on the tree branches with lights reflecting off their glossy surfaces. Hang them near the front where they can be admired up close.
On the mantel – Arrange a grouping of coordinating clay ornaments on your mantel to add festive flair. You can nestle them amongst greenery, candles, and other holiday decor.
On a wreath – Weave colorful clay ornaments into a fresh Christmas wreath for your front door. They’ll add bright pops of color and interest.
On gift packages – Use miniature clay ornaments as gift toppers. They add a sweet handmade touch to any wrapped present.
As gift tags – Flatten a ball of clay and use letter stamps or markers to add names to the back. Punch a hole, add string or ribbon, and you have custom gift tags!
When giving your ornament creations as gifts, include care instructions so the recipients know how to care for them. Remind them that as handmade items, clay ornaments are delicate and should be handled with care to avoid breaking. Suggest displaying them out of direct sunlight to help preserve the colors. And let them know to dust gently to keep their new treasure looking its best for many holidays to come.