How Do You Make Clay With 3 Ingredients?
Making clay at home is an easy, fun activity that only requires 3 common household ingredients that most people already have on hand. Homemade clay offers a safe, moldable material that people of all ages can shape into endless creations.
With just baking soda, cornstarch, and water, you can make your own clay right in your kitchen. The clay air dries naturally and doesn’t require special equipment or skills. Creating clay with materials you likely already have is a budget-friendly way to spark creativity and enjoy crafting.
Gather Materials
Making clay at home is a simple process that only requires 3 main ingredients: flour, salt, and water. All purpose flour or plain flour works best. You’ll also need standard table salt. For the amounts, combine 1 cup of flour, 1/2 cup of salt, and 1 cup of water to start. This will make a good amount of clay to work with. Optionally, you can add a few drops of liquid watercolor, food coloring, or acrylic paint to the clay mix to create colored clay if desired.
Combine Ingredients
When making clay at home, the first step in combining ingredients is to mix the flour and salt together thoroughly in a large bowl. Start with 1 cup of flour and 1/4 cup of salt. Use a whisk or fork to blend the dry ingredients until fully incorporated.
After the flour and salt are well blended, begin adding water gradually while stirring continuously. Add the water 1 tablespoon at a time, mixing well after each addition. The ideal texture to aim for is a smooth dough that is not sticky but still moist and pliable enough to shape.
As you mix, the dough will begin to come together into a clay-like ball. You may need to add slightly less or more than 1/2 cup of water, depending on the humidity of the flour. Continue mixing until all of the dry flour is hydrated and a cohesive dough forms that is easy to handle and mold. Test the consistency by shaping a piece of the clay in your hands – it should hold its form without cracking when bent or pressed gently.
Knead the Clay
Properly kneading the clay is a crucial step for achieving the right texture. Kneading blends the ingredients together thoroughly and eliminates air pockets that can weaken sculptures or cause cracking when baked. The clay should be kneaded for 10-15 minutes until it becomes uniformly soft and pliable.
To knead clay, start by slamming it forcefully onto your work surface. Then use the weight and force of your upper body to push down and work the clay. Fold the clay over itself and continue pushing and folding until the texture is completely smooth. Kneading develops long gluten strands in the flour, resulting in clay that is elastic and doesn’t crack when sculpted. Insufficient kneading can lead to clay that crumbles easily during sculpting. Set aside plenty of time for vigorous kneading by hand or with a stand mixer fitted with a dough hook attachment.
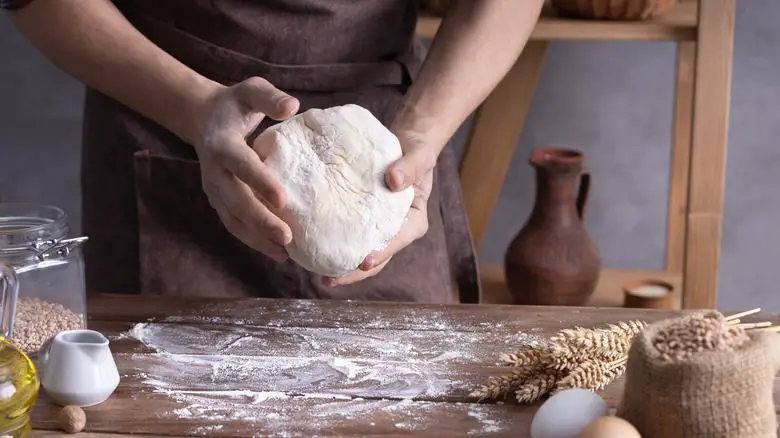
As you knead, pay attention to any lumps or air bubbles and work them completely out by continuing to fold and push the clay. Well-kneaded clay should feel soft, smooth, and elastic. When it can be stretched without cracking, it is ready for sculpting or adding color.
Add Color
The three clay ingredients typically form a white or gray colored clay. But you can add pigments to customize the clay color you want. Here are some options:
- Acrylic paint – Add a few drops at a time and knead it in to achieve the desired shade. Acrylics work well for coloring clay.
- Tempera paint – This type of paint is safe for clay and good for vibrant colors. Start with a small amount.
- Food coloring – Just a drop or two of food coloring can create a bright shade. Be careful adding too much.
- Chalk pastels – Shave little bits of chalk pastel into the clay. The color will distribute as you knead.
A small amount of color additive goes a long way. Start with just a drop or shaving and knead thoroughly before adding more. Too much pigment can weaken the clay. Get creative and mix colors to make new shades.
Store the Clay
Properly storing clay is important to prevent it from drying out prematurely. Air dry clay should be kept in an airtight container or ziplock bag with as much air pressed out as possible. According to Gathering Beauty, clay should be stored at room temperature away from direct sunlight or heat sources which can cause cracking or drying. Refrigeration is another storage option that can extend the lifespan of homemade or store-bought clay for weeks or months by slowing the drying process.
For long term storage, wrap chunks of clay tightly in plastic wrap before placing in a ziplock bag or airtight tub. Make sure to push out any excess air. Then store in a cool, dark place like a cupboard or pantry. Avoid temperature extremes. With proper storage, air dry clay can last for many months before drying out.
Modeling with Clay
Kids can make so many fun creations with modeling clay. Some ideas include animals, mythical creatures, vehicles, foods, holiday ornaments, jewelry, and more. Encourage them to use their imagination to make their own unique clay models.
When working with clay, start with basic shapes like balls, coils, and slabs then add details. Add texture using tools or household items like feathers, forks, and toothpicks. Let the clay air dry fully before painting.
Instead of step-by-step instructions, allow kids to freely create. Offer ideas and assistance if needed. Focus on the process over the end result. Clay is very forgiving – creations can be reshaped, added to, or smooshed back into a ball to start over.
Clay stimulates creativity and imagination in kids. There are no rules – anything they dream up can be shaped from clay. Don’t be afraid of messy projects that stretch their artistic abilities. The experience itself is what’s most important.
Baking Creations
Once you’ve created sculptures or other items with your homemade clay, you’ll likely want to bake them to harden and preserve the clay. Baking the clay is optional, but will make the creations more durable.
Preheat the oven to 225°F. Place clay creations on a baking sheet lined with parchment paper or aluminum foil. Bake the items for 1-2 hours until hardened. Check them periodically while baking. The baking time will vary based on the size and thickness of the clay creations.
Make sure to have an adult help with operating the oven. Oven baking can get hot and kids shouldn’t handle it alone. Watch the items carefully as they bake to prevent any burning or over-baking which could damage the clay.
Once cooled, the homemade clay creations will be hard and sturdy. They can be painted or decorated as desired. Enjoy displaying your homemade clay art pieces!
Online Recipes
Other online recipes provide additional ways to make homemade clay. For example, this recipe only uses 2 ingredients – cornstarch and cold water. There are also recipes that incorporate materials like baking soda and water for modeling clay. Checking out various recipes can give you additional options and ideas for homemade clay.
Conclusion
Homemade clay is an easy, safe, and fun DIY project that anyone can create using just three basic ingredients – flour, salt, and water. By mixing together these common household items, you can make your own moldable clay ready for crafting and creative play. The process requires no baking and allows for endless imagination. Feel free to add food coloring, spices, or other natural materials to create different colors and textures. Homemade clay is an engaging tactile activity that inspires creativity. Now that you know the simple recipe, get ready to unleash your inner sculptor!
In summary, all you need is flour, salt, and water to make your own clay at home. Then let your imagination run wild to shape fun figurines, jewelry, pots, and endless other possibilities. Making your own clay can be a enjoyable hands-on project for both kids and adults. Take this simple craft even further by safely baking finished clay creations in the oven to harden them. No matter your skill level, homemade clay is sure to provide hours of creative fun.