How Do You Maximize Space In A Small Craft Room?
Assess Your Space
The first step in maximizing a small craft room is to take measurements and assess the space. Note the room’s dimensions, including ceiling height. Identify any windows, doors, columns, or architectural elements that take up space. Look for any awkward dead spaces that go unused. According to The Spruce, assessing your space helps you “identify challenges and opportunities to work with.”1 Take time to analyze traffic flow and how you naturally move through the room. Determine what furniture or equipment takes up the most area. Consider any limitations like sloped ceilings or odd corners. All this will allow you to see your craft room with fresh eyes.
Sources:
1. https://www.thespruce.com/small-craft-room-ideas-7107262
Organize and Purge
The first step in maximizing your small craft room is to go through all of your craft supplies and materials. Get rid of anything you haven’t used in over a year and toss or donate any unused or extras items. This process of organizing and purging will help you clear out your space and understand exactly what you have to work with.
Make four piles as you sort through your supplies: keep, toss, donate, and relocate. Be ruthless here – if you haven’t used it and have no plans to use it, get rid of it. Donate unopened supplies or lightly used materials to local schools, youth groups, senior centers, or craft fairs. This will free up valuable space in your craft area.
As you sort and purge, also take note of supplies you use frequently or need to easily access versus those used less often. This will help inform your storage and organizational plans moving forward.
Optimize Storage
One of the best ways to maximize storage in a small craft room is to optimize your organizational systems by going vertical. Use shelves, bins, drawers, hanging racks and other vertical storage solutions to free up floor and horizontal surfaces for your workspace (The Spruce, 2022).
Some ideas include:
- Installing tall bookshelves or storage units that go all the way up to the ceiling
- Hanging mesh grids or pegboards on the wall to store small supplies
- Using over-the-door racks or hanging shelves for extra storage
- Stacking plastic drawers or cubbies vertically to save floor space
- Placing narrow floor-to-ceiling cabinets or shelves in unused corners
Going vertical with your storage allows you to keep more supplies and tools within arm’s reach while keeping your workspace open. Just be sure to label bins and baskets so you can easily find what you need on high shelves (HGTV, 2022). The key is optimizing every inch of available wall and floor space for storage.
Multipurpose Furniture
One of the best ways to maximize space in a small craft room is to use multipurpose furniture that serves more than one function. Look for pieces like storage ottomans that provide seating but also lift up to reveal hidden storage for craft supplies. An ottoman bench with cubbies and shelves underneath is perfect for stashing away extra materials.
Craft carts on wheels can act as extra work surfaces when needed, then tuck away against a wall when not in use. A rolling cart with drawers allows you to neatly organize small items while also creating an easily movable side table for assembling projects. Just roll it right up to your main workspace when needed.
Look for a craft desk or table that has storage cubbies and shelves built right in to maximize vertical space. Wall mounted fold-down workstations can transform an empty wall into a functional craft zone then fold flush against the wall when not needed. Dual-purpose furniture is key for small craft rooms.
Display Strategically
Walls and vertical surfaces provide excellent opportunities for storage and display in small craft spaces. Make use of pegboards, racks, shelving, and wall units to store supplies neatly while keeping them in sight and easily accessible.
Pegboards allow you to hang frequently used tools like scissors, rulers, and craft knives. Add small shelves or baskets to corral loose supplies. Racks can hold rolls of fabric, wrapping paper, or artwork. Mount shelves at varying heights to accommodate bins, baskets, and boxes of all sizes.
Wall-mounted storage from systems like Elfa and IKEA’s Algot series can be customized to your space. Install shelving flanking windows to hold bins of scraps or materials. A tall bookcase positioned near your work area provides storage and display. floating shelves and wall mounted cabinets add open storage without taking up floor space.
The key is to make sure everything has a designated spot on your vertical storage system within easy reach. Utilizing vertical space allows you to keep more supplies accessible while maximizing your compact craft area. According to craft and organizational expert Torrie of Plaid Crafts, “Wall storage is perfect for small craft spaces!”
Mobile Storage
One of the best ways to maximize space in a small craft room is by utilizing mobile storage solutions (cite: https://www.pinterest.com/raicho/mobile-craft-storage/). This allows you to easily move supplies out of the way when not in use so they don’t take up valuable real estate. Look for wheeled carts, trays, and baskets that can roll or slide under tables or shelving units.
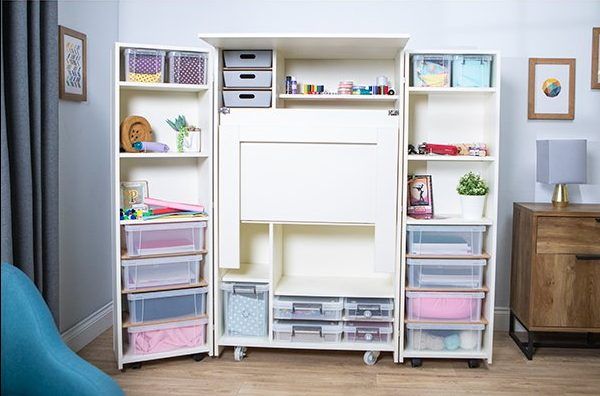
Carts with shelves or drawers are great for housing tools, adhesives, paints, papers, and other crafting essentials. Consider installing drawer organizers to maximize vertical space within the cart. Turntables and lazy susans are also useful for accessing items in a small footprint. For extra storage, look for carts with a hutch or cabinets on top (cite: https://www.amazon.com/Rolling-Craft-Storage/s?k=Rolling+Craft+Storage).
Trays and baskets outfitted with wheels or sliders can neatly corral small supplies like embellishments, ribbons, stamps, and more. When not in use, simply slide them under a work surface to get them out of the way. This is an easy and affordable way to add mobile storage.
No matter what types of mobile storage you choose, look for ones that fit the scale of your space. The goal is to maximize usage of every inch, so make sure it can easily roll and slide around without bumping into other furniture or getting stuck.
Creative Display
Get creative with how you store and display your most-used craft supplies to maximize their visibility and access in a small space. For example, apothecary jars, hanging buckets, and magazine files allow you to neatly organize and attractively showcase your favorite art and DIY materials.
Fill clear glass apothecary jars with embellishments like buttons, beads, and pom poms to create an aesthetically pleasing display. Mount the jars to the wall or place them on floating shelves to save space on your work table (https://feelingnifty.com/how-to-organize-craft-supplies/). Hanging buckets or wire baskets offer another functional way to neatly store and display commonly used supplies within arm’s reach.
Repurpose magazine files or wall pockets to mount on the wall near your workspace. Use them to store and display papers, stickers, ribbons, and other flat craft materials you use regularly. The see-through design allows you to easily identify and grab what you need.
Maximize Corners
One creative way to maximize space in a small craft room is to make use of corners. Corners often end up being wasted space, but they can provide extra storage and display opportunities if used strategically. Use corner shelves, rotating organizers, vertical layers, and other creative solutions to take advantage of every inch.
Corner shelves at different heights create extra storage space that would otherwise go unused. Mount shelves diagonally or perpendicular to utilize vertical real estate. Rotate frequently-used supplies on corner organizers for easy access. Consider vertical layered storage like corner étagères to double your storage capacity. Place taller items in the back and smaller items in front for an organized look. The key is to think creatively about how corners in your craft room can provide efficient extra storage.
Flexible Workspaces
Having a flexible workspace is key for maximizing a small craft room. Consider using a central worktable that can serve multiple functions. Opt for a table that is height adjustable, on wheels, and/or has foldable side leaves to extend the workspace when needed. Look for worktables with built-in storage like shelves, drawers or cubbies to stash supplies within arm’s reach.
Also utilize the wall space above the worktable to mount fold-down craft surfaces. Wall-mounted drop-leaf shelves or tabletops can fold flush against the wall when not in use, then easily fold down to provide extra horizontal workspace for tasks like sewing, gift wrapping or working on a large project. Use sturdy hardware and follow the manufacturer’s installation instructions when mounting fold-down work surfaces.
Having adaptable, multi-use furnishings makes it easy to reconfigure your craft area to suit different projects or activities. With a few movable pieces like a wheeled worktable and wall-mounted drop-leaf shelf, even a very small room can transform as needed.
Keep Essentials Accessible
Having your most-used craft supplies and tools within arm’s reach will save you time and frustration while working on projects. Keep frequently used items in easy-to-access storage right at your workspace. According to First Day of Home, consider placing everyday tools like scissors, pens, brushes, rulers, and adhesives in clear acrylic containers or trays on your desk or mounted to the wall within reach (source). Paints, glitter, beads, and other small embellishments can be stored in organizers, turntables, or desktop caddies near your work surface.
HGTV recommends installing wall-mounted racks or shelves above your workspace to hold those items you need most regularly. Mounted storage like wall-pockets, hooks, and open shelves will keep essentials visible and close at hand. For especially small craft nooks, utilize vertical space with hanging storage as much as possible to keep your valuable workspace clear (source).
Having quick access to the tools and materials used in your most common projects will allow you to spend more time crafting and less time hunting down supplies. Prioritize your most reached-for items and keep them readily available within arm’s span.

