How Do You Mold Flowers With Clay?
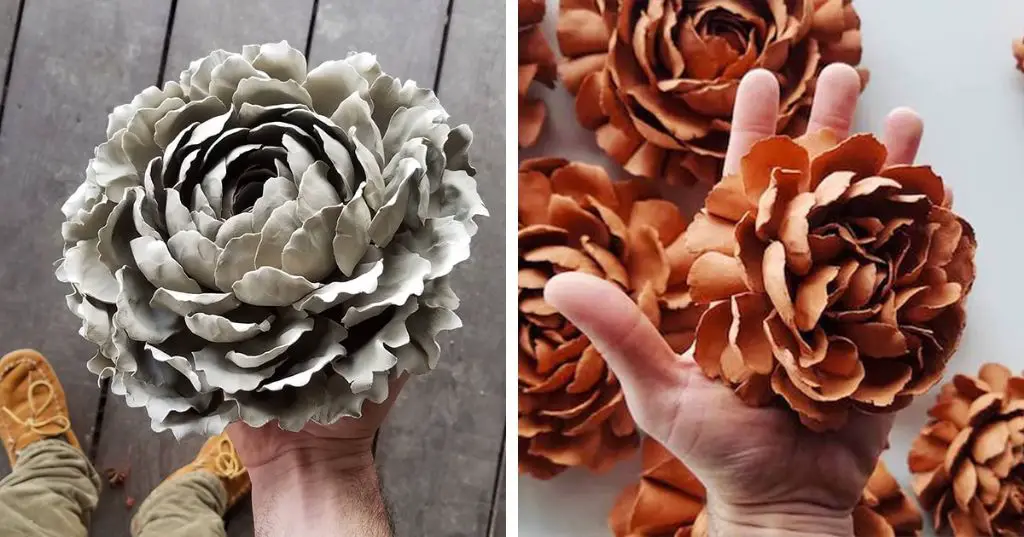
Molding flowers with clay is a fun and creative hobby that allows you to make beautiful floral clay art. It involves carefully pressing actual flowers into clay to create an impression, then letting the clay dry. Once dry, the clay holds the shape and details of the flowers pressed into it.
This hobby is enjoyable for a few reasons. First, it allows you to preserve beautiful flowers and foliage in clay, capturing their shape and texture. The molded flowers can be painted and displayed as artwork. Second, it taps into creativity as you experiment with different flowers, arrangements, and clay colors. Finally, molded flower clay projects make great handmade gifts.
The best types of clay for pressing flowers are air-dry clay and oven-bake polymer clay. Air-dry clay is easy to work with and dries at room temperature. Polymer clays require baking but produce durable results. Both clay types can pick up fine flower details.
Gather Your Supplies
To mold flowers out of clay, you’ll need the following basic supplies:
- Air-drying clay – This clay dries at room temperature without needing to be baked. Popular brands include Crayola Model Magic and Activa Air-Dry Clay.
- Clay sculpting tools – You’ll want basic tools like a roller, sculpting pick, and craft knife. A beginner polymer clay tool set like this one from Sculpey has all the essentials.
- Rolling pin – Use to roll out the clay into an even sheet or shape.
- Craft paint – Acrylic paint works well for adding color after the clay has dried.
- Varnish – Adding a protective sealant like polyurethane helps preserve the flowers.
Focus on getting air-drying clay and basic sculpting tools to start. The other supplies you may already have on hand or can pick up later.
Choose Your Flower
When choosing which type of flower to make out of clay, start with simple flowers if you’re a beginner. Some easy options are daisies, roses, orchids, and lilies. Focus on flowers with a basic round or oval shape. According to this article on sculpey.com, lilies are one of the easiest flowers to mold because their petals have a simple curved shape.
Once you feel more comfortable, try your hand at more intricate flowers like calla lilies, carnations, or chrysanthemums. These flowers have more specific shapes and details that take some practice to perfect. Before molding a complex flower, research pictures of the real flower and take note of the exact shape and size of the petals, stamen, and other parts. Paying close attention to the details will help your clay flower look realistic.
No matter what flower you choose, looking at reference photos as you work is key. Take the time to study the subtle curves, ridges, and variations in the flower parts. Capturing the natural imperfections is what brings clay flowers to life.
Prepare the Clay
Before you can start shaping your clay flowers, you need to properly prepare the clay. The two main methods for preparing clay are the wet method and the dry method. According to Making Up and Testing Mixtures, and Clay Preparation, with the wet method, clay from the ground is spread out to dry first. Once dried, the clay is broken up and soaked in water to make a slip. The dry method involves taking dried clay and breaking it up into smaller pieces before combining it with water.
To prepare clay for flower making using the wet method, start by kneading the softened clay thoroughly until it becomes uniform in consistency and all cracks and air pockets are worked out, making it soft and pliable. Next, roll or press the clay out on a flat surface to your desired thickness to cut the flower shapes from. Work slowly and methodically when kneading and rolling out the clay to prevent air bubbles from forming.
Cut Out the Basic Shape
Once you have chosen your flower and prepared the clay, it’s time to cut out the basic shape. There are two main ways to do this:
1. Use cookie cutters or clay cutters in the shape of your flower. Press the cutter firmly into the clay to cut out the shape. This will give you a clean, uniform shape to work with.
2. Cut the shape freehand using a craft knife. Draw the outline of the petals on the clay lightly first if needed. Then carefully cut along the lines to cut out the flower shape. This takes more skill but allows you to customize the shape.
Once the basic shape is cut out, use your fingers to smooth the edges so they are even. Removing any rough edges will make the flower look more realistic. Avoid overhandling the clay as it can distort the shape. Source
Add Details
This is the stage where you can add realistic details to make your clay flower look more natural and life-like. Press different shapes and patterns into the petals to give them more texture – you can use the back of a paint brush, a ball stylus, or even just your fingertips. Refer to photos of real flowers to see the variations in petal shapes and vein patterns.
To add veining, use a blunt clay tool or toothpick to gently press in lines radiating from the base of the petal. Add thinner, smaller veins branching off the main ones. Veins give the petal more depth and dimension. For many flowers like roses, add stamens – these are the thin filaments inside the flower that contain pollen. Roll tiny balls of clay into oval or cylindrical shapes and insert them into the center of the flower. If the flower has a visible pistil (the female part of the flower), you can form one out of clay as well.
Take your time with the detailing to create delicate, realistic looking petals and flower parts. Referencing botanical diagrams or pictures will help capture the right shapes and details (https://onelittleproject.com/clay-flowers/). The smaller touches really bring the clay flower to life.
Let Dry Completely
Allowing your clay flowers ample time to dry is a crucial step. According to thepotterywheel.com, pottery clay usually takes about 7 days to fully dry, but this depends on the temperature and humidity. Thick pieces may require up to 3 weeks to dry, especially in humid climates, cites soulceramics.com.
Be sure to follow the package instructions for recommended drying times. Most air-dry clays require 24-48 hours to dry completely. Do not rush the drying process, as drying too quickly can cause cracking. Place your clay flowers in a warm, dry area out of direct sunlight. You may gently rotate or prop up pieces while drying to prevent flat spots.
Test pieces for dryness before moving on. Flowers should be lightweight, firm, and no longer cool to the touch. If needed, allow extra drying time. Proper drying is crucial for clay flowers to retain their shape and achieve maximum strength.
Paint the Flower
Once the clay has dried completely, it’s time to bring your flower to life with color. Acrylic paints work best for painting clay. Make sure to have a variety of acrylic paint colors on hand so you can achieve the look you want.
Start by base coating the entire flower in one main color. Allow this coat to dry fully before moving on. Then, use additional colors to add details and dimension. Paint the edges of petals in a darker shade and add lighter highlights. Use a small brush for intricate details like veins on leaves or stripes on petals.
Applying multiple thin coats of acrylic paint allows the colors to remain vivid. Let each coat dry between applications. Adding too much paint at once can cause dripping or pooling. Build up the color intensity gradually for a clean, even appearance.
Metallic acrylic paints can be used for cool effects on the center of flowers or edges of leaves and petals. Pearlized or iridescent paints also help make certain elements pop.
Get creative combining colors and paint effects until you achieve the look you desire for your clay flower. The right paint job can make it look incredibly life-like.
Add Protective Sealant
Once the painted clay flower has dried completely, it’s important to seal it with a protective varnish or sealant. This adds a protective coating that makes the flower more durable and allows it to be handled repeatedly without the paint wearing off.
Use a paintbrush to brush a thin layer of varnish or sealant over the entire painted surface of the flower. An acrylic sealer formulated for clay or an outdoor sealer works best. Allow the sealer to dry completely. Then apply a second thin coat of sealer to ensure full coverage and protection. Let this coat dry fully as well.
The sealant allows the painted clay flower to be touched and handled without worrying about fingerprints or smudging the paint. It protects the paint from moisture and prevents chipping or peeling over time. Sealing is a crucial final step to preserve your clay flower artwork and allow it to be displayed and enjoyed for years to come.
Display Your Creations
Once your clay flowers are complete and sealed, you have many options for displaying them. Clay flowers make wonderful gifts. Present them in a nice pot or frame them under glass. Create a stunning centerpiece by gathering a collection of different clay blooms in a vase or bowl. Clay flowers also work beautifully on wreaths and garlands. Weave them into a grapevine wreath or string them together to make a lovely garland to adorn over a doorway or mantle.
Use wire to make small stems for your clay flowers so you can insert them into foam for professional looking arrangements. The colors and textures of clay flowers add an artistic touch to any decor. Group them into color themes or mix-and-match for an eclectic look. Let your completed clay flowers enhance your living space or brighten someone else’s day as a heartfelt, handmade gift.