How Do You Sculpt Animals In Clay?
Introduction
Sculpting clay animals has been a popular art form throughout human history. Ancient civilizations like the Greeks, Romans, Chinese, and Mesoamericans all created animal sculptures out of clay. Clay is an appealing artistic medium because it is inexpensive, readily available, and easy to work with. Sculptors can quickly shape animals out of clay by hand or using basic tools. Once fired, clay becomes durable and preserves the artwork for centuries. Creating animal sculptures in clay allows artists to represent creatures from life or mythology in 3D form.
Pick Your Animal Subject
When deciding what animal to sculpt, consider its size, complexity, and meaning. For beginners, smaller animals like birds, rabbits, or cats are easier to manage than larger animals like horses or elephants. The anatomy of an animal like a dog is less complex than that of a human figure. Start with simple forms before attempting more intricate sculptures.
Choosing an animal with personal significance can make the sculpting process more meaningful. Your pet, spirit animal, or favorite zoo creature will let you convey emotion and tell a story through the artwork. Just make sure to select a subject you feel confident sculpting as a beginner.
Some classic animal subjects for novice sculptors are:
- Dogs
- Cats
- Birds
- Rabbits
- Turtles
- Fish
Focus on an animal you feel a connection with and whose anatomy you can reasonably manage as a developing sculptor.
Gather Materials
The right materials are essential for sculpting animals in clay. The most important supply is the type of clay you choose. Polymer clay, oil-based clay, and air-dry clay are common options for sculpting animals (source). Consider how much clay you’ll need based on the size of the sculpture. Air-dry clays like Creative Paperclay are lightweight and easy to work with.
You’ll also need basic sculpting tools like metal sculpting loops, clay shapers, and sculpting knives. Smooth wood and silicone tools help refine details and textures. Collect reference photos of the animal from multiple angles to guide anatomy and proportions (source).
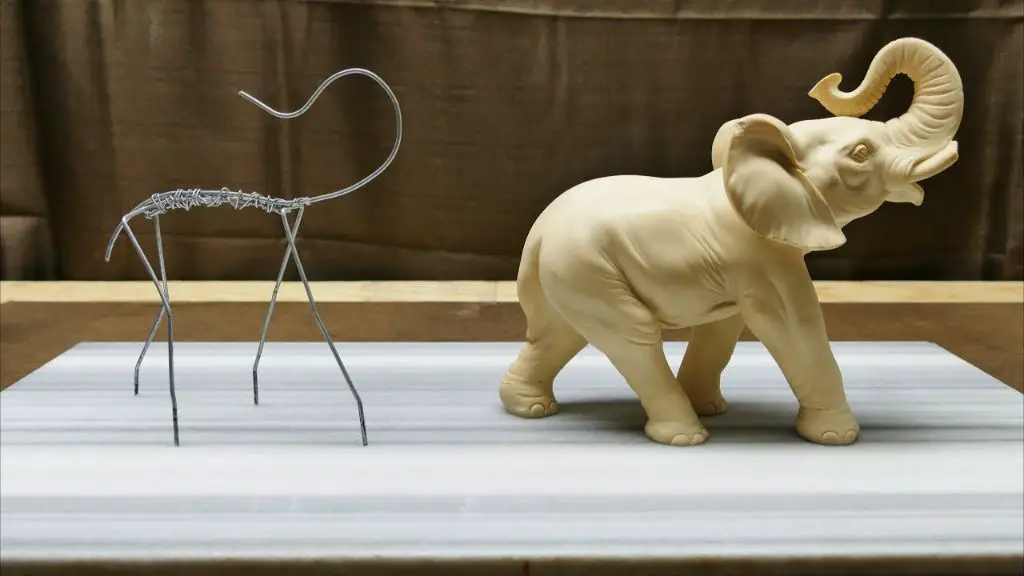
Make an Armature
An armature provides important interior support for your clay sculpture. It helps define the basic shape and proportions of your sculpted animal. The armature also keeps the clay from sagging or collapsing as you work on details. A strong armature enables you to sculpt larger, heavier pieces in clay.
To build a simple armature, you will need:
- Armature wire – aluminum wire works well as it can be rigid but also bent into shape
- Wire cutters
- Pliers
- Reference photos – to determine the size and pose
Start by cutting pieces of wire to length based on the height and width of your planned sculpture. Use thicker gauge wire for the core spine and legs. Then wrap and bend thinner wire to form the basic shape of your animal [1]. Connect the pieces by tightly wrapping the ends together with more wire to form joints. The armature provides the foundation, which you will then pack clay around and sculpt further anatomical details on top of.
Create Basic Form
Once you have the armature in place, it’s time to start shaping the basic form of your sculpture. Focus first on capturing the overall proportions and balance. Look at reference images to understand the general shapes and gesture of your animal subject.
Start adding clay gradually and evenly around the armature. Use your hands to pinch, pull, and smooth the clay into the basic form. Work symmetrically to ensure both sides are proportional. Pay attention to the flow of the body and how the head, limbs, and tail connect to the torso.
As you work, frequently look at your sculpture from multiple angles and make adjustments. Having a rotating turntable can help with this. Also take breaks and let your eyes rest to maintain an objective perspective.
Don’t worry about sculpting details yet. Concentrate on achieving accurate proportions, balance of shapes and forms, and the overall gesture. This stage establishes the foundation upon which you will add finer details.
Define Anatomy
After you have created the basic form, it’s time to define the anatomy and bring your sculpture to life. Focus on the underlying structures that define the shape and form of your animal subject.
For a quadruped animal like a dog or horse, indicate the major muscle groups of the legs, shoulders, neck and hindquarters. Use your knowledge of anatomy or look at photos for reference. Sculpt the forms of muscles, tendons and joints to show how they attach to the skeleton and influence the surface. For example, the muscles of the hind legs need to bulge and taper in a natural way.
Sketch in the skeletal shapes as well, like the ribs, hips, joints and skull. While you likely won’t sculpt each individual bone, indicate their presence under the surface. The forms of bones can significantly impact the look of a sculpture.
Also consider areas of loose skin, fat deposits, or fur. Sculpt folds of skin around the neck, joints and belly to increase realism. Build up areas like the jowls and midsection to show where an animal naturally carries more weight.
Take your time on the anatomy stage – the more lifelike your armature, the better your finished sculpture will be. Refine the forms until you have an accurate depiction of how the muscles, bones, fat and skin shape your animal’s body.
Refine Details
Adding realistic details is one of the most important steps when sculpting animals out of clay. This helps bring your sculpture to life. For mammals, focus on sculpting fur textures and patterns. Study references of your animal subject to observe the direction, length, and flow of fur. According to sculptor Nastia Calaca, short fur can be created by impressing small zigzag lines into the clay with various sculpting tools 1. For longer fur, add small snakes of clay in the direction the fur grows 2.
For birds, carefully sculpt individual feathers using thin snakes of clay, paying close attention to the patterns and placement. Look at reference photos to see how feathers lay across the form. Overlap and layer the feathers to create realism. For reptiles like snakes and lizards, roll out thin coils of clay and apply them in the pattern of scales, alternating directions and overlapping layers.
Take your time on this detailing stage, and remember that real animal fur and textures are intricate and complex. Embrace the textures, patterns and imperfections that bring your clay sculpture to life.
Add Surface Texture
Adding realistic surface textures is key to making your animal sculpture come alive. To recreate fur, feathers, scales, or skin, pay close attention to the patterns and flow of the texture. Here are some techniques for achieving different textures:
For fur, use various sized loop or kemper tools to imprint wavy lines into the clay, following the direction fur grows. Look at reference photos to see how fur lies smoothly in some areas and tufts up in others. For short fur, make small stab marks with a rounded sculpting tool. For long fur, drag long lines through the clay 1.
For feathers, use a needle tool or thin knitting needle to imprint feather veins. Draw the tool from the quill outwards to recreate the organic look of feathers. For downy feathers, imprint tiny dots and strokes radiating outward 1.
For scales, imprint overlapping lines or individual scale shapes using various sized loop tools, clay shapers, or home-made tools. Consider the size and placement of scales based on reference images. For smooth skin, blend and stipple the clay to remove any visible tool marks.
Finally, accentuate bony prominences, muscles, and veins by engraving lines along the contours of the anatomy. These lines will catch shadows and enhance realism. Work carefully to maintain accuracy.
Bake/Cure the Clay
Polymer clay needs to be fully cured through baking before it reaches its maximum strength and durability. There are a few things to consider when baking polymer clay sculptures:
Oven baking versus air drying – Polymer clays like Sculpey require oven baking. Air drying clays can be dried at room temperature, but take much longer. Polymer clays do not properly harden through air drying alone.
Temperature – Follow the manufacturer’s instructions, but generally bake at 225-275°F. Thinner pieces may only need 15 minutes, while thicker sculptures need longer, baked in increments to prevent cracking or burning. Sculpey recommends initially baking pieces for 15 minutes per 1⁄4 inch of thickness, then baking for additional increments of 5 minutes as needed (1).
Allow sculptures to thoroughly cool after baking before handling to prevent damaging soft clay. Baking transforms the clay into a permanently hardened state.
(1) https://www.sculpey.com/products/baking-polymer-clay
Apply Finish
Once the sculpture has been thoroughly dried, it’s time to apply a finishing coating to protect the clay and bring out the colors. There are a few options for clay finishes:
Paints are a great way to add color and vibrancy to a clay sculpture. Acrylic and enamel paints work well on cured clay. Make sure to use paints designed for clay, ceramics, or porcelain. Apply paint in thin layers and allow each coat to fully dry before adding another layer. Multiple thin coats will provide better coverage than one thick coat. Refer to paint manufacturer instructions for any special considerations.
Glazes can also be used to color clay sculptures. Ceramic and porcelain glazes are specially formulated to bond with clay at high temperatures. Glazes produce a glossy finish and are ideal if you plan to fire your finished piece in a kiln. Always test glazes first before applying to your sculpture. Follow manufacturer instructions carefully.
Finally, clear varnishes or finishes will help protect the surface of the clay without altering the color. Look for water-based, non-toxic varnishes designed for clay, ceramic, or porcelain. Apply 2-3 thin, even coats allowing each layer to fully dry in between. A matte finish provides a subtle look while gloss finishes offer more shine.
No matter which finish you choose, take care to evenly coat the entire surface of the sculpture. This ensures proper curing and protects from damage over time. With the right clay finish applied, your sculpted animal will maintain its beauty for many years to come.