How Do You Transfer Designs On Clay?
Clay transfer techniques allow you to imprint designs onto clay surfaces to create beautiful and intricate ceramic pieces. The basic process involves creating a design on paper or another material, transferring it to raw clay, and then firing the clay to set the design permanently. There are several different methods for transferring images and patterns, each with their own advantages. The most common techniques include paper transfers, decal transfers, stenciling, and relief carving.
This guide will provide an overview of the different clay transfer methods, the tools and supplies needed, step-by-step instructions for the transfer process, tips for applying color and getting clean results, firing and finishing considerations, troubleshooting advice, and inspiration for creative designs you can make using these techniques.
Tools Needed
When transferring designs onto clay, there are some essential tools you’ll need to have on hand:
Transfer Paper
Transfer paper is a thin tissue-like paper that allows you to trace your design onto it, then press the design onto the clay to transfer it. There are a few types of transfer paper, including graphite paper which leaves a pencil-like transfer and carbon paper which leaves a darker transfer.
Stylus
A stylus is a pen-like tool with a blunt point used to carefully trace over your design on the transfer paper. Metal or plastic styluses work well as they won’t rip the delicate transfer paper.
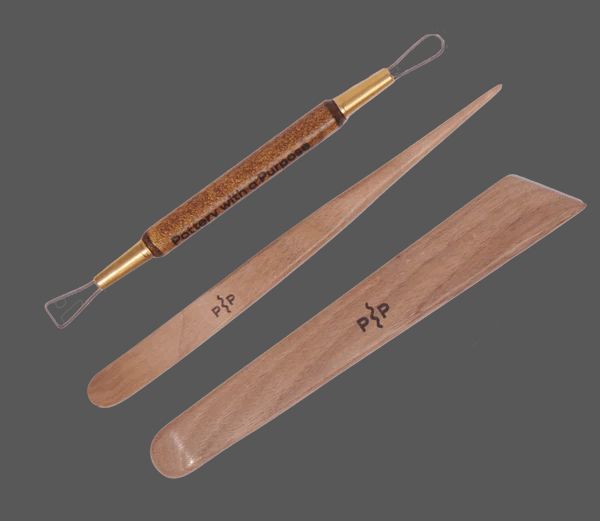
Clay Carving Tools
Carving tools like loops, ribs, cutters and ribbon tools help make precise adjustments to your transferred design once it’s on the clay. They allow you to cleanly carve lines and details into the clay surface.
Sponges
Sponges can be used to gently press the transfer paper against the clay when transferring your design. They ensure good contact between the paper and clay. Foam sponges work well as they are soft and won’t rip the paper.
Preparing the Clay
The type of clay you choose is one of the most important steps in preparing to transfer a design. Clay comes in different varieties, with some better suited for handbuilding and sculpting while others are preferable for throwing on the wheel. Polymer clay and air-dry clay are often easiest to work with for beginners.
Next you’ll want to properly condition your clay by wedging it. This process involves kneading and folding the clay over itself repeatedly to distribute moisture evenly and remove air bubbles. Well-conditioned clay is smooth, elastic, and doesn’t crack. Start with a lump and cut it in half, then smash the halves together. Fold the clay over itself, press down firmly with the heels of your hands, and repeat until smooth.
Before transferring the design, the clay should be formed into a flat, even surface. Use a rolling pin over a canvas or other nonstick surface to roll out the clay into the desired thickness, removing any creases. Smooth the surface with a rubber rib or flexible metal scraper to eliminate fingerprints and imperfections.
Creating the Design
There are several techniques you can use to create a design that you want to transfer onto clay:
Freehand Drawing
If you have artistic skills, you can create an original design by freehand drawing directly onto the clay. This takes practice, but allows you to make one-of-a-kind designs tailored exactly how you envision them.
Tracing
You can trace an existing image, like a photograph or illustration, onto tracing paper or vellum. Place the tracing paper over the clay and go over the lines with a stylus to imprint the design. Tracing lets you recreate existing images as custom ceramic pieces.
Photocopying
Print or photocopy an image onto tissue paper or carbon paper. Place the paper image-side-down onto the clay and trace the lines to transfer the design. This is an easy way to duplicate more complex designs.
Computer Printing
Print any image from your computer onto a laser printer or photocopier. Place the paper print-side down onto the clay and rub firmly with a spoon to transfer the toner. This allows you to use digital art, photos, text, or graphics.
Transferring the Design
Once you have created your design, it’s time to transfer it onto the clay. There are a few different techniques for accomplishing this:
Using Transfer Paper
One of the most common ways to transfer a design is with transfer paper. This is a thin tissue or carbon paper that allows you to trace your design so that it transfers onto the clay. To use transfer paper:
- Place the transfer paper ink-side down on top of the clay.
- Put your design on top of the transfer paper.
- Use a stylus to carefully trace all the lines of your design, applying firm pressure. This will transfer the design onto the clay.
The advantage of transfer paper is that you can preserve your original artwork and reuse it. It also allows you to transfer complex designs relatively easily.
Burnishing
An alternative technique is to draw directly on the raw clay using a toothpick or other tool. This takes practice, but allows you to freehand a design directly onto the clay. Once your design is complete, you can use a technique called burnishing to affix it:
- Use the side of a spoon, popsicle stick, or other tool to gently rub over all of the design lines you’ve drawn.
- Apply firm pressure while burnishing to work the clay and make sure the design adheres.
Burnishing fuses the design into the clay surface so it won’t wipe away when removing the transfer paper.
Removing the Paper
Once your design is transferred via either method, carefully peel away the transfer paper. Try peeling it back at a low angle to keep the transferred image intact. Any stray leftover bits of paper can be rubbed off after firing.
Smoothing and Cleaning
Once you have transferred the design onto the clay, there will likely be excess material and rough edges that need smoothing over. Here are some techniques for smoothing and cleaning up the transferred design:
Sponging
Use a slightly damp natural sea sponge to gently smooth over the surface of the clay and remove any bumps or excess material. Apply even, light pressure and work in circular motions. Rinse the sponge frequently in clean water as you work. Sponging will help refine the edges and give a uniform surface texture.
Carving Away Excess
For excess clay that cannot be sponged away, use clay sculpting tools to carefully carve and scrape it off. Metal loop tools, kebab sticks, or paddle
pop sticks all work well. Take care not to dig into the actual design lines. Gently shave away the excess material bit by bit.
Refining Edges
Use a rounded clay tool or finger to smooth over rough edges and create clean lines for your design. Apply even pressure and blend the edges into the clay surface. Work slowly and carefully to preserve the design details. Refining the edges will give a crisp, professional look.
Applying Color
Adding color to your clay designs opens up an exciting new dimension of creative possibilities. There are several techniques for applying color to fired or unfired clay:
Glazes
Glazes are mixtures of minerals and coloring oxides that are applied to bisqueware clay and fuse to the surface when fired in a kiln. Glazes come in a wide variety of finishes like glossy, satin, or matte. They can be brushed, poured, or sprayed on the piece to add striking colors and effects.
Underglazes
Underglazes are ceramic colors very similar to glazes, except they do not fuse and become glassy when fired. Rather, they are meant to be used under a transparent glaze. Underglazes come in vibrant colors and offer painterly effects not possible with glazes alone.
Staining
Stains are concentrated ceramic pigments suspended in liquid that are directly absorbed by the clay surface. They create soft, translucent colors and patterns. Stains can be brushed on greenware or bisqueware clay.
Painted Details
Ceramic paints and colored slips can be used to hand-paint fine details and imagery on top of glazes and underglazes. This allows for intricate, nuanced designs. Common paint options include ceramic enamels, china paints, and colored slips.
Firing
Firing is one of the most important steps when transferring designs onto clay. Choosing the right firing method, schedule, and temperature will help set the design and make sure the clay reaches the desired hardness and finish.
Choosing Firing Method
There are several firing methods to choose from when transferring designs onto clay:
- Kiln firing – Using a kiln allows precise control over temperature and firing schedule. Kilns allow clay to be fired to higher temperatures for harder finishes.
- Raku firing – Raku is a type of low-fire pottery that involves removing clay from the kiln at peak temperature. It produces unique finishes.
- Pit firing – Burying pots in sawdust pits and burning wood to produce the heat. Pit firing gives organic, natural finishes.
- Saggar firing – Placing clay in sealed containers prevents exposure to flame and allows effects like raku.
Consider the design, desired hardness, and types of finishes when selecting a firing method.
Firing Schedule
The firing schedule refers to the temperatures and hold times used when firing clay. Typical schedules involve:
- A warm-up period to completely dry the clay.
- Low fire holds to prepare the clay for higher temperatures.
- High fire at peak temperature to fully cure and harden the clay.
- A cool down phase to avoid cracking from quick temperature changes.
Schedules can be adjusted to control the finishes and colors achieved.
Firing Temperature
Higher firing temperatures make clay harder and more durable. Typical firing ranges include:
- Low-fire – Up to 2,100°F. Produces soft, porous clay.
- Mid-fire – 2,100°F to 2,200°F. Provides harder clay.
- High-fire – Over 2,300°F. Creates vitrified, non-porous clay.
Use the desired hardness, type of clay, and colors in the design to determine the ideal firing temperature.
Troubleshooting
Transferring designs can sometimes lead to issues like smudging, cracking, or unclear transfers. Here are some tips for troubleshooting common problems when transferring designs onto clay:
Fixing Smudged Transfers
If part of your design gets smudged in the transfer process, don’t panic. Use a craft knife or needle tool to gently scrape away the smudged sections. You can then reapply those sections with more of the transfer medium and run it through the press again.
To prevent smudging in the future, make sure your clay is fully dry before transferring the design. Letting the transfer medium fully dry between coats can also help.
Preventing Cracking
Cracking occurs when the clay surface dries and shrinks at a different rate than the transfer medium. To prevent cracking:
- Apply transfer medium in thin, even coats and let dry fully between coats.
- Make sure clay is fully dry before applying transfer medium.
- Avoid using too much transfer medium.
- Transfer designs onto moist clay rather than bone-dry clay.
Repair Techniques
If cracking does occur, there are a few repair techniques:
- Lightly brush on a thin layer of water or transfer medium to rehydrate cracked sections, then smooth with a clay tool or soft paint brush.
- For thin cracks, rub a little clay slip or water into the cracks to soften and fill them.
- For large cracks, cut out the cracked section and re-transfer just that section.
Proper clay prep and careful transfer technique can prevent many common issues with transferred designs.
Inspiration and Examples
When it comes to transferring designs onto clay, the possibilities are endless. From geometric patterns to floral motifs, landscapes to portraits, the finished pieces can showcase amazing creativity.
One standout example is using lace or doilies to imprint delicate designs onto clay surfaces. Pressing down the lace piece firmly and then peeling it away leaves behind a beautiful impression. This technique works well for jewelry, vases, plates, and more. An intricate lace design transforms a plain piece into a work of art.
Using leaves and flower petals is another creative way to transfer natural textures and shapes onto clay. Leaf vein patterns add organic flair, while flower petals can impart a lovely floral motif. Some potters even use sea shells, feathers, or other natural objects to make impressions.
Custom stamps are a great option for repeating patterns, letters, and images. You can buy premade stamps or carve your own out of erasers, potatoes, etc. Stamping in different colors of clay or glaze builds up cool designs.
Freehand drawing directly onto the clay with tools creates artistic, one-of-a-kind transfers. Etchings made with wooden sticks, rubber stamps, or dull blades produce hand-drawn effects. Use this to add fine details like expressions on a portrait piece.
So embrace your inner artistry. With the right tools and techniques, clay provides an open canvas to imprint truly inspired designs.


