How Do You Turn A Bedroom Into A Craft Room?
Assess Your Needs
The first step in turning a bedroom into a craft room is determining what types of crafts you’ll be doing in the space and how much room you’ll need for supplies, furniture and equipment. According to LeLaBurris, you should consider if you’ll be sewing, scrapbooking, making jewelry or doing other crafts. Think about the specific tools, machinery and materials involved in your chosen crafts.
You’ll also need to decide how much storage space you require to house all of your craft supplies and projects, as noted by ExtraSpace. Take an inventory of everything you currently own for your crafts so you know how much room is needed. Additionally, determine if the space will be just for you or if you want room for friends, kids or family members to use it as well.
Choose a Room
When deciding where to set up your craft room, look for a spare bedroom, basement room, or other underutilized space in your home. As suggested in this article on craft room ideas from Extra Space Storage, “The best place to start when converting a spare room into a craft room is by choosing a room with great natural lighting. Good overhead lighting and sunlight will make crafting easier on your eyes.” https://www.extraspace.com/blog/home-organization/diy-projects/spare-room-into-craft-room-ideas/
Proper ventilation is also key for craft rooms, where you may be using paints, glues, solvents, and other fumes. Look for a room that has windows you can open as well as space for a window fan or air purifier. Basement craft rooms should have dehumidifiers to prevent mold or mildew. Consider noise levels as well – you don’t want your craft room right next to a TV room or kitchen if quiet is important.
When evaluating rooms, make sure there is enough space for your particular hobbies and crafts. Measure the room dimensions and sketch out potential layouts to ensure all your must-have furniture and equipment will fit comfortably.
Clear Out the Space
Before you can transform a bedroom into a craft room, you’ll need to completely clear out the existing space. This means removing any furniture, decor, or possessions currently occupying the room.
Start by taking out larger pieces of furniture like the bed, nightstands, dressers, etc. Donate any items still in good condition to local charities or thrift stores. Sell any quality furniture through online marketplaces. Anything broken or unusable can be disposed of or recycled.
Next, go through all the smaller items and possessions in drawers, closets and elsewhere. Be ruthless in decluttering – if you haven’t used an item in over a year, it’s unlikely you’ll need it again. According to The Simplicity Habit, “If your end goal is a totally decluttered craft room, you can either jump all in to get it all done if your schedule allows, or you can break it down into more manageable chunks over days or weeks.”
Sort everything into “keep”, “donate/sell” and “trash” piles. Donate or consign quality clothes, shoes, accessories, linens and more that you no longer need. Sell collectibles, valuables and hobby supplies you won’t use. Toss out anything that is broken, damaged or expired.
By thoroughly decluttering the existing space, you’ll create a blank canvas to transform into the craft room of your dreams. Removing clutter also helps maximize storage and surface area for crafting.
Add Storage
Adding adequate storage is key to creating a functional craft room. Look for ways to maximize every inch of space with storage solutions like shelves, cabinets, drawers, and organizational containers. For example, you can install floating shelves on the walls, add a storage cabinet with built-in cubbies, or use rolling utility carts for mobile storage.
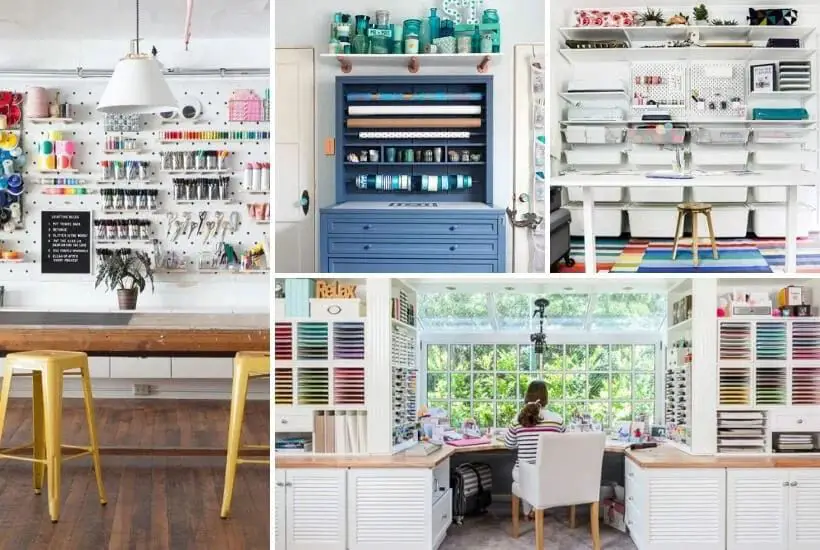
Consider installing floor-to-ceiling shelving units to take advantage of vertical space. Use baskets, bins, and containers to corral small items like ribbon, buttons, paper, and other craft supplies. Label everything clearly so you can find what you need quickly. If the room has a closet, add shelving and rods to transform it into dedicated craft storage.
For small or awkward spaces, look into customized storage solutions. California Closets reports that the average craft room contains over 10,000 items (source). Careful planning and smart storage can help keep your new craft room from becoming cluttered.
Get Crafting Furniture
The centerpiece of any craft room is having the right furniture tailored to your hobbies and projects. For most crafters, this means adding a large, sturdy table or desks for working on projects. Opt for a table with a smooth, solid surface and ample leg room underneath to accommodate your needs. Look for sturdy construction that can hold the weight of your supplies and materials without wobbling.
Consider getting adjustable-height work surfaces. Sit-stand desks allow you to alternate between sitting and standing while crafting to avoid getting stiff and sore. Many crafters find they are more productive and creative when they can move around and change postures.
Improve Lighting
Proper lighting is essential for craft rooms. Since many crafts require detailed work, having bright task lighting is a must. Here are some tips for lighting your craft space:
Install overhead fixtures that provide bright, white light. Look for ceiling lights rated at 3,000 to 5,000 lumens for ample brightness. Track lighting or pendant lights work well to illuminate work surfaces.1
Use natural light from windows if possible. Supplement with curtains or blinds to control glare. Position work tables near windows to take advantage of daylight.2
Add portable task lighting. Desk lamps, clip-on lights and tabletop lighting provide direct illumination for close work. Opt for bulbs that provide full spectrum light to help distinguish colors accurately.
Create a Design Plan
Choosing a color palette and decorative theme for your craft room is crucial for creating an inspiring and cohesive space. Select 2-3 core colors that energize and excite you, such as lavender, mint green, and peach. Complement them with metallics like gold, rose gold, and copper for accents. Pick decor elements like artwork, pillows, and accessories that tie into your color scheme.
Incorporate inspiration boards or galleries with pictures, fabric swatches, and color chips to help motivate your creative spirit. You can pin these to a corkboard or wall or keep them in a notebook. Refer to them as you make decor decisions to ensure your craft room reflects your personal style. See example inspiration galleries here: https://www.thespruce.com/craft-rooms-ideas-4172926 and here: https://www.extraspace.com/blog/home-organization/diy-projects/spare-room-into-craft-room-ideas/.
Add Comfort Features
Spending extended periods in your craft room can be tiring, so it’s important to incorporate some creature comforts as well. Include a comfortable chair for taking breaks when your feet get tired. Consider an oversized armchair or recliner where you can really relax and unwind. You can even look for a rocking chair if you want gentle motion while working on projects.
It’s also nice to have some entertainment options handy in your craft space. Set up speakers or a TV so you can listen to music or watch shows while you work. Ambient noise can help make the time pass quickly. Just be sure the volume is low enough that it doesn’t distract you from any intricate crafting tasks that require concentration.
Some other ideas for boosting comfort include: having plenty of natural light from windows, using cozy rugs on the floor, keeping a small fridge for snacks and drinks, and maintaining a comfortable room temperature year-round with heating and cooling as needed. The more at ease you feel in your craft area, the more creativity will flow.
Get Organized
Organization is key for any craft space. Staying organized allows you to quickly find the tools and materials you need for each project. Here are some tips for organizing your craft room:
Label all storage bins, drawers, and shelves clearly so you know exactly what’s inside at a glance. Use consistent labeling with font style and size. Consider using images along with text on labels. For example, a bin for fabric scraps could have a fabric image plus the words “Fabric Scraps.”
Create visible systems for the tools and supplies you use most often. Mount pegboards, slatwall panels, shelves, and other displays so your frequently used items are easily accessible. Store scissors, rulers, adhesives, and other go-to tools together near your main work area.
Post charts listing all your craft supplies in each storage unit. Include pictures and labels for reference. Keep an updated master inventory list somewhere handy like inside a drawer or on the wall. This helps you take stock of materials and avoid buying duplicates.
Refer to: https://www.firstdayofhome.com/craft-room-organization-ideas/
Safety First
When setting up your craft room, safety should be a top priority. Make sure exit routes are clear and cords are secured so no one trips while working on a project. Have a well-stocked first-aid kit and an appropriate fire extinguisher nearby in case of an emergency.
Proper ventilation is also important, so open a window or use an exhaust fan if working with fumes. Wear protective gear like gloves, goggles, or a mask when required. Keep young kids away from sharp tools, toxic materials, or anything hot like a glue gun. Have a designated clean-up area for washing hands and cleaning brushes.
Check out the craft room safety tips at https://craftroomtime.com/craft-room-ventilation-and-other-safety-precautions/ and https://www.arbee.com.au/blog/41-craft-safety-precautions-craft-safely-with-our-top-tips-and-rules- for more on creating a secure, hazard-free workspace.