How Do You Work With Clay Step By Step?
Gathering Materials
When working with clay, it’s important to select the right type based on your project and skill level. The three main types of pottery clay are earthenware, stoneware, and porcelain. Earthenware is the most commonly used type of clay for beginners. It has a coarse texture and requires firing at lower temperatures. Stoneware clay is denser, more durable, and needs higher firing temperatures. Porcelain clay is delicate, fine, and translucent requiring the highest firing temperatures. Each type has unique properties best suited for certain kinds of pottery and sculpture.
You’ll also need basic sculpting tools for shaping the clay. Metal sculpting knives with different shaped blades are essential for cutting, smoothing, and refining the clay. Loop tools create grooves and indentations for adding texture and detail. Clay shapers and ribs even out surfaces. Sponges, cutters, rollers, and stamps can also create interesting effects. Choose tools with comfortable, ergonomic handles. Investing in high-quality tools ensures durability and longevity.
Setting up a proper work surface is also key. Cover a table with thick canvas to provide a staple base for working. Wooden workboards and clay bats also make excellent sculpting surfaces. Avoid working directly on hard materials that can damage clay tools. Having ample workspace allows flexibility in sculpting three-dimensional forms.
Preparing the Clay
Proper clay preparation is a crucial first step before beginning any clay project. The goal is to wedge or knead the clay thoroughly to achieve a uniform consistency free of air pockets. Wedging involves cutting the clay in half, slamming it back together, and repeating. This process compresses the clay while working out bubbles. Avoid over-wedging, as it can make clay difficult to work with. Test the clay’s readiness by poking it with a tool. If it maintains shape without crumbling, it has been sufficiently wedged. The clay should be soft and pliable, but not sticky. If clay is too wet, allow it to air dry slightly before wedging. Add water to dry clay a bit at a time to reach ideal consistency. Take time to properly prepare clay so it cooperates as you shape your creation.
Shaping the Clay
Once you have prepared your clay and gotten familiar with its texture and properties, you can start shaping it into your desired form. There are several basic sculpting methods that are commonly used:
Pinch Method
The pinch method involves taking a ball of clay and literally pinching it with your fingers and thumbs to form basic shapes. Pinching areas will thin the clay out while smoothing over areas will create fuller forms. This method is great for making small handbuilt pieces like cups, bowls, and figurines.
Coil Method
For the coil method, you roll out “snakes” or coils of clay and stack or attach them together to build up a form. Coiling is commonly used for making vessels like vases, pots, and jars. It allows you to gradually build up vertical walls in a controllable way.
Slab Method
The slab method involves rolling out flat “slabs” of clay that can be cut into shapes and joined together. This is useful for making flat surfaces like tablets, tiles, and plaques. Slab clay can also be draped over molds to create curved forms.
You can combine these sculpting methods too. For example, you may build up a basic form with pinch or coil techniques and then add surface textures and details using slabs and carving tools.
It helps to start with basic shapes like spheres, cones, cubes, cylinders, etc. and modify them into the forms you want. Having simple starting points makes the sculpting process easier to control.
Texturing the Clay
Texturing clay adds visual interest and dimension to your pieces. There are many techniques for impressing textures into clay using a variety of tools. Texturing can be done when the clay is soft (greenware stage) or after firing when the clay has hardened (bisqueware stage).
Tools for Impressing Textures
Some common tools for impressing textures include:
- Clay tools – Modeling tools, loop tools, ribs, rollers, stamps
- Found objects – Coins, keys, buttons, rubber bands, plastic nets, doilies
- Natural items – Leaves, seashells, bark, feathers, rocks
- Fabric – Burlap, lace, crochet
When using found objects or natural items, make sure they have an interesting pattern or texture. Press the object gently but firmly into the clay to transfer the texture.
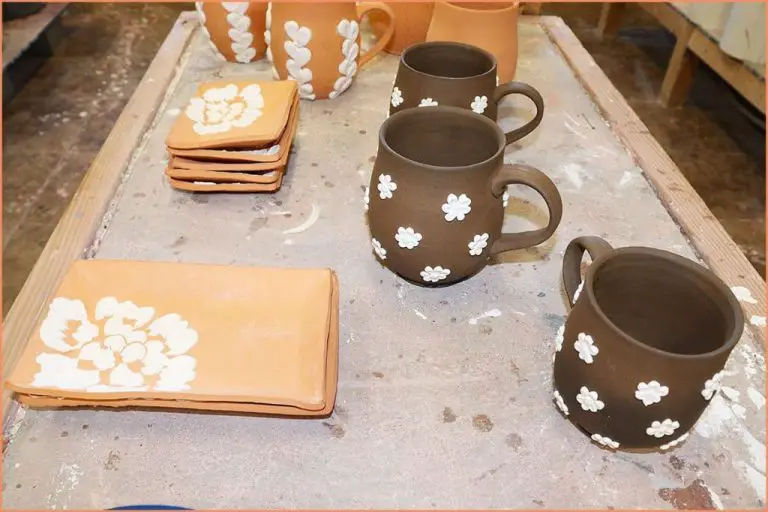
Adding Patterns and Details
In addition to impressed textures, you can add details by:
- Carving lines, grooves or designs into the clay with tools
- Incising patterns using pointed tools
- Pinching the clay to create ridges
- Rolling over the clay with a rolling pin to create a pattern
- Cutting shapes out of clay and applying them as appliqués
Textures allow you to add visual richness and appeal to your finished pieces. Experiment with different textures and patterns to find effects you like.
Structural Support
When working with clay, it’s important to consider structural support especially for larger sculptures or pieces with extended parts like arms or legs. Clay is heavy and can collapse under its own weight if not properly supported while drying and firing. Using an internal or external armature or frame provides important structural reinforcement.
For solid clay parts, the thickness needs to be sufficient to support itself. Large solid clay sections are prone to cracking and breakage. For larger sculptures, it’s better to use hollow clay parts built around an armature. Make walls thick enough to maintain shape but not excessively thick.
Armatures can be made from wire, wood, plastic or other materials. The armature serves as the skeleton to support the clay layers built up around it. Use water-based clay to affix clay onto the armature. Allow drying time between adding layers to prevent collapse. An armature enables larger, more complex and freestanding sculptures.
Drying the Clay
After shaping and texturing the clay, it must be thoroughly dried before firing. Drying eliminates the water content from the clay so that it does not crack or break apart in the kiln. There are a couple approaches to properly drying clay:
Air Drying
Air drying is the most common technique. Allow adequate air circulation around the clay pieces and let them sit at room temperature until dry. The drying time can range from a few days for small thin items to weeks for larger thicker pieces. Avoid extreme temperatures and direct sunlight which can either dry the clay too rapidly causing cracks or prevent thorough drying.
Using Drying Boxes
For more controlled drying, a drying box can be used. The box is kept closed and contains a heating element or light bulb to gently warm the interior. The warmth accelerates drying time while the closed environment prevents cracking. Using a hygrometer allows monitoring the interior humidity. Pieces should dry over the course of several days to weeks by slowly reducing the interior humidity down to room levels.
Bisque Firing
Bisque firing is the first firing process for clay pieces. This step transforms the dried, unfired clay into a stable, ceramic material. During bisque firing, the clay is heated to a high temperature, between 1600-2200°F (871-1204°C), which causes chemical and physical changes that permanently harden and strengthen the clay.
The specific bisque temperature and firing time depends on factors like the size and thickness of the clay piece, the type of clay body, and the makeup of the clay. Typical firing times range from 4-12 hours. The goal is to heat the clay at a gradual rate to allow any steam or gases to escape slowly, preventing cracks or explosions.
It’s essential that the clay is completely dry before bisque firing. Any moisture left in the clay will turn to steam and risk cracking or warping the structure. The bisque firing prepares the clay for the application of glaze and the final firing.
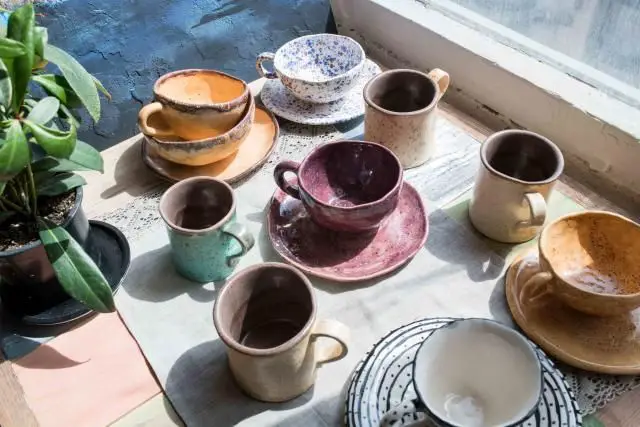
Glazing
Glazing is an essential step in finishing clay work that serves both aesthetic and practical purposes. Glazes come in various types, including transparent, opaque, satin matte, glossy, and metallic. They can impart color, texture, and sheen to the clay surface.
When choosing a glaze, consider the clay body, desired visual effects, and firing temperature. Glazes contain compounds that melt during firing to create a glassy coating. Different glazes require specific firing ranges to melt properly and fuse with the clay body.
To apply glaze, first make sure the bisqueware is free of dust. Use a soft brush, sponge, or pouring technique to coat the bisque evenly. Apply at least two coats, allowing each to dry before adding the next. Multiple thin coats prevent dripping and crawling. Ensure proper coverage inside concave areas and undercut rims.
Take care not to overload or puddle glaze on the bottom or corners of pieces. Let the glazed ware dry completely before firing. Handling wet glaze can mar the surface. Firing melts the glaze into a smooth, translucent finish.
Final Firing
This second firing process, known as the final firing, is the last step before your clay creation is complete. The purpose of final firing is to melt the glaze and permanently set the clay. This firing is done at an even higher temperature than bisque firing, usually between 2,200°F and 2,400°F. The final firing process typically takes between 8-12 hours. The gradual increase and decrease in kiln temperature is important to avoid cracking or breaking your clay piece.
It’s crucial to follow the temperature guidelines for the specific clay and glaze you are using. Pay close attention to the glaze manufacturer’s instructions, as some glazes require lower or higher temperatures. Set the kiln to reach the desired temperature and hold it there for the recommended amount of time to properly melt and fuse the glaze. Using a kiln sitter, cones, or a kiln controller will help ensure the firing goes smoothly and the kiln doesn’t overfire.
Always allow sufficient time for the kiln and clay work to cool down completely before removing finished pieces. The final firing transforms glazed clay work into a hardened, finished ceramic object ready for display and use.
Finishing Touches
Once your clay sculpture is fired and glazed or left in its bisque form, the final step is adding those finishing touches. This final step can really enhance the overall look and feel of your finished clay piece.
For glazed pieces, polishing is key. Use a soft cloth to gently buff the entire surface of the glazed clay. This will make the colors shine and give your piece a glass-like finished look. It also smooths any final rough spots from the firing. For unglazed clay, sealing is an important finishing step. Using acrylic sealant sprayed over the bisque surface will protect the pottery and help keep its color vibrant for years to come.
Now it’s time to display your completed clay artwork. For free standing sculptures, consider mounting on a base or stand to showcase them. Wall hangings can be affixed with hanger brackets or wire. Carefully handle the artwork to avoid smudging or fingerprints. Make sure it is out of direct sunlight which can cause fading. Your creativity and hard work now has a professional looking finished clay piece ready for hanging, gifting or selling.