How Long Does Air Clay Take To Dry?
What is Air Clay?
Air clay, also known as air-drying clay, is a popular modeling and crafting material used by artists, hobbyists, and children. It’s made from a mixture of natural ingredients that allow it to dry into a durable, lightweight finished product at room temperature.
The main ingredients in air clay are:
- Cellulose fiber – gives structure and strength
- Gypsum – helps harden and set the clay
- Silicone – keeps the clay malleable and flexible when wet
- Water – allows the clay to be shaped and molded
Unlike ceramic clays that require firing in a kiln, air clay dries by evaporation. The water evaporates out over time, leaving behind a solid clay material. It can be easily shaped by hand without requiring specialized tools or equipment. When properly dried and sealed, air clay sculptures are quite durable.
Some key properties that make air clay a popular choice for artists and hobbyists:
- Doesn’t require baking or firing, dries at room temperature
- Very lightweight when dry
- Smooth, non-sticky consistency when wet
- Easy to paint, decorate, and seal when dry
- Can be re-wetted and reworked if needed
Drying Time Compared to Other Clays
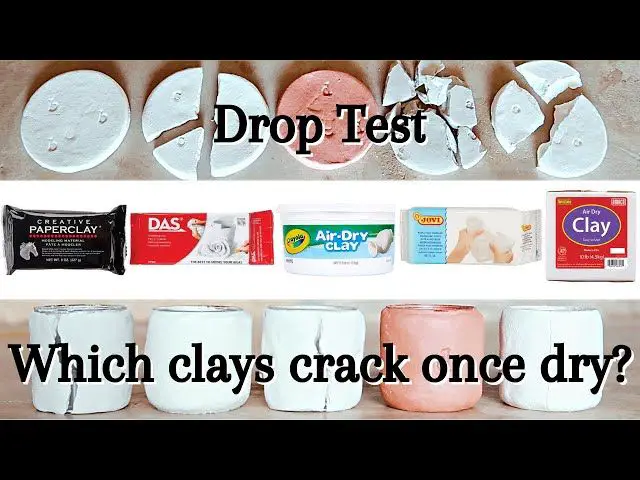
Air dry clay generally dries faster than traditional clays that require firing in a kiln. According to Sculpey, air dry clays can fully dry and cure in 1-7 days depending on thickness, whereas traditional clays need to be fired for hours at high temperatures in a kiln to fully cure.
However, air dry clay takes longer to dry and cure compared to oven-bake polymer clays like Sculpey. Polymer clays only require 15-20 minutes in the oven to cure thin pieces, whereas air dry clay takes at least 24 hours according to Crayola.
So air dry clay provides a middle ground, drying faster than kiln-fired clays but slower than quick oven-baked polymer clays. This makes it a good choice for modeling and crafting when you want quicker drying than clay but don’t need the instant curing of polymer.
Sources:
https://www.sculpey.com/blogs/blog/difference-between-polymer-clay-air-dry-clay
https://medium.com/@terryhappyliving/crayola-air-dry-clay-drying-time-comparison-with-other-air-dry-clays-spinning-pots-47c1582e7303
Factors That Affect Drying Time
There are several key factors that impact how long it takes air dry clay to fully dry:
Clay Thickness
The thickness of the clay is one of the biggest factors. Thicker pieces take longer to dry because it takes more time for the moisture to evaporate from the middle of the clay. According to Susie Benes, pieces thicker than 1/4 inch can take over 48 hours to dry with normal air exposure.
Air Exposure
Exposing all surfaces of the clay to moving air will speed up drying time compared to leaving it in a closed container or box. Pieces dried in open air with fans circulating the air will dry faster than those left on a shelf. Rotating pieces while drying ensures moisture can evaporate evenly.
Humidity
High humidity slows evaporation, so clay will dry slower on humid days. Low humidity allows moisture to evaporate faster from the clay. Sculpey recommends drying clay in a room with less than 50% humidity if possible.
Temperature
Warmer temperatures speed up the drying process, while cooler temps cause clay to dry slower. Heating the room or using a hairdryer can help accelerate drying with air exposure. Do not exceed 120°F when warming clay.
Drying Stages
Air clay goes through multiple stages as it dries. According to The 6 different stages of clay (https://www.oxfordclay.co.uk/blog-1/blog-post-title-four-de9r7-9yzl3), air clay initially hardens as the water evaporates from the surface. This process can take from 10 minutes up to an hour depending on the size and shape of the piece.
After the initial surface hardening, the drying process continues more slowly from the outside in. The interior of the piece remains flexible while the outer surface becomes rigid. During this stage, moisture continues evaporating from the center outward over the next several hours to days, depending on the thickness. The clay becomes firmer and harder throughout as more water leaves.
This gradual drying prevents cracking and allows time for the clay to shrink evenly. Rushing the drying with additional heat can cause cracks and deformities. Allowing thick pieces to dry slowly results in a more durable finished product.
Thin Pieces
Air dry clay projects that are relatively thin, such as 1/4 inch thick or less, will dry the quickest. Thin pieces like figurines, jewelry, wall plaques, and decorative items often only take 24-48 hours to fully dry and cure to hardness.
According to Mont Marte, pieces that are 1/8 inch thick or thinner may only need 12 hours to fully dry and cure when left out at room temperature.
For comparison, polymer clay items of similar thinness may only take 1-2 hours to bake and cure in a home oven. However, air dry clay is much more convenient since it cures passively without requiring heat.
Thick Pieces
For thick pieces of air dry clay that are 1 inch or more, drying times can take significantly longer. Some examples of thicknesses and approximate drying times:
- 1 inch thick – 48-72 hours
- 2 inches thick – 5-7 days
- 3 inches thick – 1-2 weeks
The thicker the clay, the longer the drying time needed. This is because moisture has farther to travel to evaporate from the center of the clay outwards. Be patient and allow thick pieces ample time to dry all the way through before handling, painting, or baking.
Drying in the Oven
While air dry clay will harden naturally at room temperature over time, using your oven can speed up the drying process. However, it’s important not to bake air dry clay at temperatures above 200°F. As explained on Craftyourhappyplace.com, higher temperatures can cause the clay to crack or become brittle.
For best results, bake air dry clay at the lowest possible oven temperature, around 100-200°F. Susiebenes.com recommends baking small pieces for 10-15 minutes, and larger pieces for up to an hour at 200°F. Check the clay frequently as it bakes and remove it once hardened.
Allow pieces to cool completely before handling or painting. The low oven temperatures gently evaporate moisture from air dry clay without compromising its structure.
Air Drying Tips
There are a few tricks to speed up the air drying process and prevent cracking or warping:
- Exposure – Make sure your air dry clay pieces have adequate air circulation. Avoid drying in enclosed spaces or boxes. Allow air to reach all surfaces of the sculpture.
- Rotating – Turn sculptures periodically while drying so all sides are exposed to air. This prevents sagging or slumping on one side.
- Support – Use wadded up plastic bags, foam, or other materials inside hollow parts or underneath overhangs. This prevents drooping or collapse while drying.
Check clay often as it dries and adjust support as needed. With good air exposure and rotation, thin pieces may dry fully overnight while thick areas can take 24-48 hours or more.
Storing Unfinished Pieces
When working on air dry clay projects over multiple sessions, it’s important to store unfinished pieces properly between work times so they don’t dry out prematurely. There are a few key techniques for keeping air dry clay workable:
Wrapping the clay tightly in plastic wrap or a damp paper towel is one good option for short-term storage (Source: https://blog.schoolspecialty.com/preserving-in-process-clay-projects-between-class-periods/). The wrap helps retain moisture in the clay. For longer term storage, placing the wrapped clay in an airtight plastic bag or container is recommended.
Refrigeration can also help slow the drying process. Storing unfinished clay pieces in the refrigerator, inside a sealed bag or container, can keep the clay malleable for days or weeks (Source: https://www.delineateyourdwelling.com/how-to-store-air-dry-clay/). The cold temperature prevents moisture from evaporating quickly.
Keeping unused clay in an airtight container is also advised to prevent it from drying out. Portion out only the amount needed for a project session, and store the rest sealed in a bag or jar.
Curing and Finishing
Curing and finishing air clay is an important final step before your sculpture or project is complete. Proper curing and sealing provides several key benefits:
Curing allows any remaining moisture in the clay to fully evaporate, preventing future cracking or damage. Air dry clay continues to cure even after it feels dry to the touch. Letting it cure for 1-2 weeks ensures proper hardening throughout the sculpture [1].
Applying a sealer or varnish creates a protective barrier against moisture and oils from hands. Acrylic sprays designed for clay work best. Avoid using sealers that contain toluene or other solvents, as these can damage air dry clay [2].
Sealing makes the surface more durable and smoother. Multiple thin coats allow the sealer to fully saturate the clay. Lightly sanding between coats enhances the finish.
Painting or glazing over a sealed surface creates a good foundation layer. The sealer prevents chipping or flaking of any decorative final coatings.
Proper curing and sealing transforms soft, porous air dry clay into a hardened, finished sculpture suitable for display and use.