How Thick Should You Roll Clay Slabs?
Clay slabs are flattened pieces of clay used for creating pottery, sculpture, and other ceramic artworks. Slabs allow artists to construct forms by stacking, joining, and molding sheets of clay, rather than building directly with clay coils or throwing on a wheel. Slabs can be made by rolling out clay to an even thickness using a roller, guides, or an extruder. They provide a versatile foundation for handbuilding and allow greater control over the final size and shape.
Slabs are commonly used in pottery to make planters, boxes, plates, and other functional items with flat bases and sides. For sculpture, slabs enable artists to create free-standing forms with hollow bodies, as well as relief sculptures mounted on walls. The techniques for slab construction include draping soft slabs over molds, joining cut-out shapes, and layering and smoothing slabs to blend seams.
Determining the appropriate thickness is an important consideration when working with clay slabs. Thicker slabs provide more structural integrity for large works, while thin slabs offer delicacy and flexibility for detailing. The intended use, clay type, and firing process all factor into ideal slab thickness.
Recommended Thickness
The recommended thickness for clay slabs typically falls between 1/4 inch (6 mm) and 3/4 inch (19 mm). Thinner slabs under 1/4 inch can be prone to tearing or cracking while handling, especially when wet. Thicker slabs over 3/4 inch become heavy, require excessive drying time, and may crack or warp. Most potters find that slabs between 1/4 and 1/2 inch provide an ideal balance of strength and flexibility for constructing functional pottery and sculpture.
According to the Ceramic Arts Daily community forums, many experienced ceramic artists work with slab thicknesses around 1/4 inch for plates, bowls and vases, 1/2 inch for mugs and cups, and 3/4 inch for large pots and sculpture. Adjusting slab thickness for the specific project helps minimize issues like warping or breakage during construction, drying, and firing. While there are general thickness guidelines, choosing the ideal slab thickness often comes down to personal preference and the clay body being used.
Thin vs Thick Slabs
There are advantages and disadvantages to using thin versus thick clay slabs in pottery and sculpture.
Thinner slabs, around 1/4 inch thick, are lighter and easier to lift and manipulate. Thin slabs require less clay, dry faster, and are less prone to cracking and warping. However, thin slabs can be more fragile and prone to ripping or puncturing. Pieces made with very thin slabs may lack durability and stability.
Thicker slabs, 3/4 inch or more, are stronger and more stable. Thick slabs hold their shape well and are excellent for larger pieces and attaching multiple parts. However, thick slabs are heavier, require more clay, take longer to dry, and are more prone to cracking and warping as they dry. Handling very thick wet slabs can also be physically demanding.
In general, thinner slabs from 1/4-1/2 inch may work well for smaller handbuilt pieces like boxes or wall hangings. Thicker slabs from 1/2-3/4 inch may be better for large pieces like vessels, sculptures, and attaching parts 1. The optimum slab thickness depends on considerations like the clay type, piece size, structure and purpose.
Slabs for Sculpture
For freestanding sculptures, thicker slabs are generally recommended. Thinner slabs under 1⁄2 inch (1.3 cm) may be prone to cracking or warping during the drying and firing process, especially for larger works. Most sources recommend a minimum thickness of 1⁄2-3⁄4 inch (1.3-1.9 cm) for freestanding sculpture slabs (https://community.ceramicartsdaily.org/topic/12893-slab-building-thickness/). The added thickness provides stability and structure to hold the form upright without buckling or drooping.
Sculptural works with protruding limbs or slender appendages may require an even thicker slab up to 1-1 1⁄2 inches (2.5-3.8 cm) to prevent cracking at those fragile points. The thickness can be varied across the sculpture as needed, with thicker reinforcement in key areas. Aim for the “goldilocks zone” where the slab is thick enough to be sturdy but still thin enough to manipulate easily.
In general, thinner slabs around 1⁄4-1⁄2 inch (.6-1.3cm) are better suited for relief sculpture that lies flush against a wall or stable backing surface (https://www.handthrown.studio/studionews/2020/4/27/handbuilding-from-home-tutorials). The backing support helps stabilize a thinner slab. Consider the scale and weight of the planned sculpture when determining ideal slab thickness.
Slabs for Pottery
For pottery and vessels, most potters recommend using relatively thin slabs between 1/4″ to 3/8″ (or 6mm to 9mm). Thinner slabs allow for lighter walls, thinner bases, and greater control over the finished piece. Thinner slabs also have less moisture to remove during drying.
Making thinner slabs from 1/4″ to 3/8″ (6mm to 9mm) allows the pottery forms to dry more evenly and have less chance of cracking, warping or slumping. Thinner bases are also easier to trim and shape. Potters suggest staying on the thinner end for smaller pieces, while slightly thicker 3/8″ slabs can be used for larger vessels.
When working on a large pottery piece or closed form, some potters recommend using a slightly thicker slab for the base around 1/2″ (12mm) and thinning the walls. The thicker slab base provides needed stability. Just be sure not to make the base overly thick and heavy.
Overall, thinner clay slabs from 1/4″ to 3/8″ (6mm to 9mm) are ideal for most pottery pieces. This allows faster drying, even moisture release, and better control. Keep slabs thin and uniform for pottery success. (Source)
Consider Clay Type
The clay body you choose to work with will impact the optimal thickness for slabs. Different types of clay contain varying amounts of plasticizers, minerals, and grog which affect properties like strength, elasticity, and shrinkage.
For example, clays with high plasticity and elasticity like stoneware can be rolled to thinner thicknesses of 1/8″ – 1/4″ and maintain their form through handling and drying. More fragile, coarse bodies like raku clay and some earthenware blends may need thicker slabs from 1/2″ – 3/4″ to avoid cracking and breaking.
Porcelain clays tend to require medium thicknesses around 1/4″ since they are plastic but prone to warping. Terra cotta style clays can also use medium slab thicknesses since the grog allows thinner rolling while providing stability.
In general, the more plastic and elastic the clay body, the thinner it can be successfully rolled. Stiff, coarse, and fragile clays do better with thicker slabs. Testing varies thicknesses with your specific clay is the best way to determine ideal thickness.
For more details, see this guide on choosing slab thickness for different clay types: https://ceramicartsnetwork.org/daily/clay-tools/handbuilding-techniques/choosing-clay-slab-thickness/
Achieving Even Thickness
One of the most important aspects when rolling clay slabs is achieving an even and consistent thickness throughout. Here are some tips for getting uniform slab thickness:
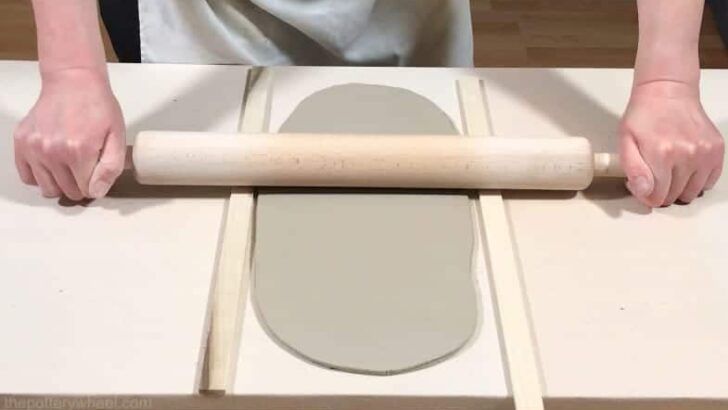
Start with a clay block of approximately the desired finished thickness. Slam or pound it down forcefully before you begin rolling to flatten it into a rough slab shape.
Use slab rollers or rolling pins specifically designed for clay. They will apply even pressure across the entire slab width. Wood or canvas-covered rollers often work better than metal or marble.
Roll in different directions and flip/rotate the slab periodically. Roll lengthwise, then crosswise, diagonally and rotate the slab 90 degrees after each pass.
Avoid thinning out the edges or ends of the slab. Make sure pressure and coverage is even across the entire slab surface each time you roll.
Check thickness and measure frequently with calipers, yardsticks or clay guides. Mark problem areas and give them extra rolling attention.
Roll on a flat, stiff, non-porous board or tabletop. Avoid rolling directly on soft surfaces.
Work quickly and decisively. Clay can start to dry out during prolonged rolling.
Let the weight of the roller do the work. Excessive downward force can make slabs thinner. Gentle pressure is key for uniform flat slabs.
Smooth any lines or ridges between passes. Use a rib tool held at a low angle to finish the slab surface.
Mist water on dry, cracking edges. Do not add too much moisture or it will make the slab sticky.
For extra large slabs, roll in sections then join them together quickly while moist.
Consistent rolling technique, patience and practice will improve your slab thickness precision.
Drying and Firing
The thickness of the clay slab affects how long it takes for the piece to dry as well as how it reacts during firing. Thicker slabs retain more moisture and take longer to dry thoroughly. Rushing the drying process with thick slabs can lead to cracking as the interior moisture tries to escape. Thinner slabs dry faster, reducing drying time and risk of cracking. However, thinner slabs can warp more easily during drying if not supported properly.
During firing, the thickness also impacts the finished piece. Thick slabs may explode or break apart if the moisture inside turns to steam and ruptures the structure. The thicker the slab, the more interior moisture needs to fully escape. Firing too quickly can shock the clay and lead to cracking or breaking. Thinner slabs have less risk of steam buildup and rupture. However, thinner pieces may warp more easily in the kiln. Careful, gradual firing allows interior moisture to slowly escape while the clay vitrifies and gains strength.
Experts recommend a maximum thickness of 1 inch for handbuilt slabs to allow thorough drying and safe firing. Thinner slabs from 1/4 to 1/2 inch are commonly used. The type of clay also impacts ideal thickness. Less plastic, grogged clays can be rolled thicker than very plastic clays. Understanding the clay properties and firing schedule is key to determining the ideal slab thickness.
Source: Drying and Firing – Ceramic Arts Network
Cracking and Breakage
Cracking and breakage are common issues when working with thicker clay slabs. As the clay dries, uneven shrinkage can cause stresses in the slab that lead to cracks. There are a few tips to help prevent cracking in thick slabs:
Allow thick slabs to dry slowly. Quick drying creates moisture gradients in the slab that lead to cracking. Thicker slabs need more time to dry evenly. Cover slabs with plastic and allow them to dry over several days before exposing them fully to air (Source: https://community.ceramicartsdaily.org/topic/16723-help-my-slabs-are-cracking-up/).
Score or slip the surfaces. Scoring the slab surfaces or applying slip gives the clay something to grip as it shrinks and can prevent cracking (Source: https://www.soulceramics.com/pages/pottery-cracks).
Avoid overly thick slabs. Slabs over 1 inch thick have a high risk of cracking. Keep slabs under 1 inch if possible (Source: https://www.soulceramics.com/pages/pottery-cracks).
Reinforce seams and joints. Use slip, score marks, or additional clay to reinforce seams between slab pieces. This helps minimize cracking at weak points.
Consider the clay type. Some clay is more prone to cracking. Porcelain and stoneware crack more easily than earthenware. For sculpture, choose a clay with good green strength.
Conclusion
When determining the ideal thickness for rolling clay slabs, there are several key factors to consider:
– Thinner slabs around 1/4″ are best for delicate items like tiles or jewelry while thicker 1/2″ – 1″ slabs are better for sturdy sculpture and pottery forms.
– Sculptural pieces often require thicker clay to support shape and structure while thinner more delicate slabs work for decorative surface elements.
– For pottery, thin even slabs are ideal for shapes like boxes or cylinders while thicker slabs allow throwing taller forms with more stability.
– Consider the clay body and shrinkage rate, with higher shrinkage clays potentially requiring slightly thicker slabs.
– Achieve even slab thickness by using guides like slats or rolling on a completely flat surface. Avoid uneven thick and thin areas.
– Allow adequate drying time to prevent cracking and breakage. Thinner slabs require less drying time than thick slabs.
– Firing schedule may also need to be adjusted for thicker vs thinner pieces to prevent cracking.
In summary, base your slab thickness on the clay type and intended use while focusing on consistency across the slab. Test different thicknesses and track results through drying and firing until you find the ideal thicknesses for your projects.