How To Create Your Own Figurines?
Creating your own figurines can be a fun and rewarding hobby. From tabletop gaming miniatures to collectible statues, sculpting and casting your own custom figurines allows you to bring your creative visions to life.
The figurine making process involves sculpting an original model out of clay or wax, making a mold from that model, casting copies using resin or other materials, and painting the final products. With some practice and the right tools, you can start designing unique figurines to decorate your home, game with friends, or even sell.
This guide will provide an overview of the different steps involved in DIY figurine creation, from choosing your materials and tools to mastering sculpting, mold making, casting, painting, and photography techniques. By the end, you’ll have the knowledge to start crafting your own imaginative miniatures.
Types of Materials
There are various types of materials that can be used to create figurines, each with their own unique properties. Some of the most common options include:
Clay
Clay is one of the oldest and most widely used materials for sculpting figurines. Types of clay used include polymer clay that hardens when baked in an oven, air-dry clay that hardens as it dries at room temperature, or kiln-fired clays like earthenware or stoneware that require high heat firing in a kiln. Clay is very malleable and easy to shape, making it great for beginners. Finished pieces may need to be sealed or painted.
Polymer Clay
Polymer clay is an extremely popular choice for figurine sculpting. It’s easy to work with and can be sanded, textured, or painted after hardening. Polymer clay brands like Sculpey and Fimo are readily available at craft stores. Figurines made from polymer clay require baking in an oven to cure and harden.
Resin
Liquid casting resins allow figurines to be cast from a mold. Two-part epoxy resins will self-cure at room temperature into hard, durable plastic. Resin casting allows more intricate detail and mass production of copies. Proper safety precautions are needed when working with liquid resin.
Plastic
Plastics like styrene sheets and rods can be cut, sculpted, and glued together. This is common for scale modeling. Plastic is durable and holds detail well. Power tools may be needed to cut and shape plastic materials.
Wood
Basswood, poplar, pine, and other soft woods are easily shaped using carving tools, rotary tools, or wood files. Wood offers a classic, natural material to work with. Grain, knots, and color variations provide natural beauty. Sealants help protect finished wood figurines.
Metal
Metals like aluminum, brass, copper, or steel allow sculpting figurines through processes like brazing, welding, bending, grinding, and machining. Durable metals hold the finest sculpted details well. Proper metalworking tools and safety equipment are necessities when working with metal.
Necessary Tools
Creating your own figurines requires having the right tools for sculpting, mold making, casting, painting, and more. Here are some of the key supplies you’ll need:
Sculpting Tools:
- Clay sculpting tools like loop tools, ribbon tools, clay shapers for shaping the clay
- Armature wire for creating the skeleton
- Sculpting stand to hold and rotate your sculpture
- Cutting tools like hobby knives, sculpting chisels to refine details
Mold Making:
- Silicone rubber for making molds
- Release agent like petroleum jelly to prep the surface
- Container to hold the liquid silicone as it sets
Casting:
- Casting resin suitable for figurines
- Measuring cups, stir sticks, and gloves for mixing
- Pressure pot to minimize air bubbles
Painting:
- Acrylic paints in a variety of colors
- Fine tip paint brushes for details
- Paint palette and water cup
Having the proper sculpting, mold making, casting, and painting supplies will allow you to bring your figurine designs to life.
Sculpting Process
The sculpting process is where you will shape your figurine and bring it to life. Here are some tips for the main sculpting steps:
Shaping the Base Material
Start with a wire armature or solid block of clay, polymer clay, wax, or other sculpting material. Slowly shape the overall form, proportions and posture. Work methodically from large forms to small details. Allow the material to set slightly between sessions.
Adding Details
Refine shapes and begin adding finer details like clothing folds, facial features, textures, etc. Use specialized sculpting tools for precision. Work carefully to avoid unintended marks or fingerprints. Pay attention to angles and perspective.
Baking/Curing
Follow manufacturer instructions to bake or cure the material once sculpting is complete. This hardens the material for the next steps. For clays, bake at the proper temperature and duration. Let cool completely before further handling.
Mold Making
To make copies of your original sculpt, you’ll need to make a mold. Molds can be made from silicone, resin, or other materials. The main options are one-piece molds or multi-piece molds.
One-piece molds are made by surrounding the original sculpt in mold material, like silicone rubber. Once cured, you can carefully remove the original and cast copies into the remaining mold cavity. One-piece molds are best for simple sculpts without intricate undercuts.
For more complex sculpts, you’ll need a multi-piece mold. This involves creating a mold box around the sculpt and pouring silicone over the top, allowing it to cure. Then you remove the sides of the box, coat the sculpt and cured silicone with mold release, and continue adding mold pieces until every surface is covered. When fully assembled, the mold pieces can be taken apart to remove the original sculpt.
Multi-piece molds allow you to create copies of sculpts with complex shapes and undercuts. Each mold piece will have registration keys so they align precisely when reassembled. Proper mold release and seam lines are critical for clean castings. Take your time and ensure proper alignment for the best results.
Casting
Once your molds are ready, it’s time to cast your figurine. This involves pouring a liquid material into the mold cavity and allowing it to cure and solidify. Some common casting materials for miniatures and figures include:
- Two-part resins – These liquid resins consist of a resin and a hardener that must be precisely mixed together before pouring into the mold. Resins like polyurethane or epoxy resin can produce detailed casts.
- Pewter – A metal alloy that melts at low temperatures, making it easy to cast in molds.
- Plaster – Plaster of Paris is a quick-setting fine white powder that is mixed with water and poured into molds.
When casting:
- Make sure your work area is level, clean, and free of drafts to avoid spillage or bubble formation.
- Use the correct proportions when mixing multi-part casting materials.
- Tap the mold gently while pouring to allow air bubbles to escape.
- Allow the material to fully cure as per manufacturer instructions before demolding.
To remove the cast parts from the mold:
- Carefully pry open and separate mold pieces.
- If parts are stuck, gently flex or twist the rubber mold to pop them loose.
- Avoid using force or tools that could damage the mold.
Clean up excess material and seam lines from your cast parts. Sanding, filing, cutting or trimming may be required to refine the pieces. Handle freshly cast items carefully until completely hardened.
Painting
Painting is one of the most enjoyable parts of creating a figurine. It’s when you really bring your creation to life with color and detail. Proper painting techniques will make the difference between an amateur and professional looking miniature.
Priming
Before painting, it’s important to first apply a primer coat. Priming provides a uniform surface for paints to adhere to. It also allows the true colors of your paints to show through. Primer comes in various colors like black, white, and grey. White is recommended for light colored miniatures while black works well for darker schemes.
Base Coats
After priming, you can start applying base coats. Base coats provide the underlying color before details are added. It’s best to be patient and apply multiple thin layers of paint rather than thick coats. Thick paint can obscure details. Let each layer fully dry before adding another.
Detailing
This is where you can really bring out textures and designs. Use techniques like dry brushing, washing, layering, blending, and highlighting to make details pop. Consider using different paint types like layers, shades, and glazes. Metallic paints are great for armor and weapons. Don’t forget to paint the base for a nice finishing touch.
Sealing
Once done painting, seal your mini with a varnish like matte, satin, or gloss. This protects the paint job from chipping and fading over time. Multiple thin layers of varnish are better than one thick coating. With proper priming, base coats, detailing, and sealing, you can achieve amazing painted miniatures.
Basing
Basing is an important step that can really enhance the overall look and feel of your finished miniature. Here are some tips for basing your figurines:
Attach to Base
Start by gluing your figure securely to the base. Plastic glue works well for plastic miniatures, while superglue is better for metal ones. Apply a sufficient amount to ensure a strong bond.
Add Texture
After attaching, you can add basing materials to create interest and texture. Some popular options include:
- Sand
- Gravel
- Small rocks
- Cork
- Static grass
Apply a layer of glue then sprinkle on your desired textures. Let dry fully before moving to the next step.
Details
Once your base texture has dried, you can add extra details if desired. Small rocks, tufts of grass, pieces of cork bark, leaves, etc can help bring your base to life. Take your time placing details for a natural look.
With creativity and the right materials, you can create nearly any type of base to complement your figurine. Take your time, experiment, and have fun with it!
Photographing
Once your figurine is complete, you’ll want to photograph it to show off your work. Proper lighting, angles, setups, and editing can make a huge difference in presenting your figurine in the best possible way.
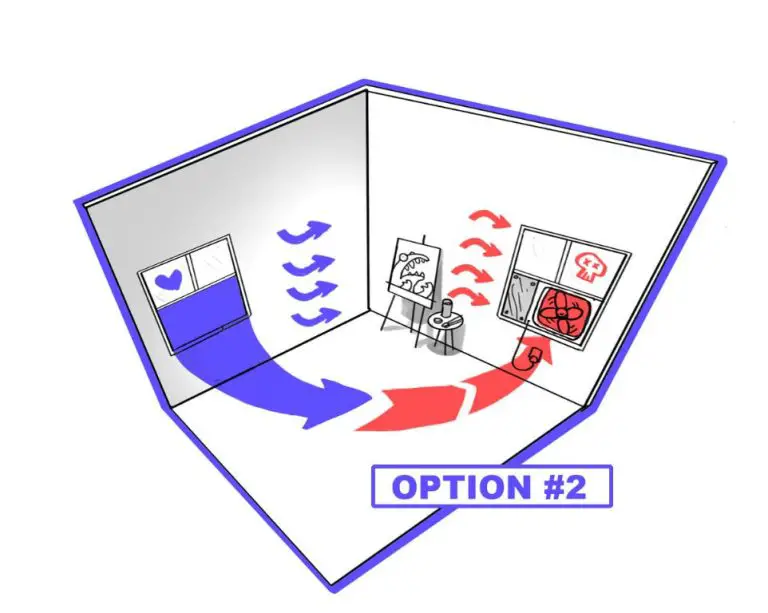
Lighting is critical for photographing miniatures and figurines. You’ll want a soft, diffused light without harsh shadows. Position your light source at a 45 degree angle to the figurine to create depth and dimension. Using a lightbox can help diffuse the lighting for even illumination. When photographing, avoid using a flash which can create unwanted reflections.
Think carefully about angles and perspective when photographing your figurine. Get down low and shoot the figurine at its own eye level. This creates a more dramatic, imposing perspective. Take photos from multiple angles to showcase the sculpting. Take some closeups of face and other details.
For setup, you may want to photograph on a neutral backdrop or subtle environment like grass or earth. This removes distractions and keeps the focus on your figurine. Consider using acrylic risers to lift the figurine off the surface. This allows you to photograph from below without background interference.
When editing, adjust lighting levels, white balance, sharpness, and contrast to make your photos really pop. Cropping images and making selective touchups can also enhance your figurine photos. With great lighting, angles, setup, and editing, you can really make your figurine shine and impress viewers.
Selling and Displaying Your Figurines
Once you’ve created your figurines, you’ll want to share them with others by selling or displaying them. Here are some ideas for getting your creations out into the world:
Online Shops
Setting up an online shop through sites like Etsy or eBay allows you to sell your figurines to a global audience. You can open your own storefront and list your items for sale directly through these sites.
Conventions
Attending conventions related to sci-fi, comics, anime, or other niches is a great way to showcase and sell your figurines directly to engaged fans. Consider applying for a booth or table at local or national conventions to get your work in front of the perfect target audience.
Curio Cabinets
Display your figurines proudly at home in a curio cabinet or on shelves. This allows you to keep your collection organized and protected while showing it off to visitors. Lighting and risers help highlight each piece.