How To Draw A 3D Cube From Different Angles
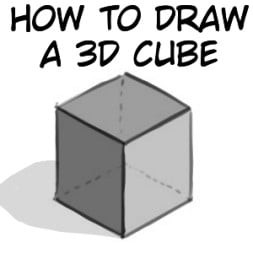
Mastering the art of drawing three-dimensional cubes is a fundamental skill for artists. By breaking down complex objects into their basic forms, such as cubes and circles, creatives can build a strong foundation for their work. A crucial aspect of this process is understanding how to draw cubes in perspective, which serves as a gateway to learning more complex techniques. This tutorial will guide you through three distinct methods for drawing 3D cubes, providing the tools and knowledge necessary to take your artistic skills to the next level.
Materials
When it comes to sketching, you can use either printer paper or a dedicated sketchbook as your canvas. For graphite pencils, opt for softer options like B, 2B, or 3B, which will make shading a breeze. Any pencil, pen, or even charcoal will suffice, offering a range of creative possibilities. Additionally, considering our previous articles on how to draw straight lines freehand and warming up before drawing may prove enlightening as you embark on your artistic journey.
How to draw a 3D cube
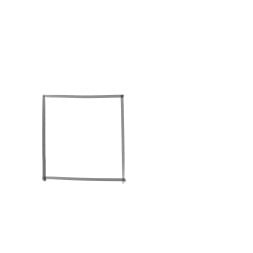
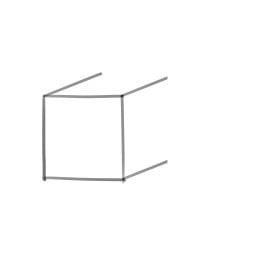
Method 1
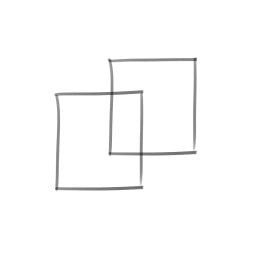

Begin by drawing two identical squares, positioned slightly offset from each other to create a sense of depth. This simple method may not teach you about perspective, but it’s a great starting point for visualizing three-dimensional forms. To start, draw the first square, ensuring it’s the size you desire. Next, draw a second square, mirroring the first in terms of size and shape, but positioned horizontally and vertically to create some distance between them. Be mindful not to place the second square too far away, as this will result in a rectangle rather than a cube. Finally, connect the top left corner of the first square with the top left corner of the second square, repeating the process for the other three corners. With these steps complete, you’ll have successfully drawn your first 3D shape.
Method 2
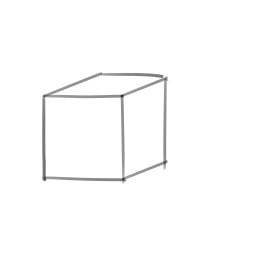
To create a 3D cube from a 2D square, start by drawing a square of your desired size. The next step is to transform this flat shape into a three-dimensional object by extending it into space. To do this, draw lines from each corner, ensuring that each line is at the same angle. Note that you won’t see one edge, as it will be hidden when viewed from the bottom left side. Alternatively, you can add a dotted line if desired. Finally, connect all lines to complete your three-dimensional cube.
Method 3

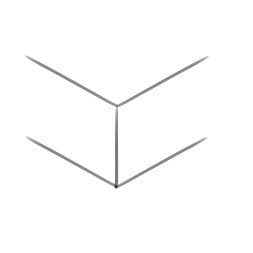
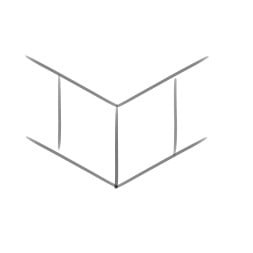
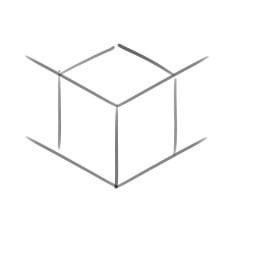
To truly master perspective drawing, focus on this third method, which offers a deeper understanding of rendering three-dimensional objects. It may seem like an overwhelming task, but breaking it down into manageable steps makes all the difference.Begin by drawing a vertical line, as this will serve as the edge closest to your viewpoint – roughly at a 45-degree angle, if you’re drawing a cube from that perspective. From here, create four guidelines that indicate where the sides of your object will fall. Ensure these lines are parallel and evenly spaced, with the upper and lower lines forming a consistent distance apart.Next, draw the left and right edges, aiming to place them equally far from the central vertical line if you’re drawing a cube. For a rectangle, one side can be positioned farther away than the other, depending on your desired proportions.Finally, connect the lines, ensuring that each new edge is perpendicular to its corresponding guideline. This final step will help you bring your 3D object into focus, resulting in a more realistic and visually appealing drawing.
How to draw a cube from different angles

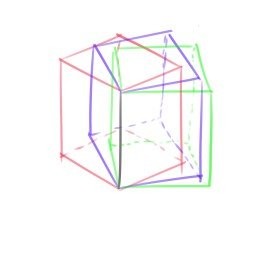

With your newfound ability to create 3D cubes, take it up a notch by experimenting with drawing them from various perspectives. If you’ve successfully mastered the third approach, this should be a breeze. Simply adjust the angle of the guide lines in step two to draw a cube from any vantage point. Take a look at how I utilized this method to craft cubes from three distinct angles – a true testament to the flexibility and creativity that comes with mastering these techniques.
Taking it to the next level!


When working with complex shapes, cubes are an excellent tool for simplification. But they can also be the star of your artwork, serving as a focal point to build upon. One approach is to combine the techniques learned in this tutorial with those from our previous article on drawing cute eyes, resulting in a charming family of cube-based characters.
Alternatively, you could take your love for cubes to the next level by creating an entire piece of art centered around them, as I did after being inspired by the incredible work of @XMIOart. In this case, I let my imagination run wild and created a unique painting that showcases the beauty of cubes in all their forms.