How To Learn Pottery Making?
Pottery making is an ancient artform that has been practiced across cultures for thousands of years. Evidence of early pottery vessels dates back over 20,000 years, with artifacts found in places like China, Japan, Africa, and the Middle East. While pottery initially served functional purposes like storing food and water, over time it evolved into a creative means of expression and artistry.
Today, pottery making remains a popular hobby and art form around the world. There is something elemental and satisfying about working with clay to mold and shape both functional pieces like bowls, cups, and vases, as well as decorative sculptures. The process of handbuilding or throwing pots on a wheel develops manual dexterity and creativity. Glazing and decorating brings out additional artistic talent. Firing clay in a kiln to harden and complete the ceramic process is exciting. Finally, there is a sense of pride and achievement in creating lasting pottery works with one’s own hands.
This guide will provide an overview of pottery making for the beginner, covering everything from the types of pottery, tools and equipment needed, clay basics, forming techniques, kiln firing, and more. With some practice and patience, the joys of pottery making can be accessible to anyone looking for a fun, relaxing and rewarding hobby.
Benefits of Learning Pottery
Learning pottery provides many benefits beyond just creating beautiful objects. It can be an extremely rewarding creative outlet that reduces stress and provides a sense of accomplishment.
Working with clay is a calming, therapeutic process. As your hands shape the clay on the wheel or sculpt a handbuilt form, your mind quiets and you become fully immersed in the moment. This is similar to the benefits of practices like yoga and meditation. Pottery making induces a relaxed, meditative state that can lower anxiety and relieve stress.
Pottery also satisfies the human need to produce creative works. Having an artistic outlet for self-expression and channeling your imagination into physical form can make you feel more centered and fulfilled. Completing a piece from start to finish provides a huge sense of achievement.
According to an article on FeelArtistic.org, pottery making can “enhance creativity, improve focus and concentration, and provide stress relief and relaxation.” The sense of satisfaction from designing, building, and glazing your own pottery can do wonders for confidence and general well-being.
Types of Pottery
There are three main types of pottery – earthenware, stoneware, and porcelain. Each type has its own characteristics and uses.
Earthenware is pottery fired at lower temperatures, typically between 1000-1200°F. It is porous and absorbs water. Earthenware is used to make tableware, decorative items, and floor and wall tiles. It comes in a variety of colors and finishes like terracotta.
Stoneware is fired at higher temperatures between 2200-2400°F making it denser and more durable than earthenware. It is water-resistant but not fully vitrified. Stoneware is often used to make crockery, jugs, and cooking pots. It has a heavier feel than earthenware.
Porcelain is fired at very high temperatures, around 2640°F. It becomes translucent vitrified, non-porous, and withstands freezing temperatures. Porcelain is commonly used to make tableware and decorative items. It has a delicate, refined appearance and feel.
Within these three main types there are further specific varieties like raku, majolica, bone china, and jasperware that have distinct aesthetic styles and production methods.
Pottery Tools and Equipment
Having the right tools and equipment is essential for pottery making. Here are some of the key supplies you’ll need:
Pottery Wheel
A pottery wheel allows you to throw and center clay to create symmetrical pottery forms. Pottery wheels come in electric, kick wheel, and treadle styles. Consider workspace size and budget when selecting a wheel (source: https://www.theceramicshop.com/store/department/11/tools/).
Kiln
Kilns are used to fire clay and ceramics at high temperatures to harden and finish them. The main types are electric and gas kilns. Look for a kiln that fits your space, production capacity, and budget needs (source: https://diamondcoretools.com/collections/clay-carvers).
Modeling Tools
Modeling tools like loop tools, ribs, cutters, and sculpting tools allow you to shape, smooth, carve, trim, and refine clay forms. Invest in a quality set of metal modeling tools for handbuilding and throwing (source: https://www.baileypottery.com/store-dept-pottery-ceramic-tools.html).
Clay
Choose an appropriate clay body for your project – porcelain, stoneware, earthenware, etc. Consider clay color, firing temperature, and workability. Prepare clay properly before using to get the ideal consistency.
Glazes
Glazes impart color and surface effects on finished clay pieces. Select food-safe glazes suited to your clay type and kiln temperature. Test glaze combinations to achieve desired colors and effects.
Clay Basics
Clay is the fundamental material used in pottery making. There are several types of clay to choose from, each with their own properties and characteristics:
- Earthenware – Lower firing temperature, more porous. Good for handbuilding.
- Stoneware – Higher firing temperature, less porous. Good for functional ware.
- Porcelain – Very high firing temperature, vitreous and non-porous. Finer quality.
The type of clay determines the methods and techniques used. For beginners, an earthenware or stoneware clay is recommended. Clays can be purchased from art supply stores either as moist, ready-to-use clay or in dry bags which require hydrating before use.
To prepare bagged clay, place it in a large container and slowly add water while wedging or kneading until it reaches the desired consistency. Allow dry clay to fully soak up the water before using. Wedging blends the water evenly and removes air pockets. It’s important to properly hydrate and wedge clay to achieve optimal consistency and workability.
The clay’s plasticity allows it to be shaped, while the drying and firing process hardens it permanently. Understanding the fundamentals of clay is key to creating pottery.
Handbuilding Techniques
Handbuilding refers to creating pottery without the use of a potter’s wheel. There are three main handbuilding techniques for creating pottery: pinching, coiling, and slabbing. Handbuilding allows for lots of creativity and control in shaping clay without relying on a wheel. It’s also a more approachable way for beginners to get started with clay.
Pinch pots are a basic handbuilding technique that involves pinching and pulling the clay to form simple pot shapes. To create a pinch pot, start with a ball of clay and push your thumb into the center to create a cavity. Then pinch and pull the clay outward while rotating to thin the walls. Pinch pots are an easy starting point for handbuilding. They can be left simple or embellished with additions like handles, spouts, or feet (https://www.thecrucible.org/guides/ceramics/handbuilding/).
Coil building involves rolling out and stacking ropes or coils of clay on top of each other to build up a form. The coils can be adhered together by smoothing and blending. Coiling lends itself well to making taller vessels like vases, mugs, and pitchers. The clay and coils need to be scored and slipped to bond together. Many organic shapes and figural sculptures can be created with coiling techniques.
Slab building is done by rolling out flat, even sheets of clay which are cut and constructed into shapes. Slabs can be drapped or molded over forms to create box shapes, bowls, and plates. The slabs are joined using slip and scoring similar to coils. Slab construction allows for large, flat surfaces and angles that can’t be easily achieved with pinching or coiling (https://www.kraftyshed.co.uk/handbuilding-with-clay).
Wheel Throwing Basics
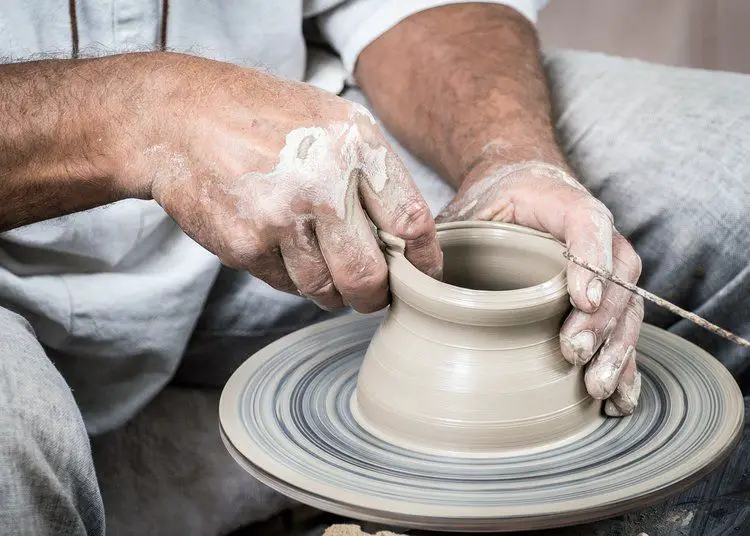
Wheel throwing is the process of using a pottery wheel to shape clay into pottery forms. There are three key steps to basic wheel throwing: centering the clay, opening the clay, and pulling up the walls.
Centering the clay involves securing a ball or lump of clay onto the wheel head and using your hands to center it. Most potters use both hands to apply even pressure and compress the clay while the wheel spins at a moderate speed. Centering ensures the clay is symmetrical and balanced for the next steps (timestamp).
After centering, you can open up the clay by using the thumb and middle finger of both hands to press into the center while the wheel spins. Apply even pressure down and out until you form a cylinder shape in the clay. Opening shapes the centered clay into a basic pot form (timestamp).
The final step is pulling up the walls by placing both hands inside the cylinder and applying an outward pressure. Use your hands, as well as a wooden rib tool, to draw the clay upwards and shape the desired wall thickness. Pulling the walls makes the pot taller and sets the overall form (source).
Decorating and Glazing
Decorating greenware (unfired clay) is an enjoyable part of making pottery where you can add color, texture, and personality to your pieces. There are many decorating techniques to explore including:
– Painting with underglazes or glazes – These liquid ceramic colors can be brushed or hand-painted onto greenware. Underglazes require a transparent glaze coating before firing. (https://ceramicartsnetwork.org/daily/ceramic-decorating-techniques)
– Stamping – Pressing rubber stamps, carved wood/linoleum blocks, or other textured materials into the clay.
– Incising – Using metal tools, skewers or knitting needles to scratch designs into leather-hard clay.
– Sprigging – Applying small hand-shaped or molded clay elements.
– Slip trailing – Using liquid clay slip to drizzle lines and patterns.
Glazes are vitreous coatings applied to pottery before firing that create a glassy surface. Common types include:
– High-fire glazes – For stoneware and porcelain firings over 1200°C.
– Low-fire glazes – For earthenware firing below 1200°C.
– Commercial glazes – Pre-made glazes to brush on.
– Recipes and mixing – Make custom glaze recipes and mixes.
Glazes can be used to color, decorate, waterproof, and enhance the look of finished pottery. Application methods include brushing, dipping, pouring, and spraying.
Firing and Post-Firing
Firing is a crucial step in pottery making. After a piece of pottery has dried, it is very fragile and porous, so it must be fired to harden it. There are typically two firings in pottery making – the bisque firing and the final glaze firing.
The bisque firing is the first firing, which happens after the clay has dried but before any glazing. Bisque firing is often done between 1650-2200°F. During bisque firing, chemical water and any organic matter is driven off, causing the clay to permanently harden. After bisque firing, clay will become ceramic material that is less porous and more durable.
The final glaze firing happens after glazing. Glaze is applied to greenware and then put back in the kiln for a final glaze firing. Glaze firing temperatures vary, but generally range from 2200-2400°F. This causes the glaze materials to liquefy, producing glass, and then harden to a glossy coating. Pieces may also be decorated with underglazes, decals, or overglazes after bisque firing but before glaze firing.[1][2]
After firing, pieces undergo finishing. This includes any final touching up that’s needed like light sanding or grinding to smooth rough spots, as well as cleaning any dust or material from the surface of the pottery.
Next Steps
Once you have learned the basics of pottery making at home, the next step is to start taking classes at a local studio to enhance your skills. Many studios offer beginner group classes that teach handbuilding and wheel throwing techniques in a fun, social environment. Classes allow you to learn from experienced instructors, get feedback on your work, and access studio equipment like pottery wheels and kilns. As you advance, you may want to take intermediate or specialized classes to explore new techniques like raku firing, nerikomi, or extruder work.
Finding a pottery studio in your area is easy with a quick online search. Look for studios that have beginner-friendly class schedules, knowledgeable teachers, and well-equipped facilities. When visiting a prospective studio, get a feel for the community and learning environment.
As your skills progress, you may consider selling your creations at local art fairs, markets, or online through sites like Etsy. Pricing your work fairly and competitively is important. Consider costs of materials, time spent, any specialty techniques used, size/weight, and local market rates. Whether as a hobby or side business, sharing your love of pottery with others is rewarding.