Introduction To Clay: Beginner’S Workshop
What is Clay?
Clay is a fine-grained natural material that combines one or more clay minerals with traces of metal oxides and organic matter. With appropriate water content, clay is flexible and can be molded into a desired shape.Evidence shows clay was first used as an art material as far back as 25,000 BCE. Ancient civilizations shaped clay into pottery, bricks, tiles, and figurines. Around 9,000 BCE, clay became widely used for making containers and art objects that spread across cultures.
Types of Clay
There are several different types of clay used in pottery, each with their own characteristics and uses. The three main types are earthenware, stoneware, and porcelain. [1] [2]
Earthenware is a low-fire clay that fires up to around 2,000°F. It’s very porous and absorbs water easily, which means earthenware pieces need to be glazed to make them waterproof. Earthenware fires to a terra-cotta red color if not glazed. It’s a very flexible, easy to work with clay that’s good for beginners. [1]
Stoneware clays fire between 2,200°F – 2,600°F. Stoneware is less porous than earthenware when fired, but the clay body can still absorb some water. Most stoneware glazes make the finished pieces impermeable to liquid. Stoneware clays are very strong and durable. The colors range from grey to brown. [2]
Porcelain is a high-fire clay, firing between 2,400°F – 2,550°F. It’s extremely non-porous and impenetrable to water, even without a glaze. Porcelain has high plasticity and strength. It fires to a pure white color if left unglazed. Porcelain can be more challenging to work with than other clays. [1]
[1] https://www.soulceramics.com/pages/types-of-clay
[2] https://thepotterywheel.com/types-of-clay-for-pottery/
Clay Tools
Having the proper tools is essential for working with clay and creating beautiful pottery pieces. Here are some of the basic tools every beginner should have:
Pottery Wheel – The pottery wheel is used for throwing and shaping clay into symmetrical pieces like bowls, vases, cups. Most wheels have variable speed controls and a splash pan to contain water and clay scraps (Clay Sculpting Tools).
Kiln – A kiln is an oven used to fire clay objects to harden them and set glazes. Kilns heat items to over 1000°F. There are electric and gas kilns available (Sculpting Tools Add-On – Pottery with a Purpose).
Sculpting Tools – Sculpting tools are used to shape, smooth, carve, and decorate clay. Basic tools include loop tools, ribbon tools, metal scrapers, wire tools, sponges, and wooden tools. Having a variety allows for detail and precision (Clay Sculpting Tools).
There are many other helpful tools like bats, slip trailers, cutting wires, ribs, and modeling sticks to create both functional and decorative clay pieces.
Working with Clay
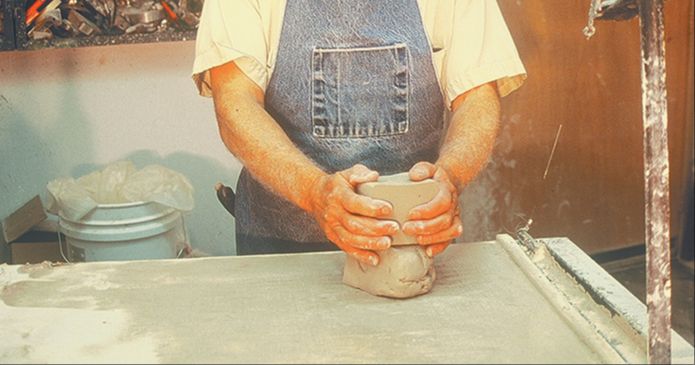
Before clay can be used for pottery, it needs to be prepared properly. An important first step is wedging, which involves kneading the clay to remove air bubbles and evenly distribute moisture. To wedge clay, roll it into a ball and then push it down and away from you on a flat surface. Then bring it back towards you while continuing to apply pressure. Repeating this process evenly distributes the moisture and removes air pockets, preparing the clay for throwing on the wheel [1].
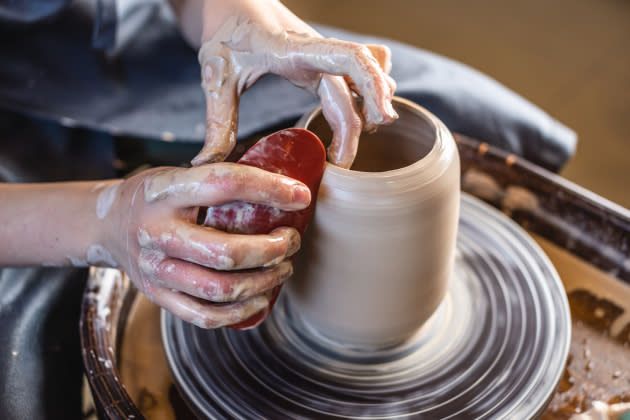
Once the clay is wedged, it can be centered on the pottery wheel. Centering involves placing a ball of clay on the wheel and applying gentle pressure while the wheel spins slowly. This centers the clay and forms it into a cylinder. Use your thumbs to apply pressure on the sides while keeping your fingers firm but relaxed. Adjust the speed and pressure as needed until the clay spins evenly without wobbling. Centering clay takes practice, but is an essential skill before shaping pottery on the wheel [2].
Well-prepared and centered clay is ready to be shaped into vessels, bowls, vases, and more. The key is taking the time to properly wedge and center the clay first, as this provides the strong foundation necessary for making high quality pottery.
Basic Vessels
Some of the most common and basic vessels to make when starting with pottery are bowls, cups, and vases. These simple forms allow beginners to learn fundamental techniques without getting overwhelmed. Follow these steps to create basic pottery vessels:
- Prepare your clay by wedging it to remove air bubbles and make it more pliable. Knead and press the clay on a flat surface.
- Form the bottom of your vessel by creating a clay disc using your hands or a slab roller. Make the disc 1/4 to 1/2 inch thick depending on the size of your piece.
- Gradually pull the walls up from the bottom disc to shape your vessel. Use your fingers, a rib tool, and a sponge to refine the shape and smooth the walls.
- Allow the clay to firm up slightly before continuing to shape it. Let it sit for 5-10 minutes covered with plastic.
- Once the clay has firmed up, refine the shape using various tools. Curve the walls in for a bowl shape or keep them straight for a vase or cup.
- Smooth over any cracks, scratches or uneven areas with a wet sponge. Use a rib tool to define clean lines.
- Add any decorative elements like pushing designs into the sides with tools, adding handles, or incising patterns.
- Allow the vessels to dry completely before firing. Place them somewhere free of drafts.
With practice, you’ll be able to create these basic vessels with ease. Don’t be afraid to experiment with different shapes and sizes as you learn. For more tips, see this guide from The Crucible: https://www.thecrucible.org/guides/ceramics/pottery/.
Decorating Clay
One of the most exciting parts of working with clay is decorating the finished pieces. There are endless ways to add color, texture, and design to your clay creations. Some of the most popular decorating techniques for beginner potters include:
Glazing
Applying glaze is a great way to add color and finish to clay pieces. Glazes are glass-like coatings that are applied to bisqueware (clay that has been fired once at a low temperature). When the glazed piece is fired again at a higher temperature, the glaze melts and fuses to the clay body to create a smooth, glossy surface. Common types of glaze application methods include brushing, dipping, pouring, and spraying (Pottery Making Info).
Painting
Clay paints like underglazes, slips, and stains allow for creative surface decoration. These can be painted onto greenware (unfired clay) or bisqueware using brushes, sponges, and other tools. Underglazes are popular for hand-painting detailed designs. Once fired, the underglaze fuses with the glaze layer to become vibrant, permanent color.
Textures
Interesting textures can be made by carving, impressing, or piercing clay surfaces. Rolling textured materials over the clay, like lace or burlap, also transfers neat patterns. Adding textures creates visual interest and gives clay pieces a handmade, rustic look. Sculpting clay into organic shapes or facets provides dimensional textures as well (Ceramic Arts Network).
Firing Clay
Firing is the process of exposing clay to high temperatures in a kiln, which causes chemical and physical changes that permanently harden the clay into a ceramic material. Proper firing is essential for creating strong, finished pottery and ceramic artwork.
Clay objects are loaded into the kiln and slowly heated to temperatures generally ranging from 1800°F – 2300°F. As the temperature rises, the clay goes through several stages:
- 100°F – Evaporation of chemical water from the clay
- 150°F – Quartz inversion where quartz crystals in clay realign
- 300°F – Organic material burns out
- 1000°F – Carbon and sulfates are expelled
- 1650°F – Vitrification begins as glass phase forms and clay particles fuse
- 2200°F – Glazes mature and become glassy
The final firing temperature depends on the type of clay body and glazes used. Typical firing ranges are:
- Earthenware: 1800°F – 2100°F
- Stoneware: 2200°F – 2250°F
- Porcelain: 2300°F – 2350°F
The kiln is then cooled slowly over several hours. After firing, the clay has been permanently transformed into a hardened, finished ceramic.
For more details on the firing process, refer to this article on Firing Clay from Ceramic Arts Network.
Safety
When working with clay, it’s important to follow safe practices to avoid health hazards. According to the South Texas College, you should not eat, drink or smoke when working with clay as you don’t want to ingest any clay dust [1]. Be sure to keep your tools for clay separate from any eating utensils. Always wash your hands thoroughly after working with clay. Take breaks to stretch and prevent back strain [1].
The Ceramic School recommends keeping your work area clean by wiping down surfaces, properly storing clay powders, and having good ventilation for your kiln [2]. Keep your tools organized and clean them regularly. Be careful not to cut yourself on sharp edges. Use slip trailing bottles instead of your mouth to decorate. Always check your kiln’s emergency shut off before firing. Stay focused and avoid distractions when operating equipment [2].
Troubleshooting
Troubleshooting and avoiding mistakes is an important part of learning any new skill. Here are some of the most common issues that beginner potters face and tips for avoiding or fixing them:
Centering Problems
Having trouble getting your clay centered on the pottery wheel? Here are some potential causes and solutions:
- The clay is too hard or doesn’t have enough water – wedging and kneading will help incorporate water evenly. You can also try a clay with more grog or sand to make it less sticky.
- You are applying too much or too little pressure while centering – try varying the pressure and speed as you center.
- The wheel head wobbles – adjust the wheel head so it sits flush and doesn’t wobble. You can also try centering smaller amounts of clay.
For more tips, see this article on common centering issues and fixes: https://potterycrafters.com/11-problems-centering-clay-and-easy-ways-to-fix-them/
Pottery Wheel Mistakes
Throwing on the pottery wheel takes practice! Here are some frequent mistakes beginners make:
- Not enough water on the clay leads to problems smoothing surfaces.
- Applying too much pressure on the clay can cause cracks or deformities.
- Making walls too thick or thin based on the piece you are throwing.
- Incorrect tool use can scrape or distort the clay.
This article covers common pottery wheel errors and how to prevent them: https://potterycrafters.com/pottery-wheel-mistakes-and-how-to-fix-them/
Next Steps
Once you have mastered the basics of working with clay, throwing pots on the wheel, and glazing, you may be looking to advance your pottery skills to an intermediate level. Here are some additional skills to focus on as well as resources for intermediate potters:
Some skills to develop at the intermediate level include:
- Throwing taller pieces on the wheel up to 10 inches high (https://www.reddit.com/r/Pottery/comments/o0vmpk/what_do_you_consider_intermediate_wheel_throwing/)
- Throwing platters, bowls, and vases with thinner walls
- Creating lidded vessels with fitted lids
- Using templates and guides when throwing to ensure consistency
- Throwing multiples of the same form
- Achieving an even wall thickness when throwing
- Texturing, carving, and incising leather-hard clay
- Glazing with layered colors and designs
- Mixing your own glazes and understanding glaze chemistry
Some resources for intermediate potters include:
- Online video tutorials on specific techniques like throwing lidded jars (https://ceramicartsnetwork.org/clayflicks/technique-levels/intermediate-pottery-techniques)
- Local community studios or art centers with intermediate classes
- Books and magazines focused on developing skill as a potter
- Joining ceramics guilds or groups to network and learn from fellow potters
- Attending workshops or residencies for concentrated learning
- Experimenting and practicing new techniques independently
With dedication and practice of new skills, intermediate potters can gain proficiency and start producing more advanced works in clay.