Is It More Expensive To Lay Herringbone Tiles?
Herringbone tile patterns have become an increasingly popular flooring choice in recent years. The unique staggered brickwork layout provides visual interest while the variety of colors and textures available make it a versatile design option. Herringbone tiles can make small spaces appear larger and bring lovely old-world charm to any room.
With herringbone’s rising popularity, many homeowners are wondering – is it more expensive to install than other tile layouts? In this article, we’ll take an in-depth look at the costs of herringbone tile and the factors that impact the pricing.
What Are Herringbone Tiles?
Herringbone tiles refer to a pattern where rectangular tiles are laid out in an interlocking arrangement resembling a herringbone pattern. The tiles are placed perpendicular to each other in a V or zigzag shape 1. This gives a unique visual effect that is bolder and more dynamic than laying tiles in straight rows.
Typically, herringbone patterns use rectangular tiles, however any tile shape can be used as long as they interlock in the herringbone arrangement. The rectangles may be elongated or close to a square shape. The tiles are most commonly laid out at 45 degree angles, but can be adjusted to more acute or obtuse angles for different effects.
Herringbone tile layouts involve more planning than basic grid layouts. The installer has to cut many customized triangles and rhombuses to fill in edges and transitions. Despite requiring more work, herringbone patterns remain popular choices for floors, walls, backsplashes, and showers due to the intriguing visual appeal.
Pros of Herringbone Tiles
Herringbone tiles offer a timeless and visually appealing look that has remained popular for centuries. The classic herringbone pattern creates visual interest and brings a sense of old-world charm to any space (source). Unlike solid wood flooring, the herringbone design hides imperfections and flaws, providing a more uniform appearance. Herringbone also makes rooms appear larger, as the pattern draws the eye down the length of the floor (source). The interlocking pattern is pleasing to the eye while adding character. For those seeking elegance and visual intrigue, herringbone tiles offer timeless beauty and sophistication.
Cons of Herringbone Tiles
While herringbone tiles offer some advantages, there are also some potential downsides to consider:
Trickier installation – Installing herringbone tiles takes more time and skill compared to installing regular tiles. The pattern requires extra care to ensure proper alignment and to avoid lips between tiles. This can drive up installation costs.[1]
Not good for small spaces – The dynamic look of herringbone tiles works best in larger, open rooms. In smaller spaces, the busy pattern can feel overwhelming. Simple layouts tend to work better for small bathrooms or tight hallways.
Hard to make repairs – If one tile becomes damaged, it can be tricky to replace just that tile while maintaining the integrity of the overall herringbone design. The entire area may need retiling.
Difficult to clean – The zigzag pattern has more grout lines and crevices than simpler tile layouts. This provides more areas where dirt, grime and moisture can collect. Regular cleaning is essential.[2]
Herringbone Tile Cost
The average cost of herringbone tile installation ranges from $10 to $50 per square foot, with most homeowners paying between $30 to $40 per square foot on average. This translates to a total project cost of $6,000 to $20,000 for a 200 square foot installation.
Herringbone tiles tend to be on the more expensive end compared to basic rectangular tile patterns, due to the intricate and angled pattern that requires more precision to install properly. The herringbone design also utilizes smaller tiles, which means more grout lines and tile cuts per square foot. This increased labor and material results in a higher overall installation cost compared to basic tile layouts.
According to HomeGuide, herringbone tile installation averages $36 to $45 per square foot, making it one of the more expensive tile layouts. The pattern’s complexity means professional installers charge a premium for their skills laying the tiles. HomeAdvisor states the average national cost for herringbone tile installation is $30 to $50 per square foot.
For high-end tile materials like marble, expect to pay $40 to $60 per square foot for herringbone installation. More affordable ceramic, porcelain, or composite tiles typically range from $25 to $40 per square foot installed in a herringbone pattern.
Factors Affecting Cost
There are several key factors that impact the total cost of installing herringbone tile flooring:
Tile Material
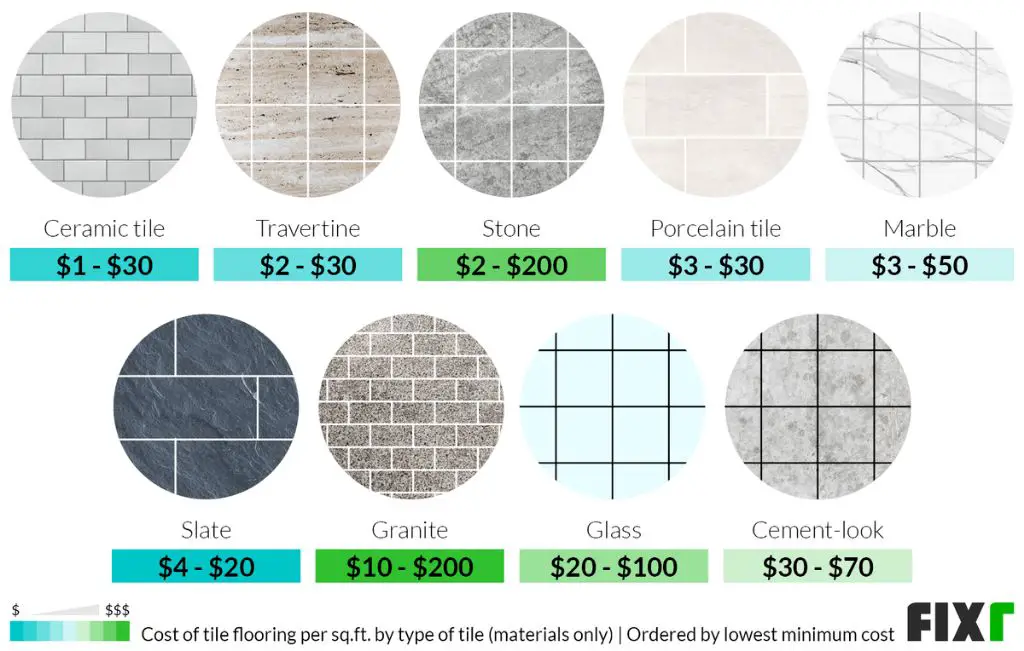
The material the tile is made from has a big effect on price. Natural stone tiles like marble or travertine are generally the most expensive. Ceramic and porcelain tiles offer an affordable option. According to this source, natural stone tile can cost $15-25 per square foot, while ceramic and porcelain are $5-15 per square foot.
Pattern Complexity
Simple herringbone patterns with larger tiles are faster to install than intricate designs with small tiles. The more complicated the pattern, the more labor is required. As one Reddit user notes in this thread, their labor quote for a 580 square foot herringbone install was $8.75 per square foot.
Professional vs. DIY Installation
Hiring a professional tile installer will increase costs, but can save time and ensure proper installation. DIY installation can cut costs substantially, but requires expertise. Pre-assembled herringbone tiles can simplify DIY installs.
Comparison to Other Tiles
Herringbone tiles tend to be more expensive than other common tile types like subway tile or mosaic tile. According to this source, herringbone tiles can cost $3-17 per piece, while subway tiles average $5-10 per square foot and mosaic tiles average $5-15 per square foot. The unique alternating pattern of herringbone tiles requires more cutting and installation work, driving up costs compared to simpler uniform tiles.
In general, herringbone tiles will cost 20-50% more than basic white subway tile for the average bathroom. However, niche designer herringbone tiles can be 2-3 times more expensive than standard subway tile. Complicated herringbone patterns with multiple colors or materials are also pricier than simple two-tone designs.
Compared to other geometric patterned tiles like hexagons or chevron, herringbone is generally cheaper since the elongated shape requires less cutting. Professionally installed herringbone floors can cost $10-20 per square foot, while more intricate geometric tiles usually run $15-30 per square foot.
Ways to Reduce Cost
There are a few ways you can reduce the cost of installing herringbone tiles:
Doing a DIY installation rather than hiring a professional can significantly cut down on labor costs, which make up a large chunk of the total expense. However, this route requires expertise in tiling to properly execute the intricate herringbone pattern [1]. An improper installation can lead to crooked patterns or tiles cracking and popping out later on.
Opting for cheaper tile materials like porcelain rather than natural stone can also lower material costs. Porcelain tiles tend to run $2-6 per square foot, while marble and travertine tiles can cost $8-15 per square foot [2].
Simpler patterns like a basic herringbone with all one sized tiles streamlines installation compared to more intricate designs. The simpler the pattern, the less time and expertise it requires for quality installation.
Maintenance
Herringbone tiles require regular cleaning and maintenance to keep them looking their best. Here are some tips for properly caring for herringbone tile floors:
For routine cleaning, sweep or vacuum the tiles at least once a week to remove dust and debris. Mix a mild pH neutral cleaner with water and mop the floor. Avoid acidic cleaners which can damage the grout over time. Rinse the floor thoroughly after mopping and allow it to fully dry (Source).
Every few months, clean the tiles with a grout brush or toothbrush to remove dirt from the grout lines. Use a grout sealer to protect the grout and make it easier to clean. Reapply grout sealer every 1-2 years as needed (Source).
Spills should be wiped up right away to prevent staining. For tough stains, use a cleaner formulated for natural stone or ceramic tile along with a white nylon scrub pad.
By regularly maintaining herringbone tile floors, they will retain their beauty and last for many years.
Conclusion
In summary, herringbone tiles tend to be more expensive than basic tiles due to the intricate pattern and labor involved in installation. However, the visual impact is worth the extra cost for many homeowners. When properly installed, herringbone tiles can increase a home’s value and create a stunning floor or wall design. There are ways to reduce the cost, such as choosing smaller sized tiles or limiting the installation area. With regular maintenance to prevent cracks and damage, herringbone tiles can be a beautiful and lasting investment. The extra cost associated with these special tiles is well worth it for those seeking a touch of elegance and sophistication in their homes.