Is Making Polymer Clay Earrings Easy?
Making polymer clay earrings is an enjoyable and accessible craft for jewelry makers of all skill levels. Polymer clay is an easy-to-use modeling material that can be shaped, textured, and colored in infinite ways. When cured in a regular oven, it hardens into a durable plastic that stands up well to daily wear. In this beginner’s guide, we will walk through all the steps and techniques for crafting beautiful, unique polymer clay earrings.
We’ll start by introducing polymer clay and examining its benefits for earring making. Next, we’ll go over the basic tools and materials needed to get started. The fun part comes when we dive into choosing colors, sculpting the clay into different shapes, adding patterns and textures, and applying findings to finish the earrings. By the end, you’ll understand the entire earring making process from start to finish. Follow along to learn just how easy and enjoyable it is to create one-of-a-kind polymer clay earrings!
What is Polymer Clay?
Polymer clay is a modeling and sculpting medium that is known for being lightweight, easy to work with, and versatile. It is made from polyvinyl chloride (PVC) particles along with plasticizers and pigments. Unlike natural clays like potter’s clay, polymer clay needs to be baked at a relatively low temperature, typically around 265°F, to harden it into a permanent, durable finish (Polymerclaysuperstore.com, 2023).
There are several popular brands of polymer clay, including Sculpey, Fimo, Kato Polyclay, Cernit, and Premo. Each brand has its own characteristics, like being softer or firmer, matte or glossy finish, and intended uses. Despite differences, most polymer clays can be mixed together and blended to create custom colors and textures (Treasurie.com, 2023).
Polymer clay is an accessible, creative material used by hobbyists and artisans to make jewelry, figurines, decorative items, and more. Its malleable and lightweight properties make it easy to shape by hand or with simple tools. The finished pieces can have an appearance similar to ceramic, metal, or wood. When cured in a home oven, polymer clay does not require a kiln like natural clays. This makes it easy to work with in any home or studio.

Benefits of Polymer Clay for Jewelry
Polymer clay offers many benefits that make it an ideal material for handcrafting jewelry pieces. Some of the main advantages of using polymer clay include:
Lightweight – Polymer clay is very lightweight even after baking, so jewelry made from it is comfortable to wear and not heavy on necklaces or earrings.
Versatile – The clay can be shaped, sculpted, molded, textured, and combined with other materials. This allows endless creative possibilities for unique jewelry designs.
Easy to Work With – Polymer clay is soft and malleable, which makes it easy to form into desired shapes by hand. It doesn’t require specialized tools or skills.
Durability – Once baked, polymer clay hardens into a strong, durable plastic that will last for years. Pieces don’t chip or fade easily.
Affordable – Basic polymer clay products and materials are inexpensive, especially compared to precious metals and gems. This allows jewelry makers to create inexpensive accessories.
Tools and Supplies Needed
To make polymer clay earrings, you’ll need some basic tools and supplies. Here are the main items you’ll want to have on hand:
- Oven – All polymer clay must be baked to cure and harden. You’ll need an oven, toaster oven, or countertop oven to bake your clay creations. Temperatures between 275°F and 300°F are ideal.
- Pasta machine or acrylic roller – These tools help roll out the clay evenly and get it to an even, workable thickness. Pasta machines allow you to get very thin and consistent sheets of clay.
- Clay cutters – Cutters in various shapes and sizes help cut uniform polymer clay pieces for earrings and jewelry. Some common cutter shapes are circles, squares, hearts, stars, etc (Amazon).
- Liquid polymer clay – Used to glue clay pieces together and seal jewelry findings. It’s an essential adhesive for polymer clay work.
- Jewelry findings – Earring hooks, posts, and other findings to attach your clay pieces when assembling the final earrings.
Other helpful tools include clay sculpting tools, texture sheets or stamps, a work surface like glass or ceramic, and natural bristle paintbrushes. Collecting the right supplies upfront makes polymer clay earring making much easier.(Temu)
Choosing Colors and Patterns
One of the best parts of working with polymer clay is all the options for creating beautiful colors and patterns. Here are some tips for choosing eye-catching color palettes and making patterned clay:
Mixing Colors: You can blend polymer clay colors together to create completely custom hues. Try mixing a little bit of two colors at a time until you achieve the perfect shade. Popular color combinations include blue and green, red and yellow, and purple and pink. The color possibilities are endless!
Color Blocking: For a bold look, form chunks of contrasting colors of clay and press them together. Once baked, the different blocks of color will remain distinct and make a statement.
Marbling: Roll contrasting colors into logs or balls. Mash them together, being careful not to overmix, so the colors create a marbled pattern. Cut slices to reveal the swirled interior.
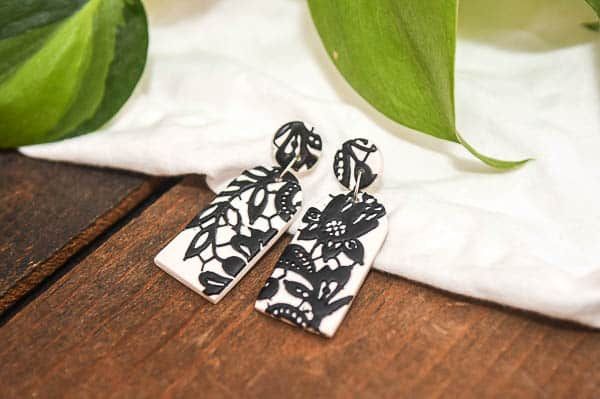
Using Molds: Press polymer clay into silicone molds to easily imprint patterns. Try geometric shapes, flowers, leaves, lace, or any design you like. If the mold is deep, you can also layer colors for a multi-dimensional effect.
Blending: To smoothly transition between colors, roll them out into thin sheets. Overlap the sheets slightly and gently blend with your fingers. The colors will fuse for a ombré effect.
Sculpting and Shaping the Clay
One of the keys to working with polymer clay is properly conditioning it before sculpting. Conditioning involves kneading and rolling the clay to make it soft and pliable. Start by taking a lump of clay and kneading it vigorously with your hands. Flatten it out into a slab using an acrylic roller or pasta machine. The clay should be rolled out to an even 1/4-1/8 inch thickness for earring components.
To cut out basic earring shapes, use cookie cutters, clay cutters, or a blade. Some helpful tools include round cutters, heart cutters, star cutters, and square or rectangle cutters (Source). Cut out the base shapes from the slab of conditioned clay.
For more unique sculpted earrings, use clay molding tools. Ball styluses, loop tools, and clay shapers help sculpt the clay by indenting, smoothing, and shaping as desired. Silicon earring molds can also quickly produce earring forms with designs. Let the clay fully set in the molds before removing (Source). With these techniques, polymer clay can be shaped into diverse earring forms both simple and elaborate.
Texturing and Embellishing
One of the best parts of working with polymer clay is all the options for adding texture, dimension, and embellishments to your pieces. There are many simple techniques to give your earrings visual interest.
You can use clay tools to impress patterns into the clay. Clay shapers, silicone tools, rubber stamps, and texture sheets work great for this. Roll the clay out and use the tools to create designs like dots, lines, squiggles, etc. You can also use cookie cutters or stencils to cut out shapes from patterned clay.
Liquid polymer clays like Diluent, Sculpey Glaze, and Fimo Liquid Decorating Gel are perfect for drizzling on top of baked polymer clay to add glossy effects. Mica powders and eye shadow can also be mixed with liquid clay or applied dry for a shimmery look.
Don’t be afraid to apply rubber stamps directly onto cured clay pieces. Use acrylic paint to coat the stamps before pressing them into the clay. This leaves a detailed impression behind. Stamparound glue works too for a temporary stick.
To add dimensional details, attach beads, sequins, charms, ribbons, chains, and other embellishments with liquid clay or strong glue like E6000. Make sure any non-clay items are also rated for the oven temperature you use to cure the clay.
Texturing the clay while shaping adds interest, and there are limitless ways to embellish polymer clay to make your earrings truly unique. Get creative with patterns, textures, and dimensional details!
Baking Instructions
Proper baking is crucial for curing the polymer clay and ensuring finished earrings are durable. When learning how to make polymer clay earrings, avoid using a microwave as it can cause uneven heating and bubbles in the clay according to Treasurie blog.
Most brands recommend baking polymer clay at 130°C/275°F for 15-30 minutes per 6mm of thickness as noted by Wearably Weird. Thinner pieces will require less time such as earring backs while larger pendants may need longer. Let the clay cool completely before handling. Baking for too long or at too high of a temperature can cause discoloration or scorching.
Work on a protected baking surface and avoid direct contact between the clay and metal pans. The clay may be baked on a ceramic tile, glass, or wrapped in aluminum foil. Placing the pieces on a layer of cornstarch can allow them to be moved after baking without sticking. Always follow the manufacturer’s instructions for proper baking times and temperatures.
Applying Findings
The final step in creating polymer clay earrings is attaching the necessary findings that will allow the earrings to be worn. There are a few common options for attaching findings:
- Eye pins – These are pins with a loop on one end that can slide through a hole in the clay. The loop allows you to attach a jump ring, allowing the earring to dangle freely.
- Earring hooks – These have a wire that gets embedded in the clay and a hook that goes through the ear lobe. Insert the wire end into the clay before baking.
- Posts – Like earring hooks, these have a post end that gets inserted in the clay and a butterfly or other backing that holds the earring on the ear.
- Gluing on clasps – You can glue on lobster clasps, jump rings, and other findings after baking using a strong two-part epoxy resin glue formulated for gluing metal to polymer clay.
According to an article on Reasons for the Seasons, when attaching findings to polymer clay earrings, make sure to “[insert] the finding’s post into the raw clay as far as possible” and to “bake the clay according to the manufacturer’s instructions.” Allowing the posts or wires to bake into the clay creates a strong bond.1
Finishing Touches
Once the polymer clay earrings are baked and cooled, there are a few finishing touches that can enhance their look and durability. An important first step is sanding the earrings using very fine grit sandpaper or sanding sponges to smooth any rough edges and create a uniform surface (source). Start with a coarse grit like 220 and work up to 600 or higher for a smooth finish. Sand evenly and thoroughly to prepare the surface.
After sanding, buffing with a soft cloth will restore shine and luster. A buffing wheel or machine can also be used for a more professional buff. Next, a liquid polymer clay gloss like Sculpey Glaze or Fimo Varnish can be brushed on to seal and protect the earrings. Allow the gloss to fully cure as per package directions. Multiple thin coats are better than one thick coat. Other options like UV resin or polyurethane can also be used to seal and add sheen.
If desired, additional embellishments like glitter, mica powders, or metal leaf can be applied over the gloss for extra dazzle. Let the sealant cure fully before wearing or handling the finished polymer clay earrings.


