Is There Colored Air Dry Clay?
What is Air Dry Clay?
Air dry clay is a modeling material made primarily from clay and a non-toxic additive such as paper pulp or glue. Unlike traditional clays that require firing in a kiln, air dry clays cure through evaporation. As the water evaporates, the clay particles bond together to harden the clay. This makes air dry clay an accessible and beginner-friendly clay medium. Air dry clays are lightweight, easy to work with, and do not require baking or specialized tools.
There are several common types of air dry clays:
- Paperclay – clay blended with cellulose fiber from recycled paper
- Cellulose clay – clay mixed with wood pulp or sawdust
- Foam clay – clay blended with foam beads
- Starch clay – clay mixed with corn starch
Air dry clays are versatile and can be used to create a variety of crafts and sculptures. They continue to gain popularity among crafters and artists for their convenience and accessibility.
Advantages of Air Dry Clay
Some of the main advantages of using air dry clay are that it is lightweight and portable compared to ceramics that require firing in a kiln[1]. Air dry clays do not require baking or firing to harden and cure. The clay will dry and harden at room temperature by simply leaving it exposed to air[2]. This makes air dry clay very convenient to use without the need for any special equipment. Additionally, working with air dry clay tends to be low mess as it only requires water for softening, not other liquids that can stain like glazes or paints. The clay hardens when the water evaporates so there is less cleanup.
Overall, air dry clay is an accessible, portable modeling material that is easy to work with and doesn’t require extensive time, equipment or cleanup like firing ceramic pieces in a kiln. It’s lightweight properties and air drying mechanism provide key advantages over other clay types.
Disadvantages of Air Dry Clay
While air dry clay is affordable and easy to use, it does have some drawbacks to be aware of. One of the main disadvantages is that air dry clay can break or crack easily if parts are too thin[1]. The clay remains fragile even when dry, so care must be taken when handling finished pieces.
Air dry clay also has a limited working time. Once exposed to air, the clay begins to harden and eventually cannot be reshaped or molded. Working quickly is necessary to fully form the clay before it dries.[2]
The drying time can feel painfully slow compared to clays that require firing. It may take 24-48 hours or more for air dry clay to fully cure and harden. Humidity and thickness of the clay can impact dry times.[1] Having patience is key when using this clay.
While the long dry time allows you to gradually finish a sculpted piece over multiple days, it also means you cannot quickly make and display a project. The slow dry time can be a frustrating disadvantage for those used to faster ceramic and polymer clays.
[1] https://theartofeducation.edu/2019/02/the-pros-and-cons-of-working-with-air-dry-clay/
[2] https://www.arttoart.net/air-dry-clay-vs-polymer-clay
Basic Air Dry Clay Ingredients
The main ingredients used in making air dry clay are:
- Water – The water acts as a binding agent and allows the clay to be molded before drying.[1]
- Glue – White glue like Elmer’s is commonly added to air dry clay recipes. The glue helps bind the ingredients together and adds strength and flexibility to the finished clay.[2]
- Clay powder – Ingredients like kaolin or bentonite clay provide plasticity and help the clay harden. These fine clay powders are essential for making high quality air dry clay.[3]
- Cellulose fiber – Natural cellulose from plant sources can be added to give clay extra strength. Materials like sawdust, paper, or wood pulp provide reinforcement.

By combining these basic ingredients, both store-bought and homemade air dry clay can be produced. The specific amounts and types used will determine the finished clay’s qualities.
[1] https://onelittleproject.com/how-to-make-clay/
[2] https://onelittleproject.com/how-to-make-clay/
[3] https://onelittleproject.com/how-to-make-clay/
Adding Color to Air Dry Clay
There are several ways to add color to air dry clay. The most popular and easy methods include:
1) Premixed colored clay varieties: Companies like Crayola and Craft Smart sell air dry clay that comes pre-colored. These allow kids and adults alike to skip the coloring step and start sculpting right away with vibrant colored clays like blue, purple, and green.
2) Painting baked pieces: After air dry clay has hardened, you can paint it with acrylic or tempera paints. Let the paint fully dry before handling. Acrylic paint will bond strongest with the clay. Paint pens and gel pens also work well for adding detail and color (Source).
3) Adding food coloring: Liquid food coloring can be kneaded directly into the raw clay to tint it. Start with just a drop or two, as the color will become more saturated the longer you knead. For light colors, brush the clay with water first so it absorbs the dye better (Source).
4) Mixing with acrylic paint: Acrylic paint is the most vivid and lightfast way to color air dry clay. Mix in a few drops of paint and knead it until smooth. Add more paint for darker shades. Let colored clay air dry 24 hours before baking (Source).
5) Coloring powdered clay before mixing: For homemade clay recipes, mix dry pigments like mica powder into the dry ingredients first. Then add water and knead as usual. This creates an evenly colored clay.
Types of Colored Air Dry Clays
There are several common types of colored air dry clays available:
Paperclay – This type of clay incorporates cellulose fiber from paper, which provides strength and flexibility when dry. Paperclay is very lightweight and can be painted after drying. Popular brands include Activa Paperclay and Makins Clay. https://www.activaproducts.com/air-dry-clay
Crayola Air Dry Clay – Crayola makes an affordable, non-toxic, colored air dry modeling clay for kids. It has a smooth, clay-like texture and comes in a variety of bright colors. The clay can be painted after drying with acrylic paints. https://www.crayola.com/products/diy/air-dry-clay/neon-clay-colors-assorted-shapes-10-pc/
Modeling Clay – This is an oil-based modeling clay that air dries to a solid finish which can be painted. Popular modeling clay brands include Das and Amaco. Adding liquid clay softener helps keep the clay workable. https://www.sculpey.com/collections/products-air-dry-clay
Oil and Chalk Based Clays – Some clays use mineral oil or linseed oil combined with whiting (calcium carbonate) or chalk as a base. These allow colors to be easily mixed and blended but can take weeks to fully dry. https://www.amazon.com/Dshengoo-Colors-Nature-Present-Children/dp/B07C591QR8
Tips for Working with Colored Clay
When working with colored air dry clay, follow these tips to get the best results:
Knead the clay thoroughly after adding color. This helps distribute the color evenly throughout the clay and avoids having streaks or blotches of concentrated color.
Work with small batches of colored clay at a time. This makes it easier to control the color consistency.
Store any leftover colored clay separately from plain clay. Keeping them separate prevents the plain clay from picking up some of the color over time.
Consider wearing disposable gloves when handling colored clay. The pigments can stain your hands.
Avoid over-handling the clay once you’ve achieved the desired color. Too much kneading after adding color can sometimes cause the color to become duller.
When mixing colors, start with small amounts until you get the hue you want. It’s easy to add more color, tricky to remove it.
Let colored pieces dry fully before painting or varnishing. This prevents any wet paint from mixing into the clay.
Hand wash finished colored clay pieces. Avoid soaking and harsh scrubbing that could remove color.
Best Uses for Colored Clay
Colored clay is extremely versatile and can be used for a wide variety of crafts and projects. Some of the best and most popular uses for colored air dry clay include:
Ornaments – From Christmas tree ornaments to decorative ornaments to hang around the home, colored clay is perfect for ornament making. Its lightweight nature makes it easy to hang. Clay ornaments can be made in any shape and decorated with paint, glitter, beads, and more.
Jewelry – Lightweight colored clay is an excellent material for making homemade jewelry such as beads, pendants, earrings, and more. The clay can be rolled, shaped, and textured before being painted or embellished. Pieces made of clay are durable and hold up well over time.
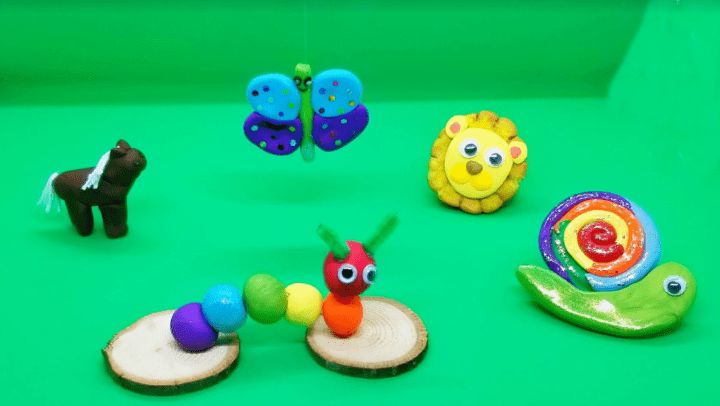
Figurines – Sculpting tiny animals, characters, plants, and objects out of colored clay is a fun hobby for both kids and adults. The lightweight clay is easy to sculpt by hand and holds fine details well after drying.
Decorative bowls – Small bowls made of colored clay make great decorative pieces around the home. The clay can be shaped into bowls, painted or glazed, and used to hold trinkets, candles, potpourri, candy, and more. Colored clay bowls add a handmade touch to any decor.
Overall, colored air dry clay is a very versatile material. Its bright colors and ability to be shaped, molded, and embellished make it perfect for endless DIY projects and crafts.
Storing and Preserving Finished Pieces
To ensure your finished colored air dry clay pieces last as long as possible, it’s important to store them properly after the clay has dried fully. Here are some tips for preserving your artwork:
Let pieces dry completely before painting or sealing. Air dry clay needs ample time to cure and harden fully before applying any finishes. Rushing the drying process can lead to cracking or weak spots in the clay.[1]
Seal pieces with an acrylic spray or polyurethane varnish. Applying a protective sealant creates a moisture- and water-resistant barrier. Acrylic and polyurethane sealers are durable options that won’t yellow over time.[2]
Avoid exposing pieces to humidity or moisture. Clay is porous and susceptible to absorbing ambient moisture. Storing pieces in an enclosed space with desiccant packs can help regulate humidity.
Display artwork out of direct sunlight. UV exposure can fade colors and damage the structural integrity of colored clay over time.
Fun Colored Clay Project Ideas
Colored air dry clay opens up a world of possibilities for fun DIY projects. Here are some of the most popular ideas to try:
Mini animal figurines – Creating miniature animal figurines out of colored clay allows you to make a whole zoo of critters. Let your imagination run wild sculpting elephants, giraffes, penguins, and more out of brightly colored clay.
Mosaic bowls – Roll pieces of colored clay into balls, discs, or cubes, then firmly press them onto the inside and outside of bowls to create beautiful mosaic designs. The colors and textures make each piece unique.
DIY fridge magnets – Make custom clay magnets for your fridge by sculpting your favorite shapes and characters. You can even spell out words with alphabet magnets.
Holiday ornaments – Ornaments made from colored clay make excellent holiday decor. Sculpt Christmas trees, dreidels, snowmen, snowflakes, and more. Get the whole family in on the fun!
With colored air dry clay, you’re limited only by your creativity. It’s an inexpensive, easy way to create endlessly unique DIY projects to decorate your home.


