25+ Cool Potting Bench Plans To Enjoy Gardening
As you work on your garden, have you ever found yourself struggling to keep everything organized? A potting bench can be a game-changer, providing a sturdy and compact workspace that keeps your gardening tools within reach. Not only does it save your back from the strain of bending over, but it also keeps all your supplies in one central location. In this article, we’ll guide you through the process of creating your own potting bench plans, tailored to fit your space and style.
Whether you’re a seasoned gardener or just starting out, having a dedicated workspace can transform your gardening experience. Before we dive into the details, let’s consider what makes a great potting bench. Assessing your space and choosing the right location are crucial steps in the process. You’ll also need to determine the size of your bench, select materials that offer both durability and aesthetics, and consider storage needs and accessories.
We’ll also cover the basic tools and materials you’ll need, as well as some safety equipment and precautions. Once you’ve got a solid plan in place, we’ll walk you through the step-by-step construction process for each of our four potting bench designs: classic, with built-in storage, mobile, and foldable. You’ll also find ideas for personalizing your bench, from adding hooks and shelves to incorporating a sink or water reservoir.
Finally, let’s not forget about maintenance and care for your new potting bench. With some simple tips and routines, you can keep your bench looking great and functioning smoothly for years to come. So why wait? Let’s get started on building the perfect workspace for your gardening needs.
Considerations Before Building Your Potting Bench
To create a functional and efficient potting bench, careful planning is paramount. It’s crucial to take into account several key factors before commencing construction. These include your specific gardening requirements, the layout of your workspace, and the dimensions of the area available for the bench. By considering these elements, you can design a potting bench that meets your needs and seamlessly integrates with its surroundings.
Assessing Your Space and Choosing the Right Location
When selecting the perfect location for your potting bench, start by evaluating the space you have available. Look for a spot that’s easily accessible and harmonizes with the rest of your garden. A well-chosen location will encourage you to use your potting bench more frequently. Aim for a position that provides partial shade to prevent direct sunlight from causing discomfort or drying out plants. Additionally, consider the wind factor – an area with some shelter is ideal.
Finally, think about accessibility: a spot close to the garden and at ground level will make it easy to move around and work efficiently. A flat surface is also crucial for your potting bench to function properly.
Determining the Size of the Potting Bench
When considering a workbench’s dimensions, it’s essential to strike a balance between functionality and spatial constraints. Take measurements of the area where the bench will reside, keeping in mind that you’ll need room to move around it comfortably. The size of your workbench will significantly impact your ability to complete tasks efficiently, as it determines how much you can accomplish at one time.
Ensure that the dimensions you choose allow for a comfortable working experience while also considering the overall footprint of the bench within your space.
Selecting Materials for Durability and Aesthetics
When selecting materials for your garden, durability and aesthetic appeal are crucial considerations. Wood is a top contender due to its natural charm and robust nature. Cedar and redwood, in particular, stand out for their resistance to rot, making them excellent choices for outdoor use. However, if wood isn’t your preference, there are alternative options like metal or recycled plastic that can also thrive in your garden.
Here’s a comprehensive breakdown of the material options:Wood boasts a natural appearance and durability, although it does require some maintenance. On the other hand, metal offers long-lasting performance but may rust over time. Plastic, meanwhile, provides low-maintenance upkeep, albeit potentially compromising on sturdiness. Regardless of which route you choose, each material has its unique strengths and weaknesses to consider.
Considering Storage Needs and Accessories
When designing your potting bench, consider what you want to store on it. Storage and accessories can make all the difference in keeping your workspace organized and efficient. Think about shelves or hooks for tools, as well as dedicated spaces for soil, pots, and any other supplies you use regularly. Some benches come with built-in features like sinks or bins that can be useful for storing and organizing materials.
By taking these factors into account, you’ll be able to create a potting bench that not only serves its purpose but also reflects your unique gardening style and needs.
Basic Tools and Materials Needed
To embark on a successful potting bench project, it’s crucial to prepare by collecting the required tools and materials. A well-stocked arsenal will facilitate a seamless building experience, while prioritizing safety is equally vital. Before commencing construction, be sure to don the necessary protective gear, ensuring your well-being throughout the process.
List of Tools Required for the Project
To build your potting bench, you’ll need to gather a set of essential tools. Here’s a comprehensive list to guide you through the process: A measuring tape is crucial for taking precise measurements of wood and other materials. You’ll also require a saw – either a handsaw or power saw – to accurately cut wood to the desired sizes. For driving screws, have a screwdriver at your disposal. Alternatively, use a power drill with a screwdriver bit to speed up the process.
A hammer comes in handy for nailing parts together if necessary. To ensure that angles are accurate and all components are properly aligned, don’t forget to include a square. Sandpaper or a sander is vital for smoothing out rough edges on wood, preventing splinters and creating a smooth surface. A drill with various bits is necessary for making pilot holes for screws, which helps prevent the wood from splitting.
Lastly, have a wrench on hand to tighten any bolts or nuts used in the construction process.
Materials List with Quantities and Measurements
When it comes to building a potting bench, the materials you’ll need will depend on the specific design and size of your project. While the list below provides a general outline, be prepared to adjust it based on your unique plan. Here’s what you can expect:
Wood planks – the quantity and measurements will vary depending on your design; refer to your chosen potting bench plans for exact specifications.
Screws – as with the wood planks, the quantity will depend on your design and size requirements.
Nails – if you prefer to use nails over screws, be prepared to have a supply on hand.
Wood glue – this is an optional component, but having it on hand can ensure extra hold; one bottle should suffice.
Finish or sealant – another optional component, this will help protect the wood from the elements; a single can should cover your needs.
Remember to consult your chosen potting bench plans for exact quantities and measurements, as these will vary depending on the specifics of your project.
Safety Equipment and Precautions
When embarking on any DIY project, it’s crucial to prioritize safety above all else.
To ensure a risk-free experience, make sure to have these essential safety gears on hand:
Safety goggles – a must-have for protecting your eyes from dust and debris;
Work gloves – vital for shielding your hands from splinters and cuts;
Ear protection – a necessity when operating loud power tools;
Dust mask – crucial for avoiding the inhalation of sawdust, particularly during sanding operations;
Sturdy footwear – essential for safeguarding your feet from any falling objects.
In addition to equipping yourself with these safety essentials, maintain a well-lit and clutter-free work area to minimize the likelihood of accidents. Remember to always keep tools unplugged when not in use and never leave sharp tools within reach of children. By being prepared with the right tools, materials, and safety precautions, you’ll be well-equipped to tackle your potting bench project with confidence.
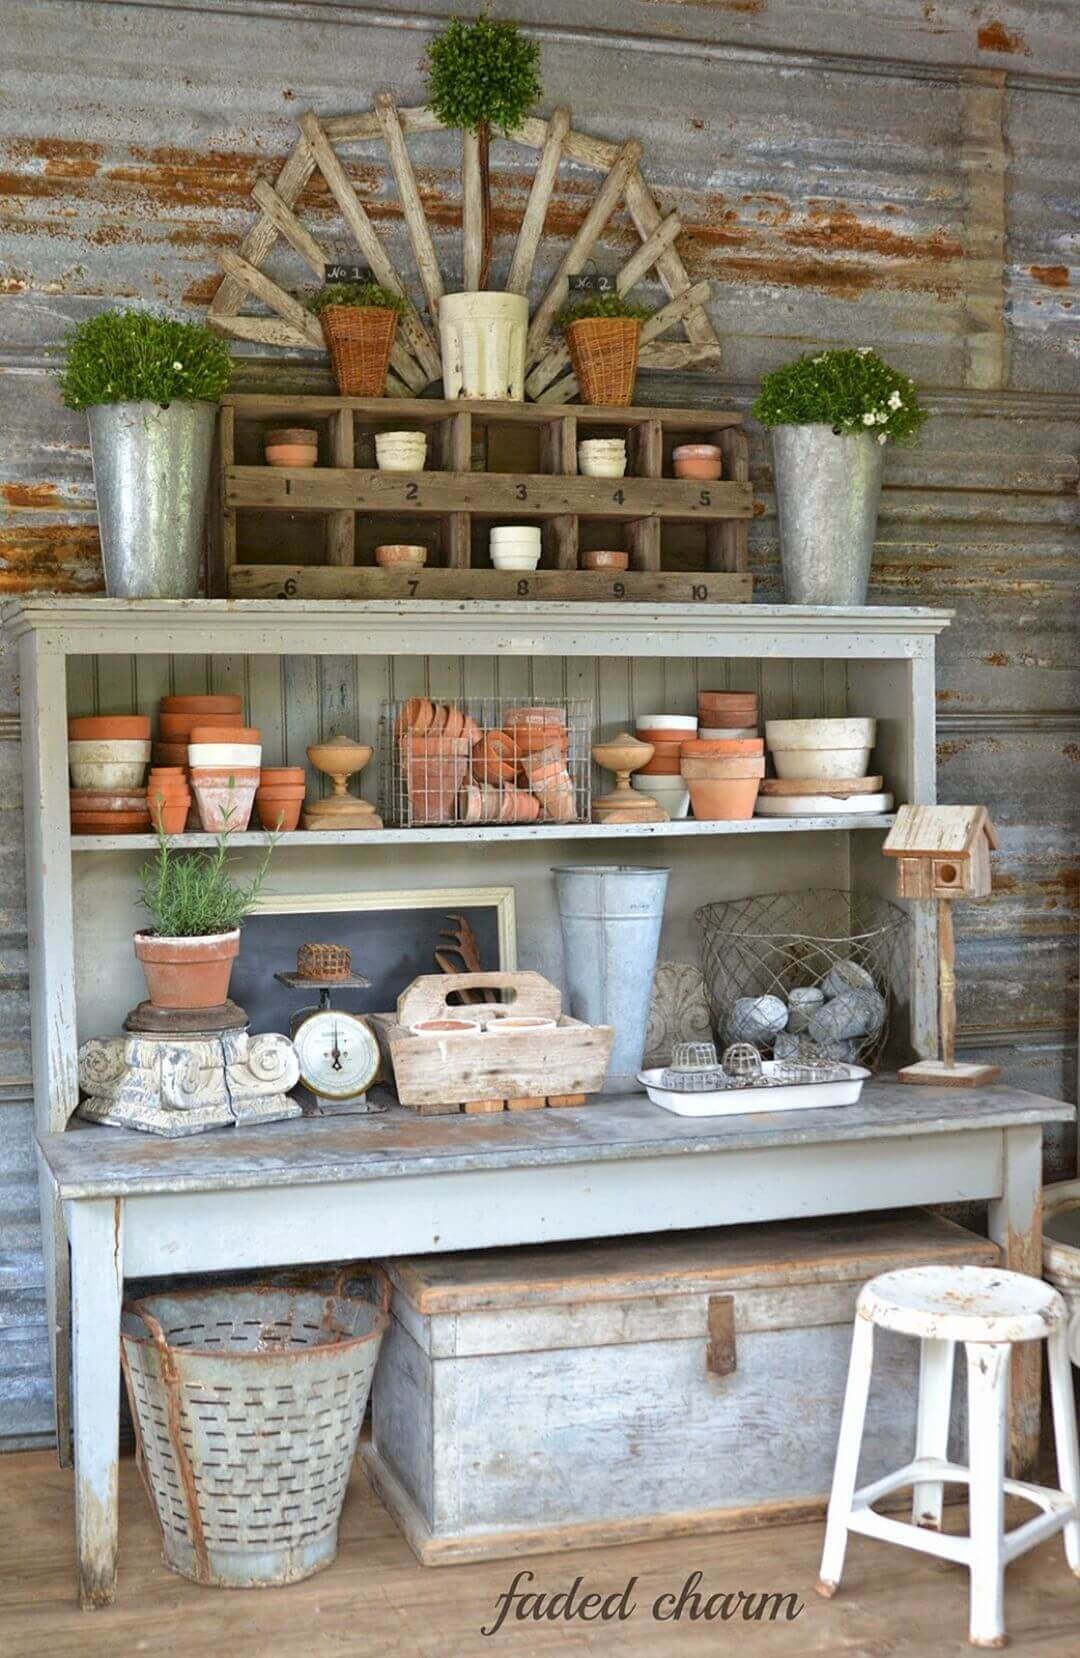
Potting Bench Design Plans
Building a custom potting bench for your garden can be a fun and fulfilling DIY adventure. To help you get started, we’ll walk you through the construction of a timeless classic design, including detailed measurements and a straightforward, easy-to-follow guide.
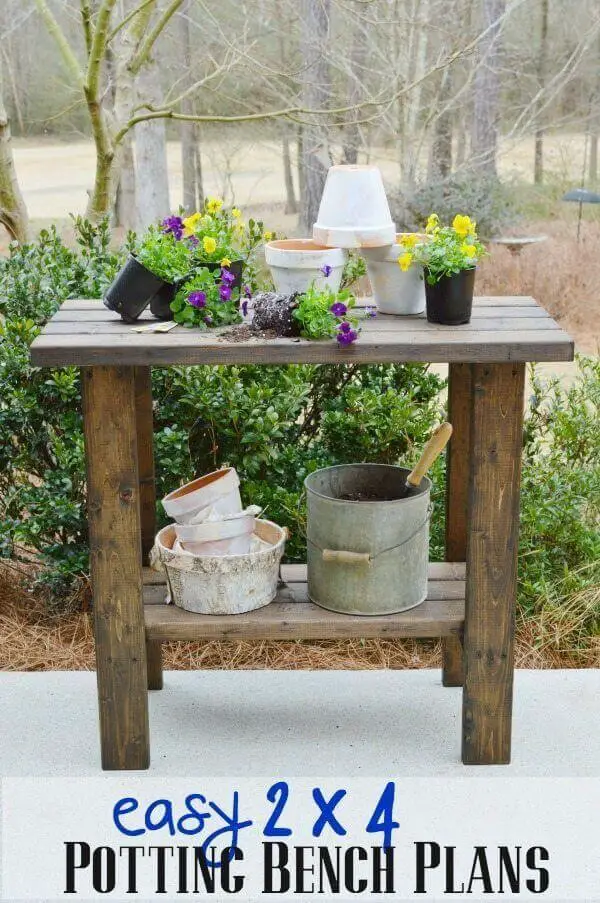
Classic Potting Bench Design
To bring your vision to life, start by planning the dimensions of your potting bench. The components include Legs (42×4 in. x 34 in.), Top Frame Long Sides (22×4 in. x 48 in.), Top Frame Short Sides (22×4 in. x 22 in.), Top Boards (51×6 in. x 48 in.), Bottom Shelf Frame Long Sides (22×4 in. x 44 in.), Bottom Shelf Frame Short Sides (22×4 in. x 22 in.), Bottom Shelf Boards (51×6 in. x 44 in.), and Backsplash Boards (31×4 in. x 48 in.).
Feel free to adjust these dimensions to suit your personal preferences or space requirements. Next, follow this step-by-step construction process: Begin by preparing the Legs – cut four legs from 2×4 lumber at 34 inches in length. Then, assemble the Top Frame by cutting two long sides and two short sides, laying out the 2x4s to form a rectangle, and securing the corners with screws.
After that, attach the Top Boards by cutting them to length, placing them on the frame, and screwing them from above, spacing them evenly. Construct the Bottom Shelf Frame by cutting two long sides and two short sides, similar to the top frame, and assemble it with screws. Add the Bottom Shelf Boards by cutting them to length and securing them to the bottom shelf frame with screws, spaced evenly.
Stand the legs upright, screw the top frame to the top of the legs, ensuring the top is level and the legs are square to the frame. Attach the bottom shelf frame between the legs at the desired height. Finally, install the Backsplash by cutting the backsplash boards to length and attaching them vertically to the back edge of the top frame for keeping soil and debris from falling off the back.
Complete the project by sanding all surfaces to remove splinters and rough edges, and applying a finish or sealant to protect the wood from the elements. Once you’ve completed these steps, your classic potting bench will be ready for use.
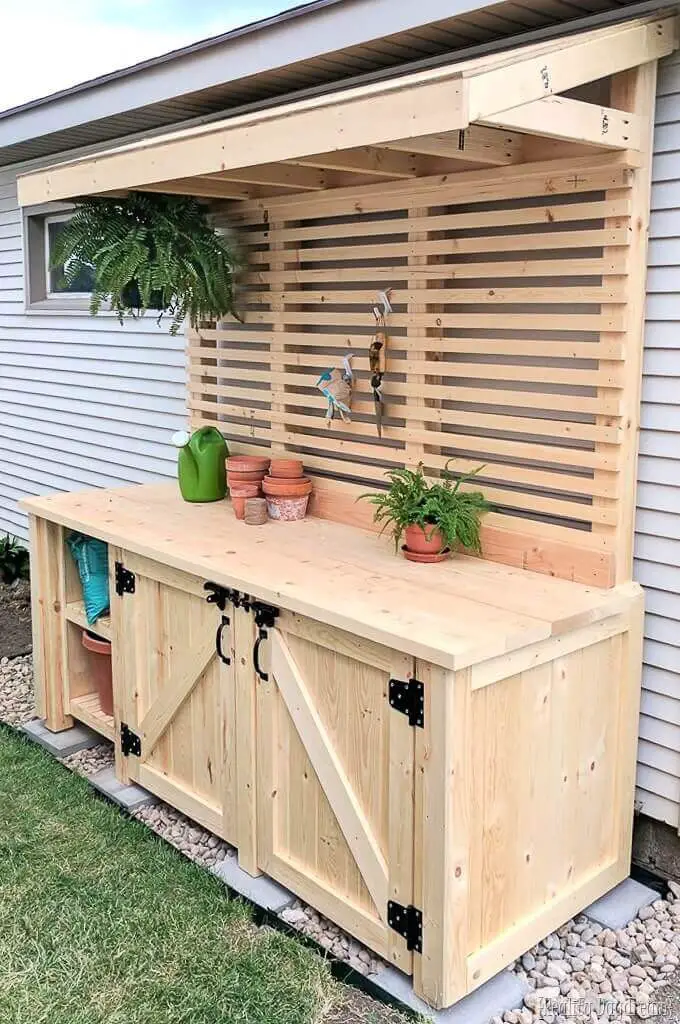
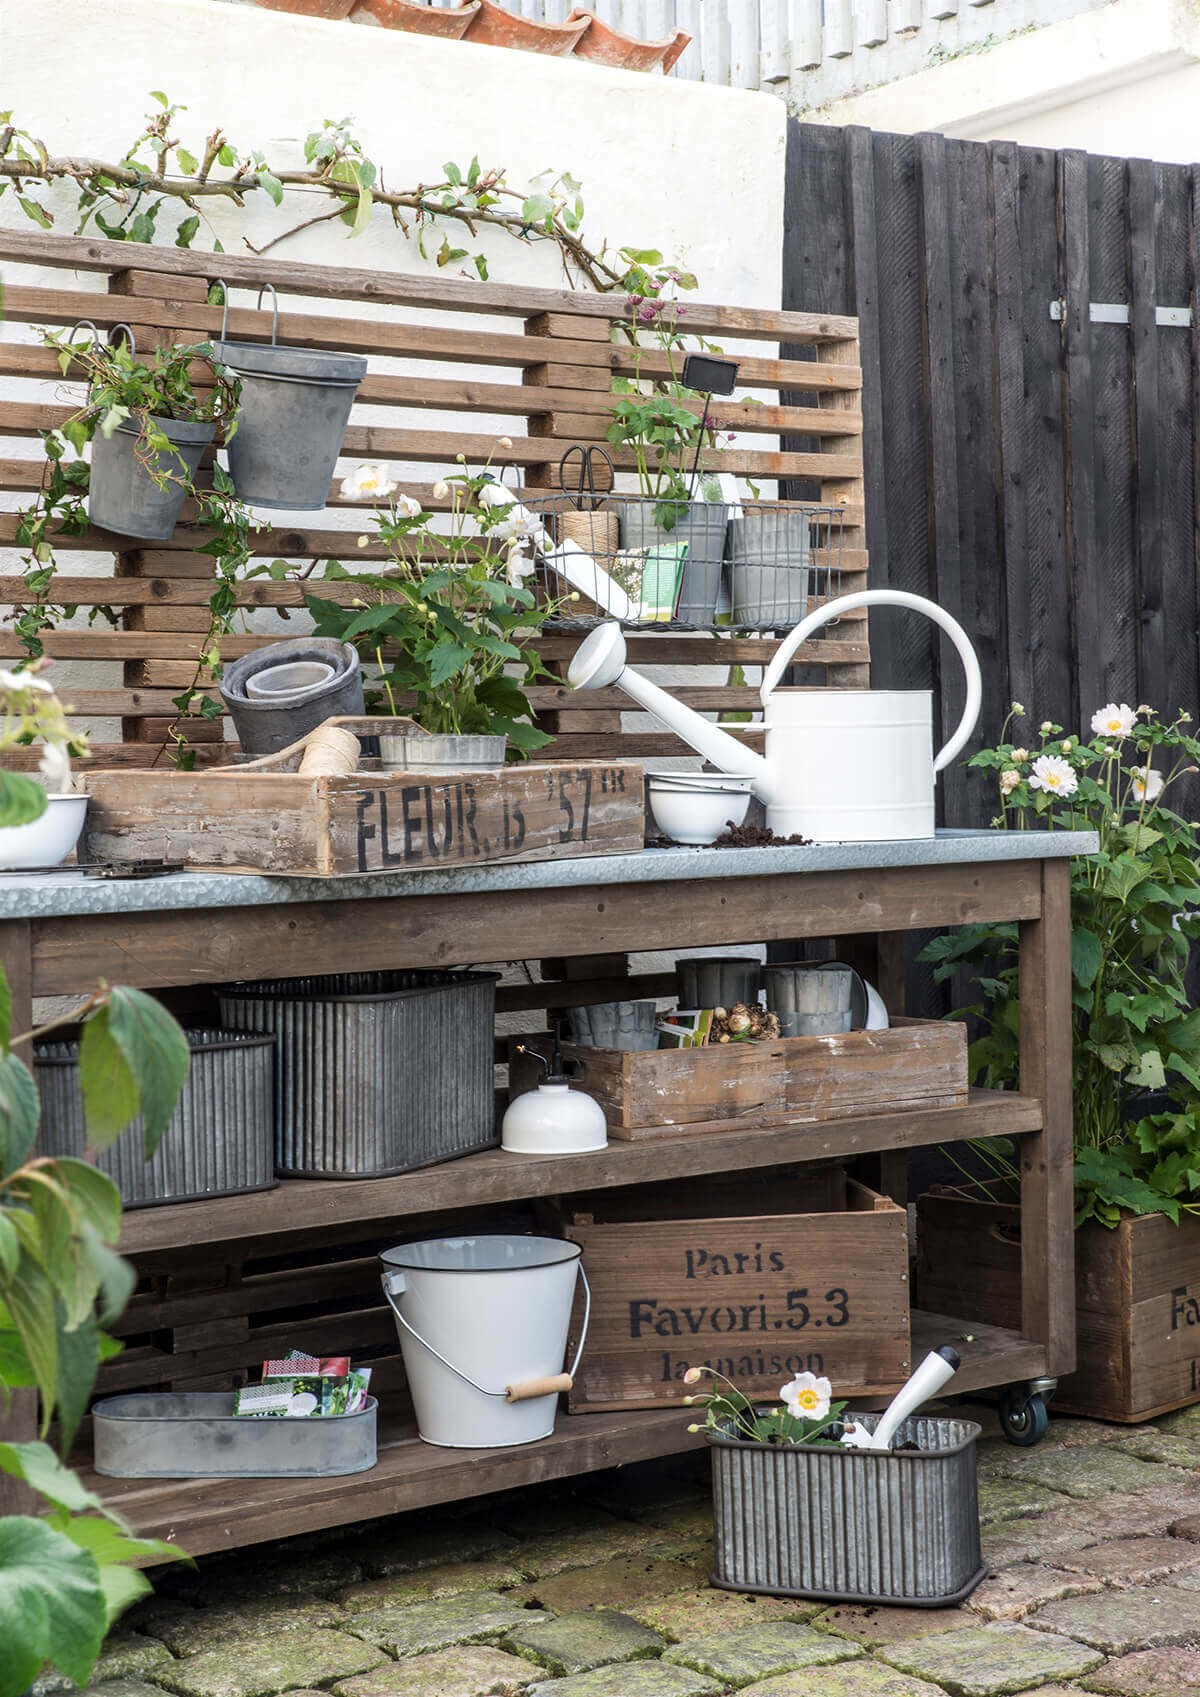
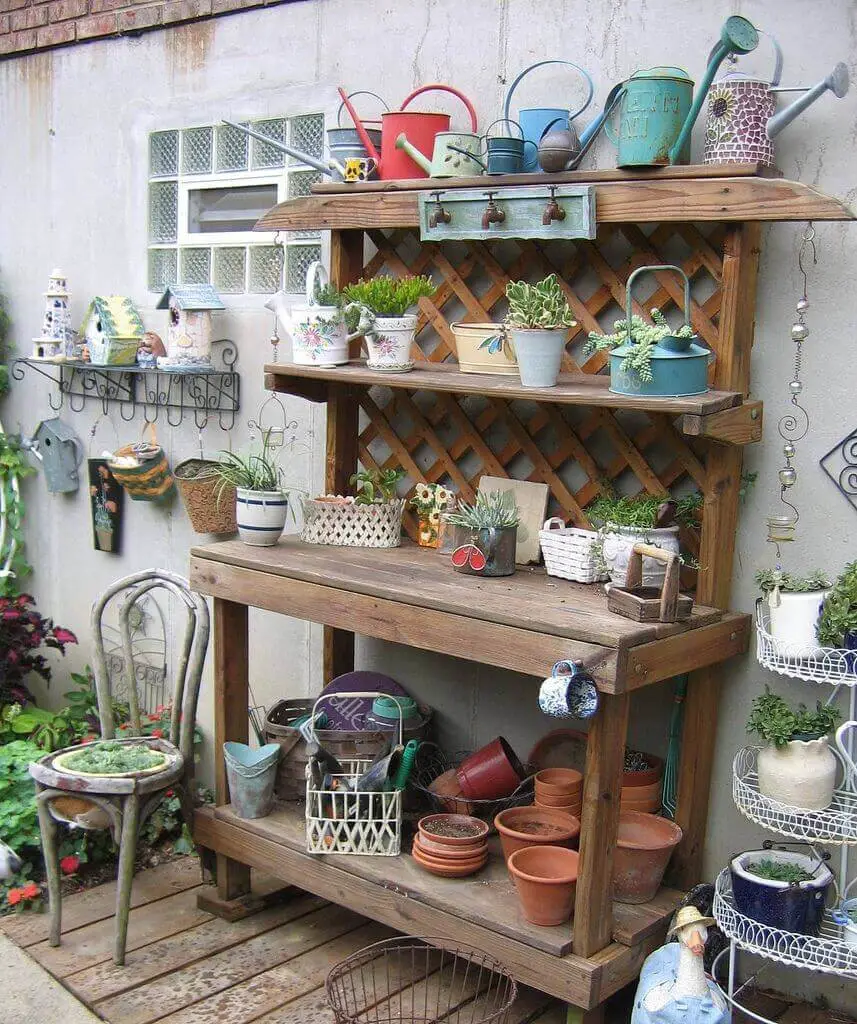
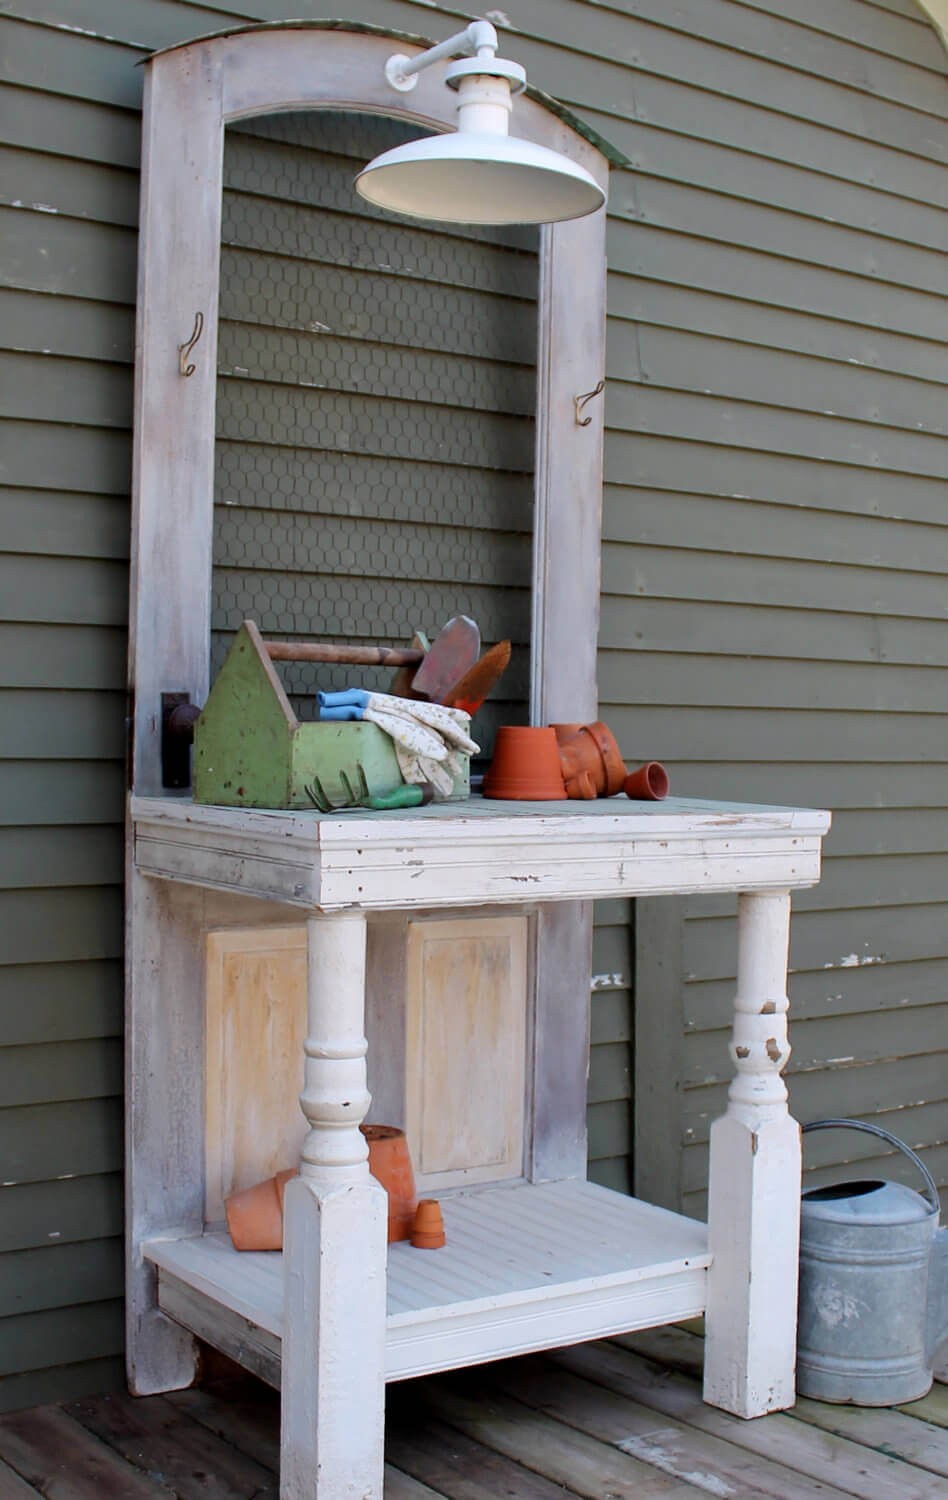
Potting Bench with Built-in Storage
A well-designed potting bench with built-in storage not only simplifies the gardening process but also provides a multitude of benefits. Not only does it offer a practical work surface for potting and planting, but it also incorporates thoughtful compartments and spaces to keep your essential tools, pots, soil, and fertilizers neatly organized and within easy reach.
Design Features and Benefits
With an integrated shelving system, you can efficiently store small pots, gardening tools, and other essentials. Additionally, enclosed cabinets or drawers safeguard your valuable supplies from the elements while keeping them neatly organized. The inclusion of hooks and side bars allows for easy access to frequently used tools like trowels, pruners, and gloves. A spacious worktop provides ample surface area for potting plants, featuring a durable and easy-to-clean finish.
To further enhance functionality, an optional sink or soil bin can be incorporated, enabling you to wash tools or hands, as well as keep potting mix within reach. Overall, these features converge to create a multifunctional space that streamlines your gardening experience by keeping everything you need readily accessible, ultimately saving time and effort.
Construction Guide with Illustrations
To build a sturdy and functional potting bench, start by constructing the frame using 2×4 lumber. Ensure the legs and supports are square and securely fastened with screws to provide a solid base for your worktop and shelves. Next, attach a plywood board cut to size on top of the frame, followed by a layer of slats or a solid piece of lumber for the worktop. If you’re incorporating a sink or soil bin, don’t forget to cut the appropriate-sized hole in the worktop before attaching it to the frame.
Once the worktop is installed, add horizontal supports within the frame where shelves or drawers will be located. Construct drawers or cabinet doors as needed and install them with the appropriate hardware. You can also add hooks directly onto the frame or onto a piece of wood that’s then attached to the frame. Install side bars by attaching vertical pieces of wood to the outside of the legs and adding dowels or metal bars across them.
Finally, sand all wooden surfaces to prevent splinters and apply a protective finish to withstand weather conditions. You can also add additional features like wheels for mobility or a towel rack for convenience. Keep in mind that this text-based format doesn’t include illustrations, but you can find many detailed potting bench plans with visual aids online or in woodworking books that will guide you through the construction process.
Mobile Potting Bench Design
Elevate your gardening experience with a mobile potting bench that offers unparalleled flexibility. This innovative solution allows you to seamlessly relocate your workspace to suit changing conditions, such as shifting sunlight patterns or working directly adjacent to specific garden beds. Whether you’re looking to revamp your outdoor layout or take advantage of optimal growing conditions, this portable work surface empowers you to adapt and thrive with ease.
Advantages of Mobility
A potting bench that can be easily moved around the yard offers unparalleled versatility, allowing you to place it in the perfect spot regardless of the weather or time of year. Whether you’re seeking shade on a hot summer day or want to get closer to your garden during planting season, this type of bench provides the flexibility to adapt to your needs.
Not only does its mobility enable you to relocate it for cleaning, reorganizing, or storage, but it also allows you to adjust to changing light conditions, weather patterns, and garden layouts without having to worry about heavy lifting or disassembly. When not in use, the bench can be rolled away, maximizing your outdoor living space and leaving room to breathe.
The added layer of functionality that comes with a mobile potting bench makes it a top choice for gardeners who value flexibility, convenience, and efficiency.
Blueprint and Assembly Instructions
To build a sturdy mobile potting bench, start by constructing the frame using 2×4 lumber. Ensure it’s square and solid, then add horizontal braces at the bottom for extra stability. Next, cut a piece of plywood or thick lumber to size for the worktop and secure it to the top of the frame. For storage, attach a lower shelf made from slats or plywood for heavy bags of soil or pots.
To make the bench mobile, choose heavy-duty caster wheels with locking mechanisms and attach them to each corner of the bottom frame. Make sure they’re tightly fastened and the bench remains level. Add some practical features like hooks on the side for hanging tools, a small drawer or toolbox, or even a fabric storage pouch. Finally, assemble all parts securely, sand down any rough edges, and apply a weather-resistant finish to protect the wood.
Test the mobility of the bench to ensure it rolls smoothly and locks in place. With these steps, you’ll create a functional mobile potting bench that can be easily moved around your garden or patio, enhancing your gardening experience with its practical design.
Foldable Potting Bench for Small Spaces
For those with limited outdoor space, a collapsible potting station offers a clever compromise between functionality and portability. By marrying the features of a comprehensive gardening work surface with a compact, foldable design, this innovative solution enables gardeners to create a dedicated workspace without sacrificing precious square footage.
Space-Saving Features
The compact design of this foldable potting bench is ideal for small patios, balconies, or storage sheds, as it requires minimal space when folded. When in use, the fold-down work surface provides a sturdy area for potting and other gardening tasks. Once finished, the work surface folds away to free up valuable space. The hanging wall mount feature allows users to double the bench’s functionality by mounting it on a wall, effectively turning it into a shelf or storage unit when not in use.
Additionally, the lightweight construction makes it easy to maneuver and store without requiring any heavy lifting efforts. Overall, these thoughtful features make this foldable potting bench an intelligent choice for those seeking to optimize their outdoor living space while still enjoying the benefits of a dedicated area for gardening pursuits.
Detailed Folding Mechanism and Build Steps
To create a versatile and space-saving potting bench, begin by constructing a rectangular frame using 2×4 lumber. Next, attach two legs to one side of the frame using hinges, allowing them to fold under the work surface when not in use. The work surface itself should be a piece of plywood or lumber that fits within the frame, secured with hinges and ensuring a smooth finish.
To ensure stability and ease of use, install a sturdy French cleat or equivalent mounting system on the wall where the bench will be located. Attach the corresponding piece to the back of the potting bench frame, providing a secure and level foundation. For added support and functionality, attach a wooden brace or metal bracket to the underside of the work surface with a hinge.
This will swing out to support the work surface when in use and fold flat against the underside when not needed, allowing for seamless transition between folding and extended modes. Upon assembly, double-check that all hinges and supports are securely attached and operate smoothly. Sand all edges and apply a protective finish to the wood to ensure durability and longevity.
Finally, mount the bench on the wall using the French cleat or mounting system, ensuring it is level and secure before testing the folding mechanism. This should allow for effortless extension and retraction of the work surface and legs, providing a convenient and functional potting experience in smaller areas.
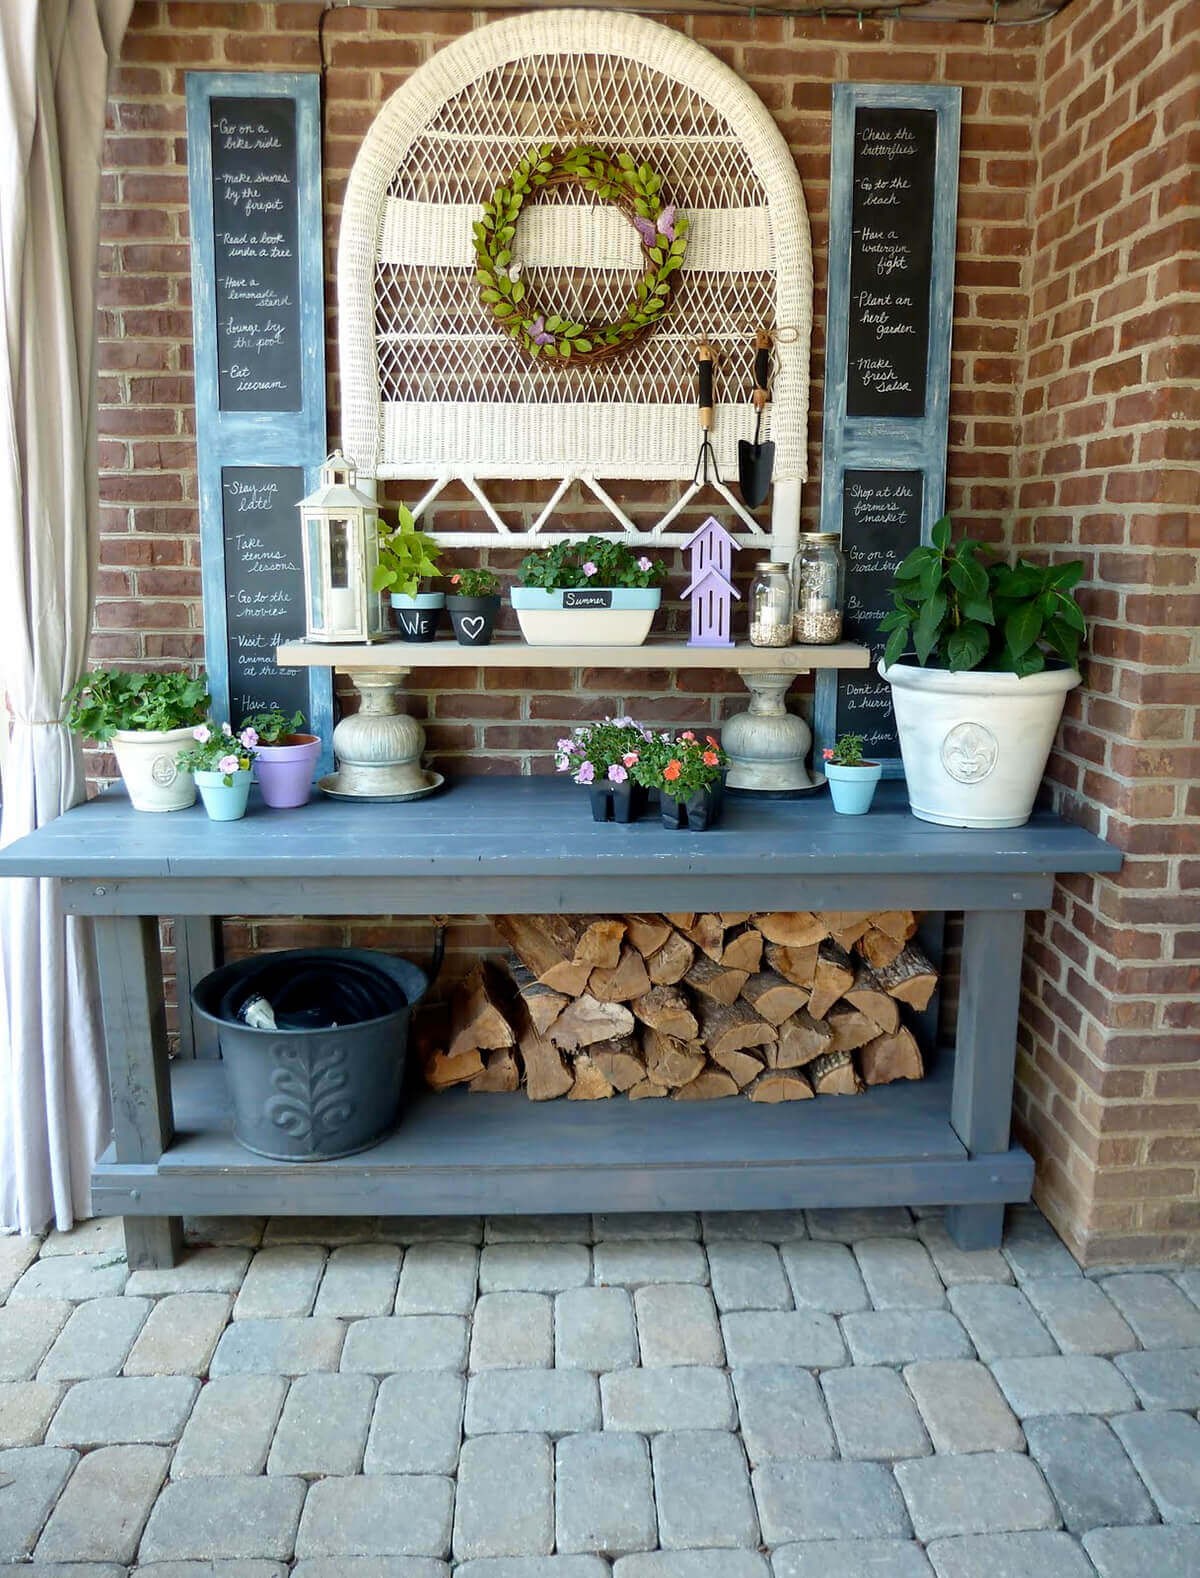
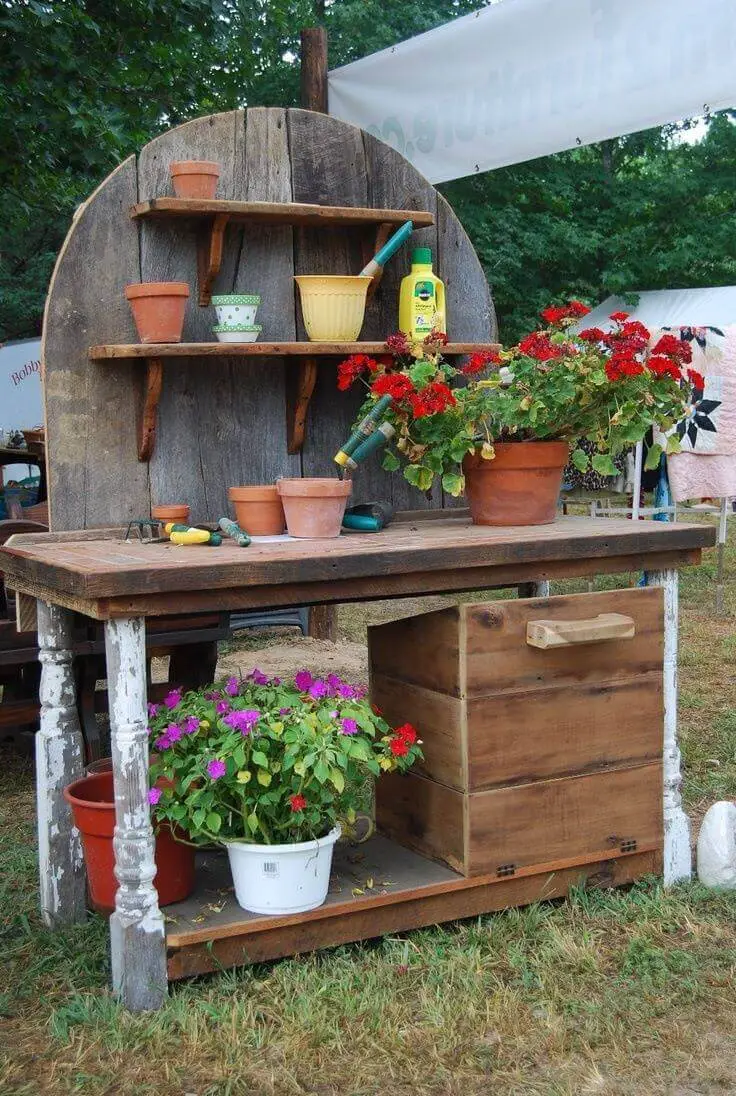
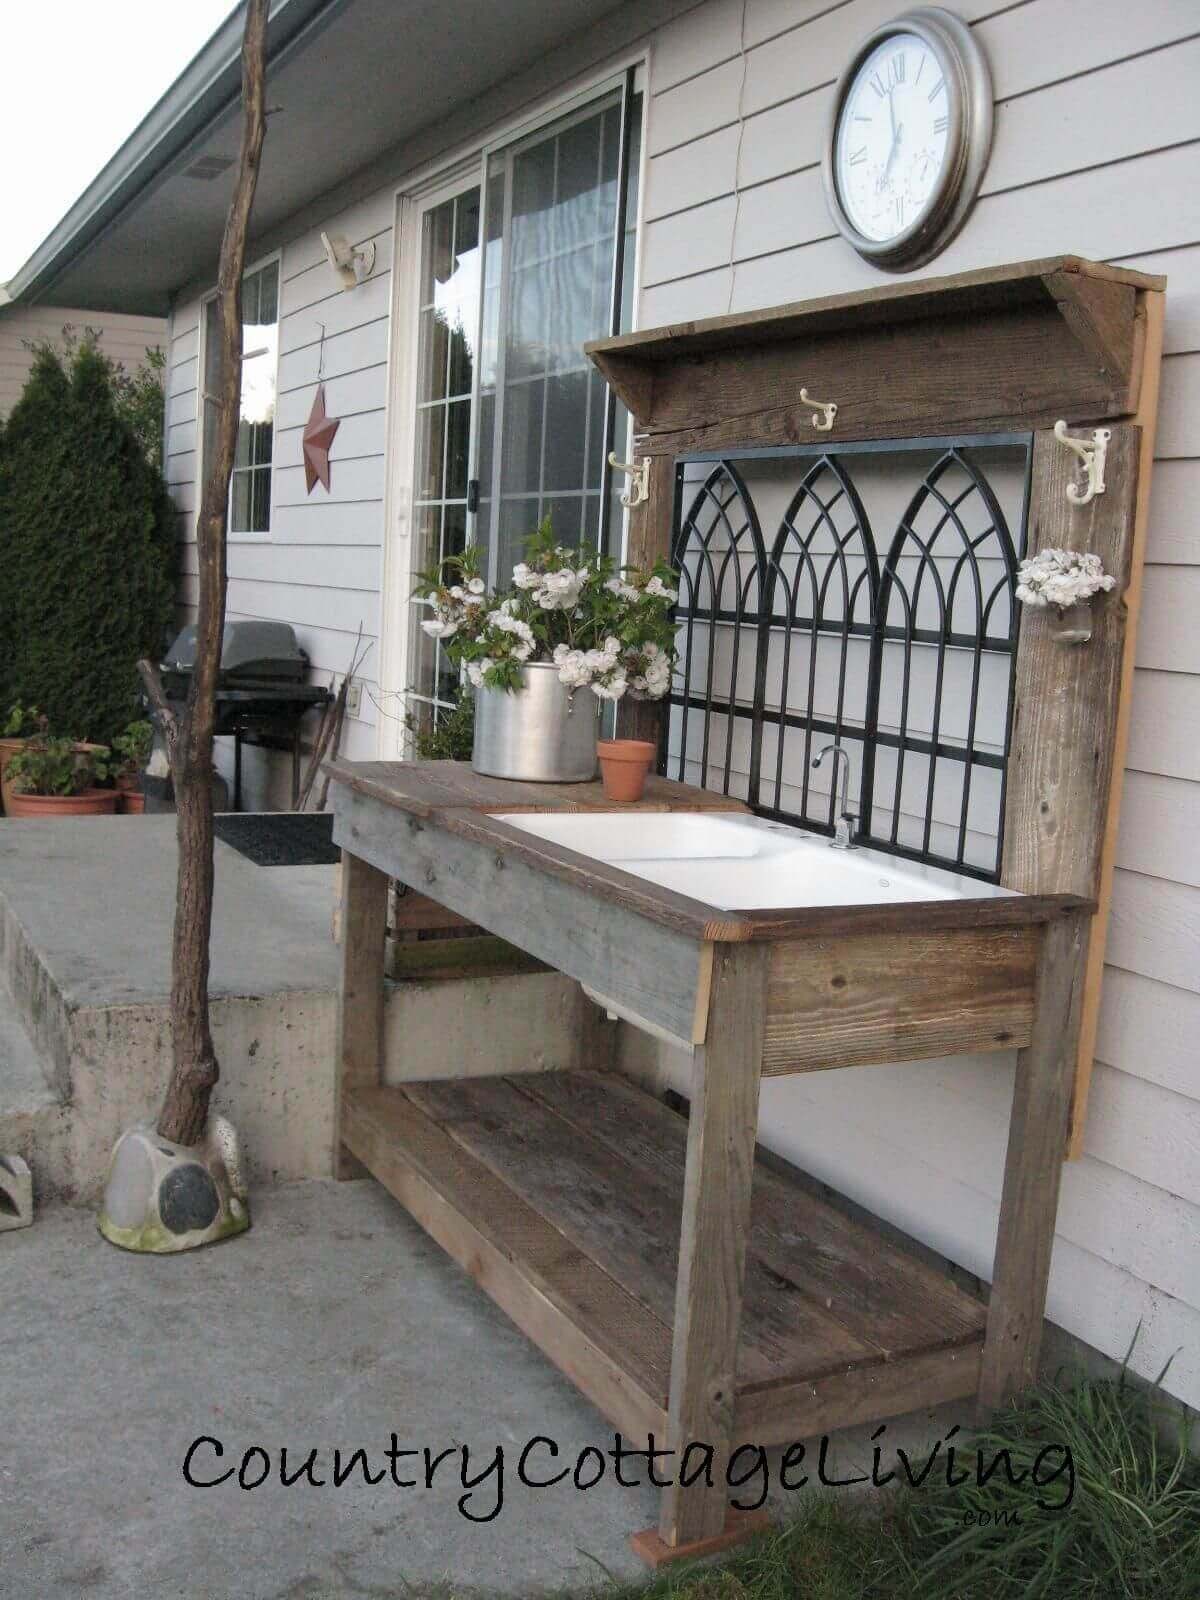
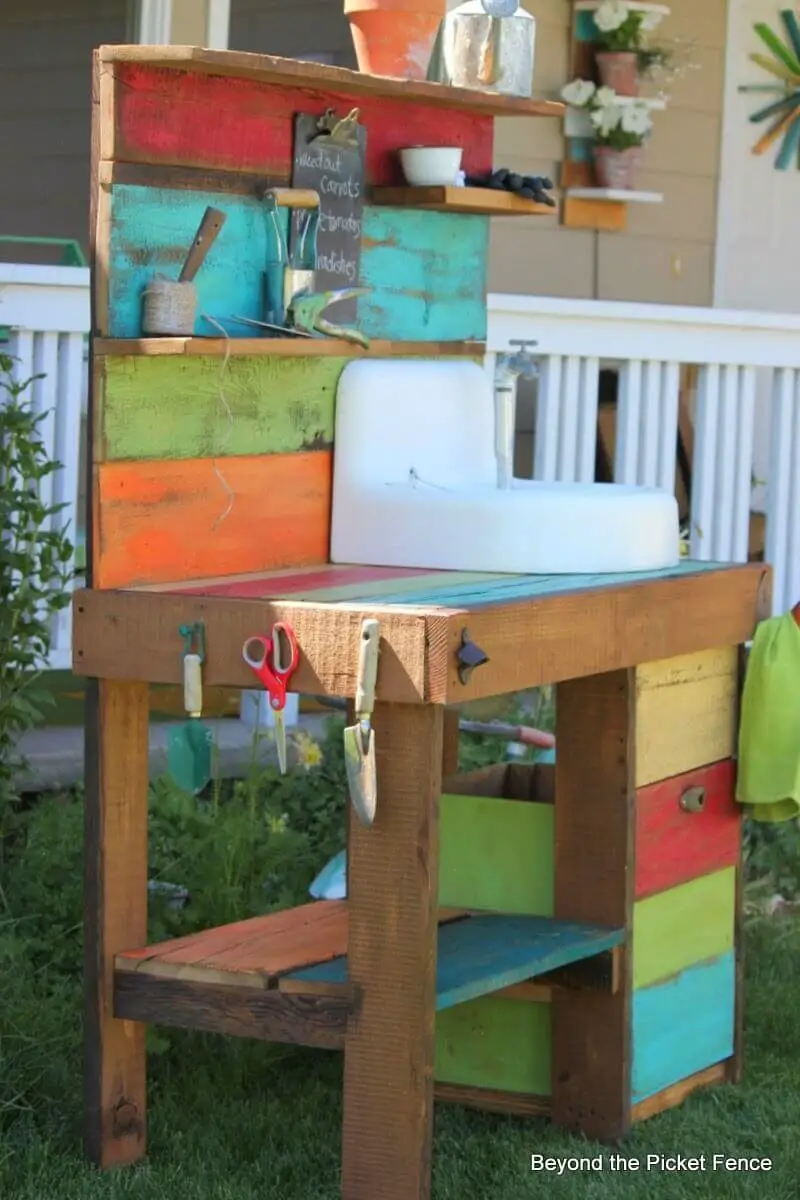
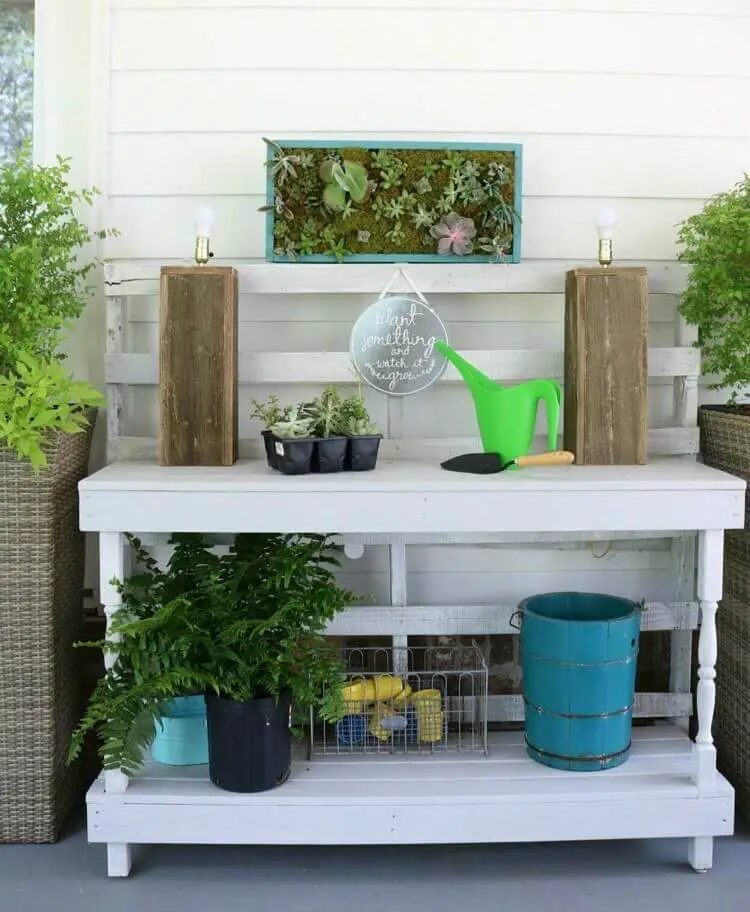
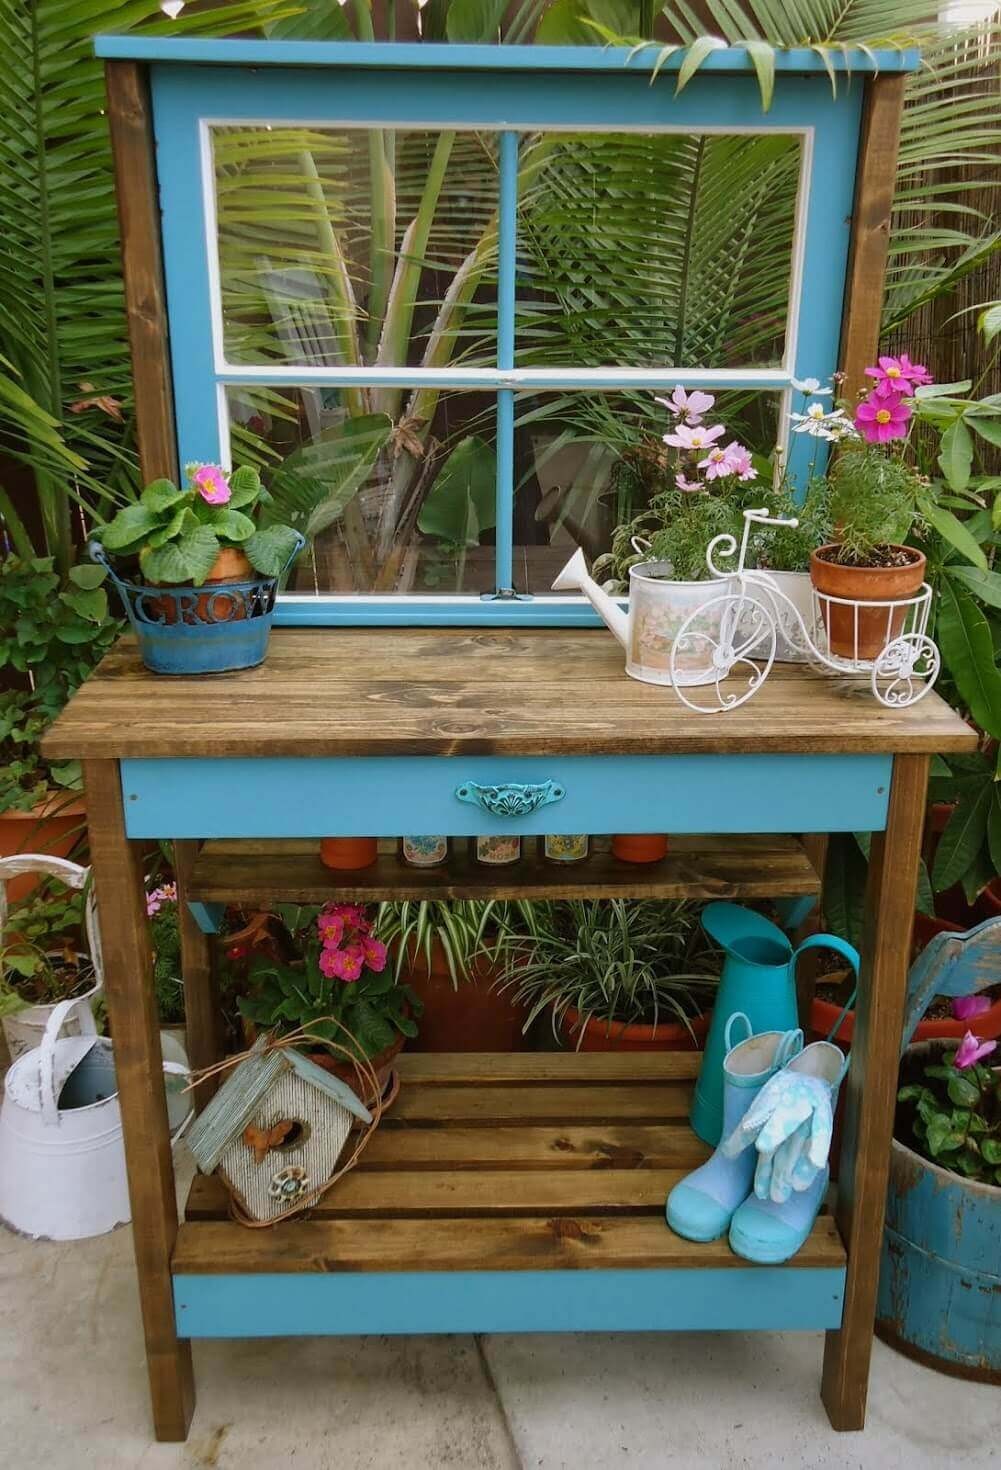
Customization and Personalization
Elevate your gardening experience by crafting a one-of-a-kind potting bench that harmonizes with your unique style and addresses your specific needs. To make the most of your time in the garden, consider incorporating these thoughtful touches that bring a personal touch to your outdoor oasis.
Ideas for Personalizing Your Potting Bench
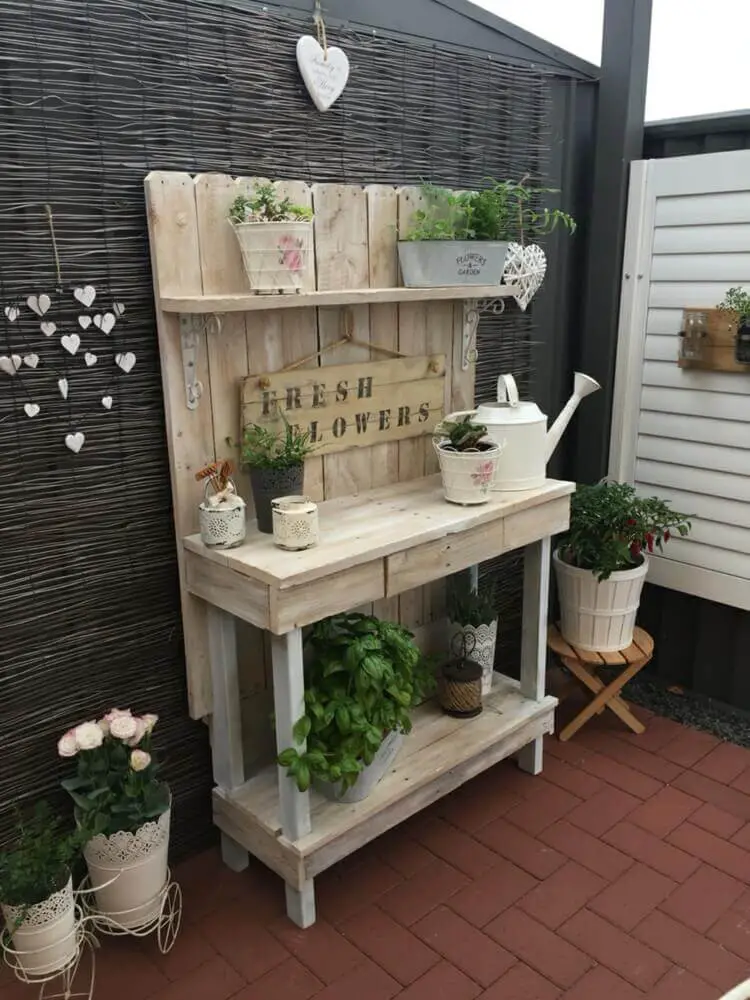
Transform your garden bench into a personalized haven by incorporating thoughtful touches. Consider adding an engraved nameplate or decorative sign featuring your name, a favorite gardening quote, or a meaningful phrase. Alternatively, get creative with themed decorations that reflect the beauty of nature. For example, adorn your bench with butterflies, flowers, herbs, or other motifs that resonate with you.
To maintain order and make tool organization a breeze, consider custom holders or painted outlines on the bench to designate a spot for each tool. Lastly, elevate the overall aesthetic by replacing standard hardware with unique handles and knobs that reflect your personal style.
Adding Hooks, Shelves, and Drawers
To maximize functionality and keep your gardening bench organized, consider implementing several design elements. Hooks can be strategically placed on the side or back of the bench to hang essentials like gloves, aprons, and tools, keeping them within easy reach. Additional shelving above or below the main work surface provides ample storage for pots, soil, and other supplies, freeing up valuable space on the work surface itself.
For a more customized solution, consider building in drawers for hidden storage or attaching pre-made drawers underneath the work surface. These clever design features can help keep your gardening bench clutter-free and efficient.
Incorporating a Sink or Water Reservoir
To elevate your DIY workspace, consider installing a few essential features. A simple basin with a drain can be added to the work surface, providing a convenient spot for washing tools or hands. You don’t necessarily need a brand new sink; a repurposed kitchen sink or even a plastic tub can serve this purpose. Additionally, incorporating a water reservoir is a great way to make watering your plants and cleaning up easy as pie.
This can be achieved by attaching a rain barrel or a water container with a spigot under or beside the bench.
Selecting Finishes and Paint Colors


To elevate your outdoor space, choose a wood stain that harmonizes with the surrounding environment or opt for a clear sealant to preserve the natural beauty of the wood. For an artistic touch, select paint colors that blend seamlessly with your garden’s aesthetic or make a statement with vibrant hues. When it comes to durability, consider using high-quality outdoor paints that can withstand the elements.
By incorporating these customization options, your potting bench will not only serve as a functional hub for your gardening routine but also reflect your personality and style. Whether you’re drawn to artistic flourishes, practical additions, or a combination of both, your potting bench can become the crowning jewel of your garden, showcasing your unique perspective.
Never Enough Thyme


In the era of digital connectivity, it’s easy to get lost in a sea of online platforms and social media channels. As you navigate through your favorite blogs and websites, you’ve likely stumbled upon a diverse array of interior design inspiration, from eclectic spaces to cozy retreats. But what sets these spaces apart? Is it the furniture, the colors, or perhaps the textures that catch our attention?
In this age of curated perfection, it’s refreshing to see real people sharing their genuine experiences and showcasing their imperfectly perfect homes.
From Our Fifth House’s charming farmhouse makeover to Reality Daydream’s whimsical playroom design, these inspiring spaces are a testament to the power of creativity and self-expression. And while we may not have the skills or resources to recreate these masterpieces in our own homes, we can certainly draw inspiration from them.
Whether it’s Funky Junk Interiors’ eclectic vintage finds or Dish Function Designs’ DIY renovations, there’s something undeniably endearing about these authentic spaces that make us feel seen and heard.
So why do these imperfectly perfect homes resonate with us so deeply? Perhaps it’s because they remind us that our own imperfections are what make us unique. Or maybe it’s the sense of community that arises from sharing our stories and showcasing our vulnerabilities.
Whatever the reason, one thing is certain: these inspiring spaces have the power to uplift, inspire, and transform our very own living spaces.
Maintenance and Care for Your Potting Bench
For a long-lasting and visually appealing potting bench, it’s crucial to prioritize regular maintenance and upkeep. By following these simple guidelines, you’ll be able to preserve the wood and materials, establish efficient seasonal routines, and safeguard your workspace from the harsh effects of the weather. This proactive approach will enable you to enjoy your potting bench for years to come.
Tips for Preserving Wood and Materials
To maintain the longevity of your outdoor wooden bench, it’s essential to establish a regular cleaning routine. Start by sweeping away dirt, soil, and plant debris that may have accumulated on the surface. If necessary, use a mild soap and water solution to wipe down surfaces, taking care not to damage the wood. Additionally, consider applying a wood preservative or sealant annually to protect against rot, insects, and weather-related damage.
When selecting a product, ensure it’s compatible with the type of wood your bench is made of and suitable for your local environment. Furthermore, if your bench features metal components, perform regular checks to detect any signs of rust. If you do find rusty spots, treat them promptly with a rust inhibitor and reapply paint as needed to prevent further deterioration.
Seasonal Maintenance Routines
As the gardening season approaches, it’s essential to inspect your outdoor bench for any winter damage. Begin by tightening loose screws or bolts and sanding down rough spots to prepare the surface for sealing or painting. This initial maintenance step will help ensure the longevity of your bench throughout the year. During the growing season, regular cleaning and drying are crucial to maintaining the integrity of the wood.
If your bench is mobile, take advantage of shaded areas during extreme heat to prevent warping. A simple relocation can go a long way in preserving the overall structure of your bench. As the seasons change and the weather cools, it’s time for a thorough cleanup. Remove any removable accessories and store them indoors to protect from moisture damage. If possible, cover the bench with a waterproof cover or move it to a sheltered location to shield it from harsh winter conditions.
For added protection against snow and ice, apply an extra coat of sealant before the cold weather sets in. Once the winter season is upon us, ensure your bench is either covered or stored in a dry place to prevent any moisture damage.
Protecting Your Bench from the Elements
To ensure your potting bench remains in excellent condition, position it in a sheltered spot where it can avoid harsh weather conditions. This could be under a canopy or within a shed when not in use. When storing the bench, make sure to cover it with a waterproof and UV-resistant material that fits snugly around it. Secure the cover to prevent it from being blown away by the wind.
Additionally, consider elevating the legs of your potting bench by placing it on pavers or concrete blocks.
This will prevent any moisture that may accumulate at ground level from seeping into the legs and causing rot.
By following these simple maintenance tips and incorporating them into your regular routine, you can effectively protect your potting bench from wear and tear. This not only extends its lifespan but also helps to preserve its structure and appearance, ensuring it remains a central part of your gardening activities for many seasons.
Conclusion
Crafting a potting bench that suits your unique gardening style can be a game-changer, allowing you to streamline tasks like planting, potting, and maintenance. The key lies in thoughtfully planning the design, selecting durable materials, and incorporating features that cater to your needs. A well-designed bench can also become a haven for creative expression, as you add personal touches that reflect your personality.
When envisioning your ideal potting bench, consider the elements it will withstand, its functionality, and how you’ll use it regularly. By incorporating practical elements like storage compartments, hooks, or even a sink, you can create a space that’s both functional and inviting. Maintaining your potting bench is equally crucial to its longevity. A regular cleaning routine, proper wood treatment, and protection from harsh weather will keep your bench sturdy and welcoming year-round.
With the guidance provided in this article, you’re empowered to build a potting bench that elevates your gardening experience. So, gather your materials, don your toolkit, and get ready to create a unique haven that celebrates the joy of nurturing growth.
Appendix
Troubleshooting Common Issues During Construction
When it comes to building a wooden bench, several common issues can arise if not addressed properly. For instance, wood splitting can occur if screws are inserted without pre-drilling holes, particularly near the ends of boards. To avoid this, it’s crucial to choose the correct screw length and ensure it’s not too long for the thickness of the wood. Another problem that may be encountered is a wobbly bench, which can be caused by uneven legs or an unlevel surface.
To prevent this, all legs should be cut to the same length, and the ground where the bench stands should be level. Additionally, adding diagonal braces between the legs can provide extra stability and ensure the bench remains steady. Difficulty attaching hardware, such as screws, bolts, and nuts, is another common challenge that builders may face. To overcome this issue, it’s essential to ensure you have the correct size and type of fasteners for your materials.
A wrench or ratchet set can also be used to achieve tight and secure fittings. Finally, issues with paint or stain not adhering to the wood can arise if the surface is not properly prepared. To avoid this, it’s important to thoroughly sand the wood before applying any finish, and ensure the wood is dry and clean. If necessary, a primer should be applied before painting to create a smooth and even surface.
In terms of preventing long-term problems, such as wood rot or insect damage, it’s essential to use naturally rot-resistant woods like cedar or redwood. Alternatively, treating the wood with a preservative can help extend its lifespan. By keeping the bench dry and off the ground when possible, you can also reduce the risk of damage from moisture and pests.
Resources for Materials and Tools
When embarking on a DIY project like building a potting bench, it’s crucial to explore various options for sourcing materials and tools. Local hardware stores are a convenient starting point, offering a range of products, including tools, hardware, and sometimes lumber. The staff can provide valuable advice and cutting services, making them an excellent choice for beginners or those seeking guidance.
For those requiring a specific type of wood, lumber yards offer a diverse selection of wood types and sizes. The knowledgeable staff can assist in selecting the ideal material for outdoor use and may even provide custom cutting services. Online retailers are also worth considering, as they often stock specialty hardware, tools, and bulk materials. Customer reviews can be especially helpful in identifying high-quality products.
Home improvement centers offer a one-stop-shop experience, providing an array of tools, materials, paint, and hardware. Many also offer guides and DIY workshops to help novice builders. For those looking for eco-friendly options, reclaimed material suppliers are an excellent choice. Sourcing reclaimed wood can add unique character and history to your potting bench.
Finally, gardening centers may carry pre-made potting benches or individual components like sinks and soil bins, serving as inspiration or providing parts for your project. Regardless of the option chosen, it’s essential to prioritize quality, durability, and suitability for outdoor use when selecting materials and tools. Investing in good materials and proper tools can streamline the construction process and ensure that your potting bench withstands the elements.