Pushing Boundaries: Advanced Tips For Clay Sculpting
Choosing the Right Clay
When starting a new sculpting project, one of the most important decisions is choosing the right type of clay. There are two main categories of sculpting clay – oil-based and water-based. Oil-based clays like Chavant NSP are made from minerals, waxes, and oils. They are firmer and hold fine detail well, but can be difficult to manipulate and require special care. Water-based clays like Laguna’s WED clay contain water rather than oil. They tend to be softer and easier to work with at room temperature, but don’t hold fine details as crisply. Oil based clay is significantly firmer and can be difficult to manipulate at room temperature, while water based clay is softer and easier to work with.
Specialty clays like porcelain and polymer also have unique properties to consider. Porcelain is known for its pure white color and translucency once fired, making it ideal for refined sculptures. Polymer clay contains plasticizers that allow it to be hardened in a regular oven, opening up creative possibilities. The sculptor’s precise goals, skill level, and project specifics will determine the ideal clay to select.
In general, oil-based clays are recommended for experienced sculptors doing intricate work, portraits, and pieces requiring durability. Water-based clays tend to be better for beginners, larger work, and sculptures that will be cast from molds instead of fired. Testing different clays and taking their properties into account allows sculptors to choose the right material for pushing their creative boundaries.
Tools and Equipment
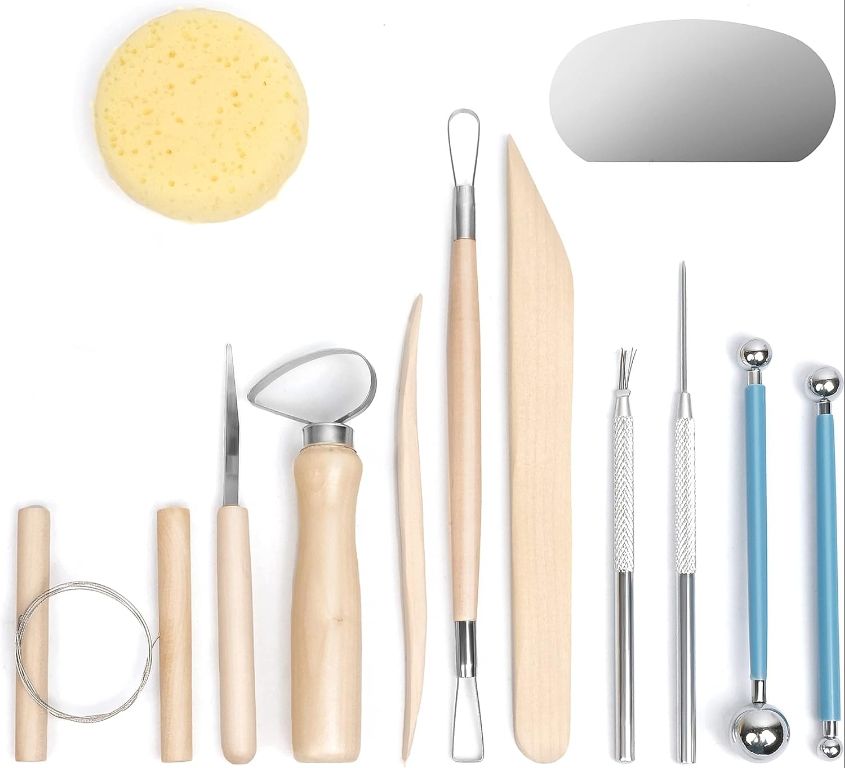
Once you move beyond basic sculpting, having the right tools is essential for unlocking advanced techniques. Here are some of the most important sculpting tools to have in your arsenal:
- Loop tools – These are shaped in a loop and allow you to smooth curves and hollow out forms. They come in different sizes and are great for refined shaping.
- Ribs – Ribs have a serrated edge and can be pressed into the clay to create realistic textures like scales, fur, or feathers. Look for ribs in varying widths.
- Cutters/knives – You’ll need a variety of looped or straight blades for cutting clay cleanly and precisely.
- Modeling tools – From rounded sculpting wedges to pointed metal tools, this versatile set allows you to carve fine details.
- Armature wire – Bendable wire that forms an inner support structure for sculpting around. Use thick gauges for larger sculpts.
Rather than generic sculpting tools, opt for high-quality specialty tools designed for polymer or ceramic clay. Brands like DiamondCore Tools and ClayClaim offer professional-grade sets with all the advanced tools you’ll need.
Making an Armature
An armature is an essential framework that supports your clay sculpture. Making a sturdy armature is crucial for successful sculpting, especially for large or complex pieces. Here are some advanced tips for constructing armatures:
Use stiff wire like aluminum armature wire or floral wire as the skeleton. Thicker gauges like 6-gauge wire work well for larger sculptures. Wind the wire around itself to form limbs and appendages. Aluminum foil can bulk up areas and smooth transitions. Source
Consider the final pose and proportions when bending the wire framework. Plan armature shapes, angles and balance to match the intended form. Sketch ideas to visualize the armature design first.
Reinforce thin areas like wrists, ankles and necks with thicker wire or tightly wrapped thinner gauge wire. These joints will need to support more weight.
Use non-hardening clay to affix pieces of the armature together. Let dry completely before adding sculpting clay on top.
Seal armatures with a layer of thin wood glue or white glue. This helps the clay adhere better over the entire surface.
Drill holes and insert short lengths of heavy wire to create stability points for connecting the armature to a base securely. This provides extra support.
Constructing a sturdy, well-planned armature provides the necessary strength and structure for an ambitious sculpture. Take time on the framework to enable more daring creative expression in the finished piece.
Sculpting Techniques
Sculpting techniques can be broadly categorized into additive and subtractive methods. With additive sculpting, the artist builds up the form by gradually adding more clay. This technique allows for a high degree of control and precision in shaping the sculpture. Subtractive sculpting involves carving away clay from a larger block to reveal the final form. This requires visualizing the end result within the block of clay. Subtractive methods like chiseling and rasping work well for stone carving.
To create realistic textures in clay, use tools like metal ribs, loop tools, dental tools, nails, and wire brushes. Make indentations, add crosshatching, stipple, or scratch the surface. Use fingers and clay shapers to softly blend textures together. For a coarse look, impress coarse materials like burlap or mesh into the clay.
Carving is an advanced subtractive technique allowing artists to shape stone, wood, or clay by removing material. When carving figures, block in the major forms before refining anatomy. Use calipers and proportional dividers to accurately measure and mark the sculpture. Chisels, rasps, rifflers, and files are essential carving tools for removing material and sharpening details.
To properly sculpt anatomy, study musculoskeletal references to understand the shapes and proportions of the body. Block in forms using action lines representing the force and direction of the pose. Add anatomical landmarks like major muscle groups, joints, and bony landmarks. Work from large forms to small details, refining the anatomy as the figure emerges.
Source: https://www.linkedin.com/advice/0/what-some-advanced-sculpting-techniques-take-your-work
Pushing Proportions
One technique sculptors use to create dynamic, expressive works is exaggerating proportions. By distorting aspects of anatomy and scale, sculptors can create pieces with heightened visual impact.
Exaggerating proportions can be used to draw attention to certain elements or convey ideas and emotions. For example, greatly enlarging the hands or feet in a sculpture creates a sense of power and importance. Elongating the torso or limbs can suggest growth, movement, and energy. Making the head much larger than life imparts an imposing, iconic presence.
Sculptors may utilize “heroic scale” by enlarging figures far beyond life size. This technique has been employed since ancient times to convey grandiosity, as seen in giant statues of gods, rulers, and mythical beasts. The exaggerated scale makes the subject seem superhuman.
Distorting proportions also allows sculptors to emphasize and accentuate physical features. Enlarging the muscles creates dramatic tension and exhibits strength. These types of distortions are often seen in Expressionistic works. The visual exaggeration externalizes emotion and metaphorical ideas.
When sculpting figures or portraits with exaggerated proportions, it helps to first sculpt an anatomically accurate armature. This provides a framework for then stretching, shrinking, and manipulating elements as desired for effect. Exaggerating proportions can infuse sculptures with compelling dynamism and psychological intensity.
Playing with Composition
A strong composition can elevate a sculpted piece by making it more visually dynamic, interesting, and pleasing to the eye. Some advanced techniques for sculpting interesting compositions include:
Creating interacting figures that overlap and intertwine. This adds a sense of energy and movement to a sculpted scene. Position figures at different angles facing each other and incorporate overlapping limbs or other body parts (Advanced Tips 001: Building a Complex Composition – YouTube).
Using diagonals and S curves throughout the composition. Diagonal lines add excitement versus static horizontal and vertical lines. S curves mimic the natural curves of the human body in an aesthetically pleasing way. Place limbs and other elements along diagonals and S curves to lead the viewer’s eye through the sculpture (Learning Advanced Art Techniques: Composition … – Rooftop).
Incorporating triangular shapes and forms. Triangles create a sense of stability and structure within a composition. Look for ways to build triangles into the negative space between figures or form triangular shapes with limbs and other elements (Composition Sculpture – Sarah Western – Weebly).
Achieving Realism
Creating a realistic sculpture requires carefully observing your reference images and paying close attention to subtle details. Capturing realistic emotions and facial expressions requires focusing on the small movements of facial muscles around the eyes, mouth, and forehead. Study photos of people displaying various emotions to understand the nuances of human expression.
When sculpting heads and figures, concentrate on capturing the shapes and contours of underlying skull and muscle structures. Pay special attention to tricky areas like the neck, hands, and feet where complex muscles and bones meet. Referencing anatomy books can provide additional insight. According to the article “15 top tips for creating realistic sculptures” on Creative Bloq, “Without a clear idea of what’s going on under the skin, it’s impossible to accurately model the body and its movements” (source).
Spend time refining textures like skin, hair, and clothing to make them look natural. Study the way skin moves and wrinkles around joints. Use small subtle strokes when sculpting wrinkled areas. For realistic hair, build up strands individually using clay extruding tools. Apply varying pressure and twist extruded strands slightly for natural variation as recommended in the Daisie blog article on hyperrealistic sculpture techniques (source).
Abstract Sculpting
Abstract sculpting allows artists to communicate emotions, ideas, and themes in non-representational ways using organic shapes, simplification, and distortion. Rather than aiming for realism, abstract sculptures focus on evoking feelings and conveying meaning through form, texture, and composition.
When starting an abstract sculpture, let go of preconceived notions and allow your intuition to guide you. Experiment with slab rolls, coils, and pulled shapes to craft flowing, interlocking forms. Consider the negative space and relationships between forms as you build up the sculpture. Allow yourself to simplify, distort, and exaggerate parts of the sculpture to accentuate emotions or ideas.
Abstract sculpting grants immense creative freedom. You can incorporate a variety of textures, colors, and materials to add depth and interest. The finishing process is also an opportunity to enhance meaning—for example, polish certain areas to contrast with a rough, scratched texture elsewhere. Display your abstract sculpture in a way that highlights its organic, free-flowing shapes.
As this article notes, let your inner voice guide you as you sculpt abstractly. Allow the clay to move in directions unplanned, and see where your hands take you. Abstract sculpting is about the process of discovery and creation rather than replicating reality.
Finishing Techniques
Once your sculpture is complete, there are several finishing techniques to make it look polished and professional. Proper finishing can enhance details, create interesting textures, and protect the clay.
Sanding and Smoothing
Use fine grit sandpaper or sanding sponges to smooth any rough areas on your sculpture. Work in small circular motions and regularly wipe away clay dust with a dry cloth. According to instructables.com, you can also use liquid clay softener applied with a brush to smooth seams and blend textures (Source).
Sealing
Apply a sealant like polyurethane or acrylic varnish to protect the finish and make cleaning easier. Multiple thin coats are better than one thick coat. Allow each coat to fully dry before adding the next.
Painting and Glazing
Acrylic paints work well for adding color and effects. Dilute with water or glazing medium to create translucent glazes. Apply in layers, allowing to dry in between. Glazing can help blend surface colors. Wax crayon or oil pastel can add additional texture when rubbed into the surface.
Patina
Chemical patinas involve applying acids to create an aged, oxidized look. Patinas come in a wide variety of colored finishes. Work in a well-ventilated area and follow safety precautions. Alternately, acrylic paints can mimic a patina effect.
With proper finishing techniques, you can take your sculpture to the next level. Experiment to find what works best for your particular style and clay type.
Protecting and Displaying
After spending hours perfecting your sculpture, you’ll want to make sure it is properly protected and displayed. Clay is fragile, so extra care must be taken.
When displaying fragile sculptures, using acrylic cases or cloches can help prevent damage. For particularly delicate pieces, create a base or stand that minimizes handling of the sculpture itself. Felt pads on the bottom of the base can prevent slipping and scratching (source).
When mounting sculptures on walls, ensure the hardware and hangers used are strong enough to bear the weight. Heavier pieces may require additional brackets or support. Properly installed lighting can add drama and dimension. For stability and to highlight the sculpture, place floor-standing spotlights nearby rather than overhead lighting. Go for diffused, neutral light that evenly illuminates the piece without harsh shadows (source).
For large or heavy sculptures, display them securely on sturdy pedestals or bases. Spread the weight evenly so the sculpture doesn’t topple. If needed, affix to the base or wall with museum wax or other reversible, non-damaging methods.
With thoughtful display and lighting, you can showcase your sculptures beautifully while keeping them safe from damage.